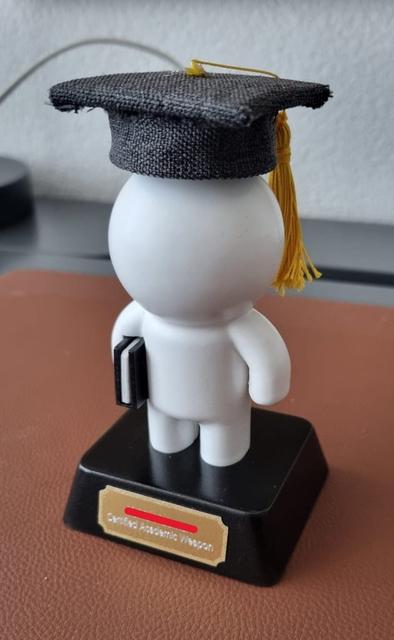
Academic weapon graduation gift
by Melihc70 · via Thingiverse
| Format | ZIP |
| Category | Other |
| License | CC BY-NC-SA |
| Triangles | 62.6M |
| Uploaded | Apr 9, 2026 |
⬇ 14 downloads
❤ 1 likes
👁 15 views
Description
I made this little stickman as a gift for a friend who had graduated university. I essentially wanted to design something that embodies the word ''academic weapon'', so I came up with a very simple spring loaded mechanism that transforms a bookcase into a tiny gun when you press down on the academic hat. The compression spring I used in my design was 7 mm in diameter and 12 mm in length. I don't know the exact spring stiffness, but I recommend choosing a spring that isn't too stiff, since the only purpose of the spring is to push back the academic hat when it is released. I started by smoothing down the pins on Stickman_back_1 with 120-grit sandpaper so the two halves of the stickman fit smoothly and firmly into eachother. I noticed that there was a very noticable gap between the two dissected parts, so I filled the gap with a putty-like mixture of wood filler and acetone. Keep in mind that acetone evaporates quickly, so you'd have to be quick when applying the mixture. After filling, I sanded the surface of the stickman with 120-grit followed by a 300-grit sanding sponge to remove the layer lines and blend the filler. I recommend sanding in circular motion rather than straight lines to achieve a more even finish. Next, I sprayed down the parts with filler putty, sanded again with 300-grit, applied primer, sanded once more, added a second coat of primer and finished off with a layer of matte varnish. When spray-painting be careful not to apply too much at once or too close to the object. Do light coats instead and wait for about an hour before applying another coat, otherwise you'll risk getting drip marks on your 3D print. To prevent the object from getting stuck to the surface, I recommend putting a sheet of parchment paper underneath. Once the surface finishing was done, I inserted two M3x6 heated inserts into the bottom of the stickman using a soldering iron. This will secure the stickman to the base. If you don't want to mess with a soldering iron and heated inserts, I have also included alternative versions of the stickman that can be super glued to the base (Stickman_front_1, Stickman_back_1, base_1) . For the book case, I repeated the same finishing steps. To create the hinge for the gun inside the bookcase, I grabbed a sewing needle with the right diameter (~0.8 mm depending on your printer's resolution), stuck it through the bookcase and the tiny gun, and then cut both sides with cutting pliers to the width of the book case (don't forget to wear your safety goggles). Then I slid the bookcase into the gap in the stickman's right arm. Move it slightly back and forth until the rod can be fully pressed in and the tiny gun turns 90 degrees. To make the academic hat, I cut out a 45 mm x 45 mm square piece of fabric with 10 mm x 45 mm tabs on all four sides. Then I folded the tabs over the 3d print and glued them together. To make the band of the hat, I cut out a 28 mm x 120 mm strip of fabric, folded 7mm along the long edge with glue and clamped it until set. After the glue had set, I stitched the two ends of the strip together and stitched the band to the flat part. If you're unsure how to stitch them, this video helped me out a lot: https://www.youtube.com/watch?v=atZJgj5N400 . To make the tassel, I followed this youtube tutorial ( https://www.youtube.com/watch?v=8Ak5AjjIMZA ) and then sewed it to the top of the academic hat. If you don't want to mess with sewing, I have also included a slightly different looking academic hat that does not need sewing (Academic hat_1). Finally, I processed the base using the same sanding and priming steps, but instead of using a matte varnish I used a black metallic spray paint. I then attached the base to the bottom of the stickman using a pair of M3x20 bolts. As a final touch, I had a custom aluminum plaque made at my local awards shop and taped it to the base. I personally learned a lot from this project, especially about surface finishing 3D prints. So if you're new to post-processing, this is a great project to practice on. If you have any suggestions or run into issues with the print, please feel free to reach out. Thanks for downloading :)
Originally published on Thingiverse


