Antikythera Mainframe, reworked countersinking
by IvyMike · via Printables
| Format | STL |
| Category | Other |
| License | CC BY-SA |
| Triangles | 5.7k |
| Uploaded | Jun 6, 2024 |
⬇ 74 downloads
❤ 3 likes
👁 237 views
Description
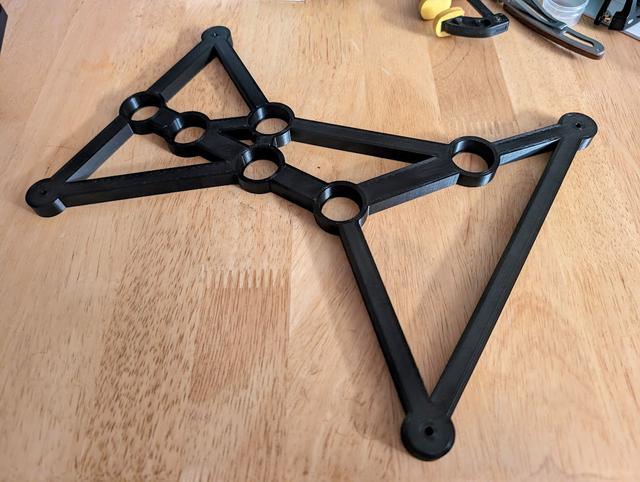
I'm in the process building FreddyZ 's amazing Antikythera Mechanism , and I realized that the countersinks on the bottom of the mainframe are on the wrong side. Several people in the comments noticed this as well. This model moves them to the correct side. Fix process If you just want the model, you can stop reading now--Just reprint the part and you're good to go. But I thought it might be interesting to others to see how I fixed the problem using PrusaSlicer alone. For reference, I'm using PrusaSlicer 2.7.4. First, I loaded the model into PrusaSlicer. You can see the countersinks at the bottom of the mainframe (towards the right in this screenshot) are on the wrong side: 📷 Image redacted — claim this model to add your own media The process will be to be to mirror (on the z-axis) just the bottom beam and holes, thus flipping the countersinks from pointing down to pointing up. First, we need to separate the bottom beam and holes from the rest of the object. From the left tool pallette, select Cut. Make sure you keep the orientation and cut into “parts”, not “objects”. But wait, before you press “Perform cut”... 📷 Image redacted — claim this model to add your own media …first rotate the cutting plane (grab the little arrow, rotate to 270 degrees. Then… 📷 Image redacted — claim this model to add your own media …grab the ball and move the cutting plane somewhere below the last bearing but above the bottom cross member and countersinks. Like this: 📷 Image redacted — claim this model to add your own media The object will now be split into two parts, “mainframe_A” and “mainframe_B”. We're halfway there! Select the lower part (mainframe_A) in my case, and then mirror it along the Z axis. This will make the things that point up point down, and vice versa. This is exactly what we want. 📷 Image redacted — claim this model to add your own media The countersinks are now on the right side of the mainframe. 📷 Image redacted — claim this model to add your own media One last thing. The object is still in two parts. This won't make a difference to printing, so you can go ahead and slice and print right here, but I wanted to save the object as a single object, not divided into parts. It feels like there should be a menu option in PrusaSlicer to do this, but I cannot find it. In any case, exporting the object as STL turns it back into a single-part object. Right click on the object name and export as STL. 📷 Image redacted — claim this model to add your own media Finally, open a new instance of PrusaSlicer and re-import the mainframe .stl file to confirm the object is exactly how we wanted it: a single object with countersinks on the correct side: 📷 Image redacted — claim this model to add your own media Thank you for reading and I hope you learned as much as I did in doing this remix. If you do print this, I'd love to see the result!
Originally published on Printables


