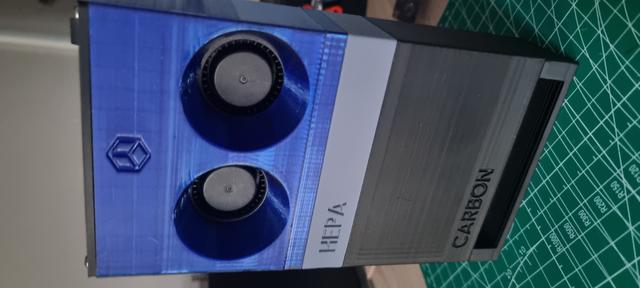
BentoBox 2x5015 bottom exhaust
by BC Designs · via Printables
| Format | STL |
| Category | Art |
| License | CC BY |
| Uploaded | Jun 5, 2023 |
⬇ 585 downloads
❤ 157 likes
👁 7.4k views
Description
Update 24/12/2022: Bottom exhaust uploaded was incorrect and didn't include the bottom L shape cut-out. This has been corrected in the latest version (v2). Description / Changes A modified version of RISCie's BentoBox 5015x2 Fan blower who kindly included STEP files to make editing easier! This blows air downwards so as not to cause any potential issues with printing temperamental materials such as ABS. The top of the fan box also now houses space for a LM2596 step down module to tweak the airflow as needed, and space for a small on off switch. Wires from the fans route directly up now into this space. The switched used in the top section is linked below. I've modified the HEPA box from the original design so as to fit the Amazon filters previously linked on the original (and linked below also) And finally, the new bottom exhaust with a low profile, keeps the entire box with original carbon filter section (see main model, linked below) to a reasonable size. I need to tidy up the Fusion file but will include that also soon. It's a mess at the moment of imported files and layouts (hence some parts may be upside down! :)) Printing Print in ABS or PETG, I used a mixture (the blue is PETG). Print at 0.20. Parts may need to be rotated on the build plate, double check before printing. Supports for the screw holes and the L shape cut-out pop out easily when printed on the X1 carbon. Assembly Install magnets and threaded heat inserts like the original Insert the right 5015 fan and route the cable to the top. Carefully route and hold the fan cables while inserting the left fan. If the gap seems tighter on the left fan, then you are likely pinching a cable. Splice the fan wires together for power based on original design Add the HEPA Filter and Activated-Carbon components on top Installation If you are feeling brave take the back off your X1 and take 24v from the PSU, there are spare ground and +24 terminals that you can use. I followed the guide linked from the other model on replacing the power supply. I really wouldn't advise hooking this up to a power bank inside the printer, lithium batteries might not like the heat. Links thrutheframe - original model: https://www.printables.com/model/272525-bambu-lab-x1c-bentobox-air-filter RISCie - 5015x2 fan remix https://www.printables.com/model/334301-2x-5015-bambu-lab-x1c-bentobox-air-filter Switch https://www.ebay.co.uk/itm/303176700532?hash=item4696bd5274:g:LZ4AAOSw3bNc9YUS&amdata=enc%3AAQAHAAAAoIDqX9UeGqAOFpGvFRnv5GFIHwrUktVhG9vZ1qh1C2Wu2nngSv9dQe%2BqSPm5uQ5hHMe4m30wTgJEGlcJjYeKTWjUJPZEm1IrsyHwAZgYwWRn3bC%2FaPBpxrliJCNLZ1ihvxEhh6qWkgFORw13fkEIq63%2FSEiUsebQ%2FOLiSaSsN8CQbQUtV%2B0qGiVuR9sAcHYUvLaIAoCmx%2BbeT6Obr3jFYUs%3D%7Ctkp%3ABk9SR9Cp0IahYQ Amazon HEPA filters for my low profile HEPA box: https://www.amazon.co.uk/gp/product/B07PJX86W9/ref=ppx_yo_dt_b_asin_title_o09_s00?ie=UTF8&psc=1 Magnets https://www.amazon.co.uk/gp/product/B07GFK5XFC/ref=ppx_yo_dt_b_asin_title_o04_s00?ie=UTF8&psc=1 Threaded Heat inserts https://www.amazon.co.uk/gp/product/B09MCWTGLZ/ref=ppx_yo_dt_b_asin_title_o07_s00?ie=UTF8&psc=1 Replace power supply (tap into PSU for 24v) https://wiki.bambulab.com/en/x1/maintenance/replace-power-module LM2596 DC DC buck converter https://www.ebay.co.uk/p/17030292675
Originally published on Printables


