BMG V6 ABL MGN12H Direct Drive System for Ender 3 and Clones
by hakancez · via Printables
| Format | STL |
| Category | Art |
| License | CC BY |
| Triangles | 10.5k |
| Uploaded | May 23, 2023 |
⬇ 261 downloads
❤ 77 likes
👁 4.8k views
Description
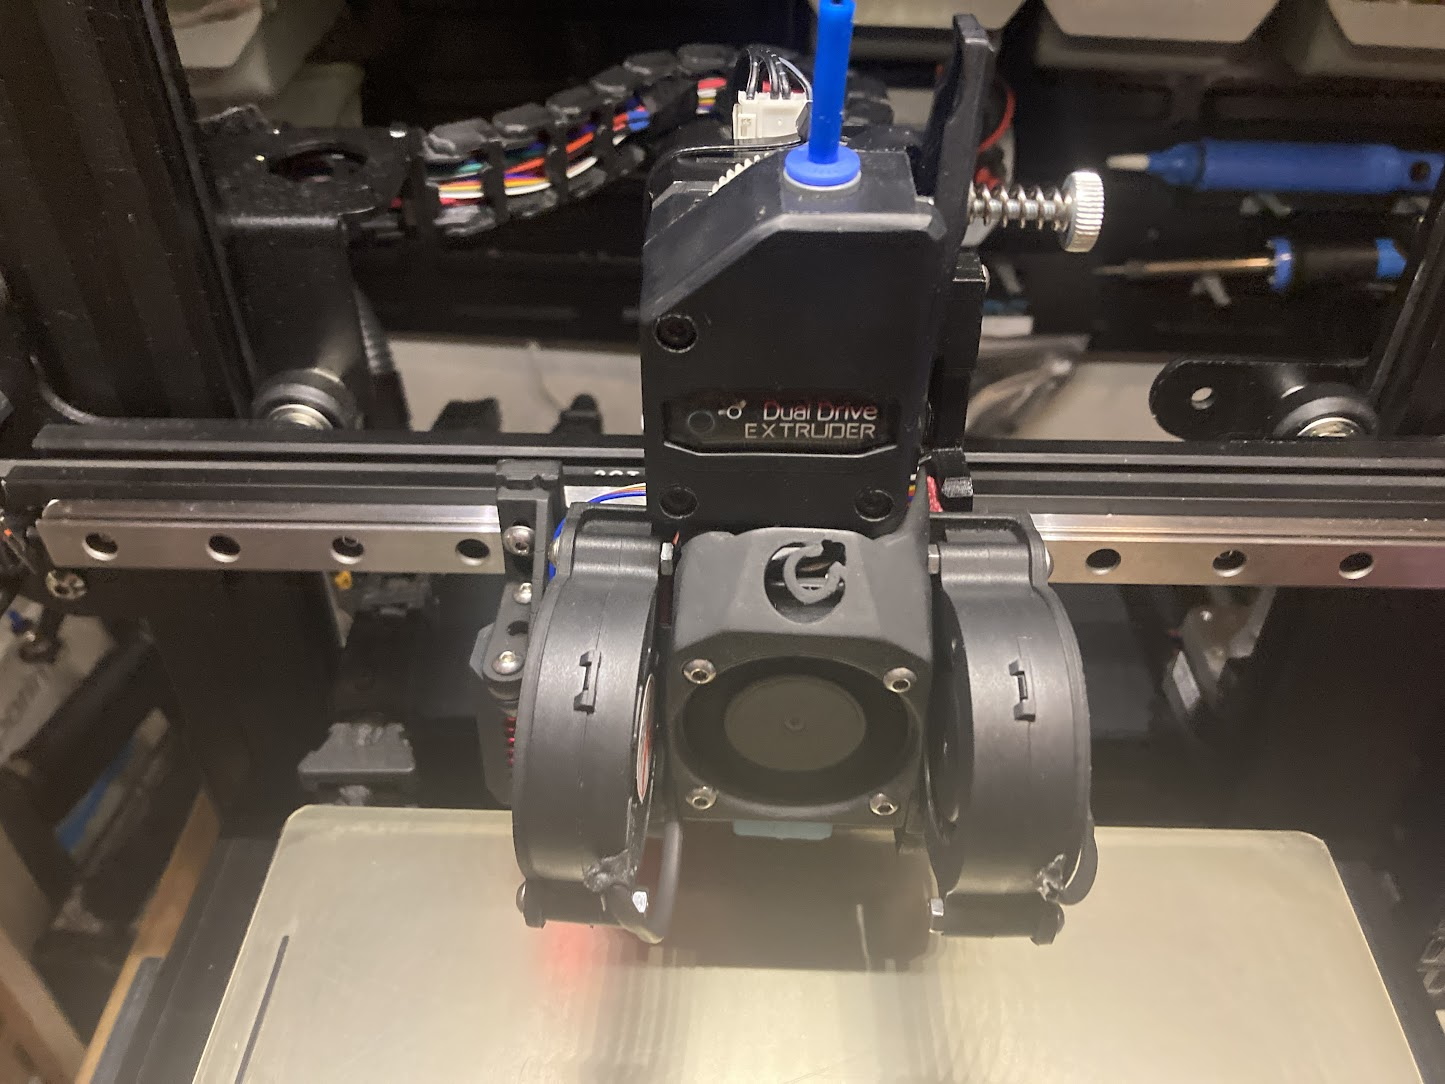
Minimal print area loose. No end stop adjusting... This project is based on SK-Tank CF BMG Dual 5015s Mount by declinox. https://thingiverse.com/thing:5182358 ) I find his design while looking a project for “MGN12H rail system, BMG extruder and E3D V6 hotend combo” for Creality Ender 3 V2. I love this design so much and start to modify it for Ender 3 and clones. When I founded some mistakes in my design, I redesigned some parts. I benefited from the awesome EVA 2 project in newly designed parts. EVA 2 project is made by Paweł Kucmus for more info; please visit; https://2.eva-3d.page/step_files/ Also i added some parts from Hero Me Gen VI from Mediaman. https://www.printables.com/model/39322-hero-me-gen7-master-suite . UPDATES 21.05.23 New Cover file added - Main-Body-Back V2 added. New mainbody has more heat inserts. You can choose which you like… 21.04.23 Cover Without Logo added.. 20.04.23 Matching ADXL345 Mount added. Needed screw sizes added (thanks to koalified) 19.04.23 Files re-organized add missing files (thanks to koalified) 18.12.22 Mount for Titan Extruder added 30.11.22 All new files uploaded. Now my duct system works fine! Very happy... 23.11.22 New experimental parts uploaded. New gantry/main body, matched belt mount, BL Touch Mount and Cable mount... Those parts are in experimental status 13.11.22 All new files uploaded PLANNED --Minor improvements WARNINGS Please consider that; some parts may need to be filed and sanded. I suggest to print parts with ABS or PETG. I re-design all parts for easy printing with minimal support and easy maintenance. Since I don't know much about 3D designing softwares, i made all my drawings on Tinkercad. You can find a lot of cosmetic defects, but all parts can work functionally. 📷 Image redacted — claim this model to add your own media PART LIST Main-Body-Back or Main-Body-Back V2 Heart of toolhead system; x gantry adapter. Its a combination of EVA by Paweł Kucmus, Hero Me Gen VI by Mediaman and SK-Tank Mount by Declinox. I added matched MGN12H holes, added extra ventilation holes for better hotend cooling. Main-Body-Back need more M3 nuts but also need some M3 heated inserts. Main-Body-Back V2 need more heated inserts but you will need some M3 nuts too… Main-Body-Front Taken form EVA by Paweł Kucmus. I added some holes for easy assembly. This part also clamp E3D V6 hotend to the main body. Belt-Mount - Taken from Hero Me Gen VI by Mediaman. Modified for better rigidity BMG-Extruder-Mount Taken form EVA by Paweł Kucmus. I added some holes for easy assembly and re-mixed for better placement for Ender like printers.. Titan-Extruder-Mount no ones loves old Titan extruders but i like them. If you want to use Titan extruder you can use this mount. Fan-Mount-Left / Fan-Mount-Right Original files from declinox. I re-designed fan mounts. I thickened the edges. For better 5015 fan stability i added a frame. This frame is taken from Hero Me Gen VI by Mediaman. Looks fantastic :) Duct-Left - Duct-Right Original files from declinox. Re-designed snap on fan ducts for better consistency to the new design. You can find different ducts for E3D Evo or Volcano as remix on Thingiverse... BL-Touch-Mount - This design is taken from "Adjustable BL-Touch sensor mount" by MyStoopidStuff. I re-designed for optimal placement and rigidity https://www.thingiverse.com/thing:3148733 Cable-Mount Taken form EVA by Paweł Kucmus. I added some holes for zip-ties and re-design for better fitting Cover - Taken form EVA by Paweł Kucmus. I hardly modified these files to match my design. Old Models As Archieve Folder - Older files dont use them…. INSTALLATION 📷 Image redacted — claim this model to add your own media Place 5 x M3 nut to BMG-Extruder-Mount. Now extruder mount is ready... 📷 Image redacted — claim this model to add your own media Main-Body-Back - Place 1x M3 nut to the front. You will need 6 x M3 heat-set inserts for the front of the duct system. Now the backside.. Place 4 x M3 nuts in total to the back side of the plate. Then place 2 x M3 heat-set inserts to the adapter. You can install heat-set inserts by pushing them into the plastic with a soldering iron. I use screws from local market. Dimensions are: M3 5,5 x 4,3mm Place 2 more M3 nut as shown in the picture.. You will need 5 x M3 nut and 8 x M3 insert in total 📷 Image redacted — claim this model to add your own media Now lets join Main-Body-Back and BMG-Extruder-Mount. You will need 3x M3 20mm bolt. Use 3 bolt as shown above. For belt mount you need 3x M3 20mm bolt. Please take a look at second illustration 📷 Image redacted — claim this model to add your own media lace 2x M3 nuts to the Main-Body-Front. Put V6 hotend and clamp Main-Body-Front with 2x M3 bolts Now you are ready to mount duct system to the MGN12H carriage. Use 4x M3 bolts to fix body to the carriage 📷 Image redacted — claim this model to add your own media Now its time for Fan-Mount-Left and Fan-Mount-Right. Place your ducts with 2x M3 bolts.You can adjust the height of the ducts later. Then place 2 x 5015 cooling fans with M3 nuts and bolts as shown above. 📷 Image redacted — claim this model to add your own media Fix 40mm fan and Cover-With-Logo or Cover-Without-Logo with 4x M3 bolt to the main body. -Place snap on Duct-Left and Duct-Right. Fix Duct-Left and Duct-Right to their final position -Place BL-Touch-Mount and fix your ABL with 2x M3 bolts. Then fix the mount to the main body with a M3 nut. Adjust the height and fix... 📷 Image redacted — claim this model to add your own media -Now its time for final assembly. -Place Cable-Mount to the BMG-Extruder-Mount with 2x M3 bolt. -Then place BMG extruder and Nema pancake motor then fix with 3x bolt that came with your extruder... -Now organize your cables and zip-tie to the Cable-Mount. Thats all :=) -------------------------------------------------------------------------------------------------- Please take these values as a base value and take your own measurements; HOME OFFSET Y Offset: -9 BL TOUCH Probe X Offset: -51 Probe Y Offset: -11 -------------------------------------------------------------------------------------------------- SCREW LENGTHS Needed screws and lengths via koalified (take a look to comments) - the 3 screws to mount the BMG holder need to be at least 24 mm length - the outer 2 screws mounting the belt holder need to be at least 32 mm in length - the middle 1 can be 10 mm length though if one tightens it with an Imbus - the 2 screws mounting the front body to the main body need to be M3x20 - the 2 screws mounting the cable mount are M3x12 - the 4 screws mounting the toolhead to the MGN12H carriage need to be M3x6 - the 4 screws mounting the fan mounts need to be M3x25 - the 4 screws mounting the Cover + 3010 hotend cooling fan need to be M3x20 In total (all M3): 4x 6mm, 1x10 mm, 2x 12m, 6x 20mm, 4x 25mm, 3x 25(+)mm, 2x 32(+)mm
Originally published on Printables


