Canon A-1, 3-part sprocket replacement (minimalist approach)
by i3enny · via Thingiverse
| Format | STL |
| Category | Mechanical |
| License | CC BY-NC |
| Uploaded | Mar 18, 2026 |
⬇ 11 downloads
❤ 2 likes
👁 43 views
Description
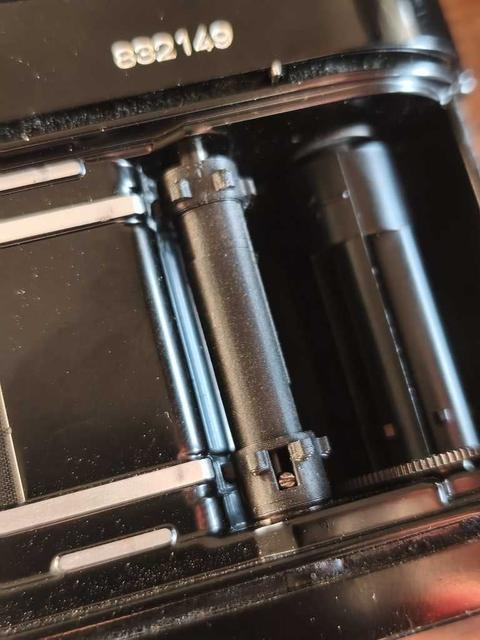
This method of fixing the sprocket works on at least all Canon A-series cameras, and likely on many more. It is based on a replica of the original sprocket that i modeled buy measuring every dimension on the original sprocket, and it is divided in 3 parts for easy assembly that does not require the disassembly of the entire camera, and it only takes less than 10 minutes to replace it, apart from the time that it takes for the parts to print of course!! The movement is very solid, the frame counter works perfectly, and the sprocket mechanism works perfectly as well! Below, I give a detailed explanation and context on how I came up with the model and how the process of replacing it works: Everywhere I looked online, it said that to replace the sprocket, the camera would have to disassemble the whole thing. It would have been fun to do it, but I didn't want to mess up anything more, so I needed to find a different way. It is true that to replace a sprocket with another, one needs to disassemble the camera, but that is for a one-part sprocket, not for a 3 part sprocket. And that's where a 3d printer comes in handy! I removed the broken sprocket and built a 3d model out of it. I divided the model into 3 parts, like in the pictures. The bottom and top parts slide into one another, and the small piece is a ring spacer, which I will explain below. The process works as follows: -You remove the film rewind button (that I discovered is also a shaft that goes all the way through the plastic sprocket), alongside with it's spring mechanism(spring and brass cylinder) that is also inside the sprocket (photo). I did it by unscrewing a tiny screw on the bottom part of the shaft, accessible through a rectangular hole on the plastic sprocket (photo). It all came out very nicely! -Having the mechanism out and the 3-part sprocket printed, you place the brass cylinder and the spring inside the top part, and then slide on the bottom part all the way, and now you have a sprocket that is 5 mm smaller than it is supposed to. This is because, in order to replace the sprocket, it has to be smaller so it can be inserted in both ends. Then, you place the sprocket in place and extend it. You will have a space on the top, and then you pop the last part, which is a spacer and prevents the sprocket from collapsing. -Lastly, you insert the shaft button the same way it was taken out, click it all the way to the top, and then screw the tiny screw on to the shaft, through the same window it was unscrewed. And you are done!! I'm giving out the STL file with all 3 parts in it, if you simply want to download it and print it right away, but also I'm giving the Fusion 360 file of the model in 3 parts and in 1 piece, so anyone can alter it as they wish!! Filament: Black mate PLA Printer: Creality Ender 3 S1 layer height: 0.12mm infill: 100% nozzle temp. : 210C Build plate temp.: 55C printing time: 36 min for all parts at the same time you can do it with or without support! It works very well ether way
Originally published on Thingiverse


