Charlees Props Wave Arch pixel prop brackets
by bnubile43 · via Thingiverse
| Format | STL |
| Category | Art |
| License | CC BY-SA |
| Triangles | 11.6k |
| Uploaded | Apr 4, 2026 |
⬇ 30 downloads
👁 12 views
Description
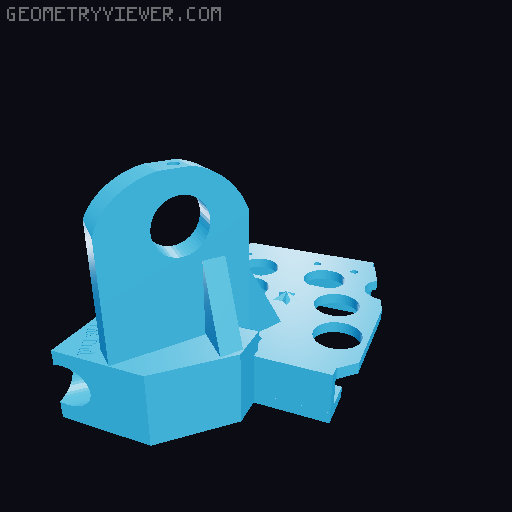
I love the look of the wave arch but after the 2nd year of operation with 4 wave arches (8 sine waves, 32 arch pieces, 1600 pixels) I was frustrated with trying to push and pull pixels out of the pieces while outside and messing with zip ties and trying to hold it up and get it attached to the support rebar all at the same time. So I came up with some custom brackets to provide support for the wave structure. They are a rudimentary design but they work. The bracket supports the wave and has a mount for standard ½ #4 rebar to hold the prop up off the ground at your desired height. ( https://charleesprops.com/products/arch-segments-modular-sets?_pos=2&_sid=694aa2ca1&_ss=r&variant=46987417682232 ) Advantages: • No more pushing or pulling pixels from the props each season ever! • Strength for the wave for moving and storing • Ability to add additional lights/props above, below, or “through” the wave if desired • Easy to hang for storage and no bending your wave accidentally There are 5 different parts (A-E) for “one wave” which is defined by Charlees Props as basically 2 cycles of a sinewave or 8 aches pieces. ½ EMT is run through bracket parts A-B-C and screwed into the bracket. Another piece is run through the next section of the wave through bracket parts(D-B-E). Where the two wave sections meet you can install a ½ EMT conduit coupler during show installation to line them up or you can just use zip ties to connect the segments. A = The start of “one wave”, piece #1. This bracket has additional zip tie holes, if you want to use these you’ll need to mark and drill them in the coro. B = The midpoint of one sinewave between pieces #2 and #3. This replaces the provided arch coupling piece from Charlees Props. This bracket has additional zip tie holes, if you want to use these you’ll need to mark and drill them in the coro. C = The end of the first sinewave between pieces #4 and #5. This replaces the provided arch coupling piece from Charlees Props. D = The start of the next sinewave. This bracket has additional zip tie holes, if you want to use these you’ll need to mark and drill them in the coro. E = The last piece of the arch gets this bracket. This is basically a chopped off C part. Only use this for the very last one. See arch diagram picture which is 8 arch pieces making a single “Charlees arch wave”. Basic retrofit sequence: Remove pixels from prop where needed. Attach bracket A with zip ties, reinstall pixels. Remove the vendor provided arch brackets from part B/C/D locations as needed. For Bracket B, put this new bracket in place to test. Confirm proper alignment of pieces #1 and #2, mark location of additional zip tie holes, drill out coro in marked location. Attach new bracket using zipties, reinstall pixels. Repeat for part C, but be sure to confirm alignment of pieces #3 and #4 before you drill your EMT bracket hole. Now measure and cut a piece of ½ EMT that is ~79 3/4 inches long. Test out piece. EMT should proceed through the part C bracket at least enough to fit half a EMT coupler if you will be connecting your wave segments with an EMT coupler. Remove it from brackets, paint the EMT a flat black color. Be sure to include the EMT coupler in your paint effort if you want it to be black also, but the couplers between segments are always behind the bracket and will not be seen from the front. Let dry, install EMT in to brackets, drill 1/8 inch hole into EMT through pre allocated bracket hole. I used a #8 3/4 inch wafer head sheet metal screw to attach the bracket to the EMT. (#372763 from HD) Repeat these steps with 2nd wave segment (pieces 5-8) with part D-B-E or D-B-C if there is another wave to attach. Test fit the coupler alignment between sections if using coupler method. I find that pushing away one segment and slightly twisting in the 2nd segment works fairly well. Align EMT position of second segment with these test fittings, then you know where the EMT should be in the brackets and you can drill the holes into the EMT. For a single arch wave (8 arch pieces) you will need 5 rebar pieces at the desired prop height to support the prop for ground mounting. The bracket part sequencing would be A-B-C / D-B-E. If you had two arch waves if would be A-B-C /D-B-C /D-B-C /D-B-E. Hanging for storage: You can now hang your arch wave segments in either a horizontal or vertical orientation. Each segment with bracket is approximately 3 inches “deep”, but they are pretty light overall so I have found that hanging systems for ladders and Kayaks are suitably large enough if you have a lot of arch waves. Pictures attached of 3 vertical hanging via ladder hook example. 8 Horizontal segments (4 arch waves) hanging on Kayak storage rack. This hanger for instance would let you hang 2 arch waves (4 segments) either horizontal or vertical: https://www.amazon.com/Naikozmo-Paddleboard-Surfboard-15-5Inches-10-8Inches/dp/B09P7FBSWH/ref=sr_1_4_sspa For 4 arch waves (8 segments) I am using this Kayak hanging bracket: https://storeyourboard.com/products/hi-port-single-kayak-ceiling-rack-adjustable-overhead-storage-mount NOTES: • I did make one wave segment out of multiple shorter EMT pieces with a coupler attaching them and did not have any issue with strength for that segment. • Make sure to remove any plastic labels from the EMT if that section of your EMT will be going through a bracket. The label will exceed the tight clearance in the bracket when trying to slide it through and it will make everything really difficult to push/slide through. I used a wire brush drill attachment to remove any labels/stickers. • See videos on You Tube under “Candy Cane lights on Canterbury” featuring the 8 Charlees arch wave arches at the front of the display. https://www.youtube.com/channel/UCoQxIPfs5rqqXuLMDKyvK6g
Originally published on Thingiverse


