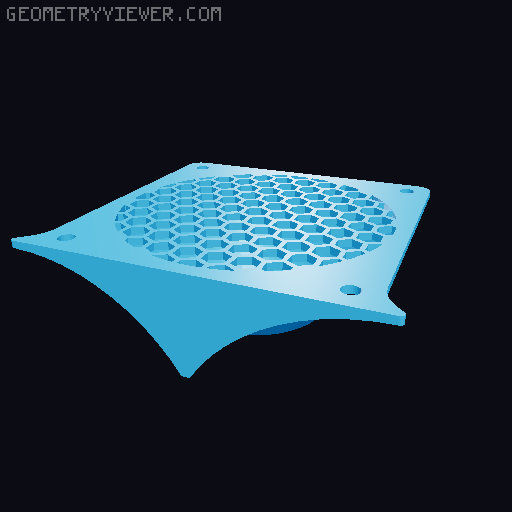
Compact and Cheap Soldering Fume Extractor with an 80mm fan
by SANGER_A2 · via Thingiverse
| Format | STL |
| Category | Other |
| License | CC BY-SA |
| Triangles | 5.9k |
| Uploaded | Mar 27, 2026 |
⬇ 295 downloads
❤ 55 likes
👁 2.0k views
Description
This is as compact and uses as little filament as I could make it. It makes use of large sheets of carbon filter material than you can buy on Amazon and are 3mm thick (the space to hold the filter material is 4mm). You can use just one sheet or two depending on how you want. I used two - one in front of the fan intake and one behind. I bought a couple of cheap 5v 80x80x25mm fans on Amazon as I wanted to use it with USB. I just soldered the two wires from the fan into a switched USB cable I had from another project. The 5v fan works fine, but it would be even more powerful if you used a standard PC 12v fan powered with a basic 12v wall adapter. You can fit a standard PWM fan connector or anything smaller through the hole provided, but for larger connectors like molex you'd have to depin it, run the wires through the hole and then repin the connector. If you're not going to remove the fan, squirting a load of hot glue into the hole for strain protection would be a good idea. I considered trying to put in a chunky cable tie to stop it getting yanked out, but couldn't figure out a way to do that with the fan needing to slide into the case. You can attach it together with normal PC fan screws as long as they aren't too short. If you were planning on swapping the filter material a lot then you may want to use a long 40mm bolt all the way through it. I considered leaving the top open to slide filters in, but that would mess up airflow. IMPORTANT: it's designed to be printed with a 0.44mm layer width with 3 outer side shells and very little wasted infill etc. It's 5 lines thick on the sides. If you use a 0.4mm line width or less than 3 outer shells you're going to get tiny amounts of infill fitting into a 2.21mm thick part and a slow and weaker printer. I just used two shells on the top/bottom with 20% lines infill. It's very easy to print with supports only needed for the hole for the fan wire to come out of the fan cover. I used a Flashforge adventurer 3, which is not a good printer and it came out fine. If you print the filter cutting template, you can cut the filter to a more pleasing shape than I did! You can use just a single filter at the front if you wanted to make it even simpler and have just the "flat filter" at the back to protect fingers. If you wanted to save even more filament and cared less about appearance, you could skip printing the fan holder and use longer screws to screw through the outer-grill, then through the filter-holder and into the fan. Then it's up to you whether you want to use just the flat rear cover or another filter holder along with the rear cover to holder a rear filter as well as not. It's quite thick at 2.2mm, but that's because the last thing you want is annoying noises when it warps/bends and rubs against the fan just to save a layer or two of filament - I've experienced this with fan covers before and had to reprint them! Update: This would work well with the Noctua Airflow Amplifier that has been remixed to fit 80mm fans. I put an STL of it here in case the Printables version disappears. https://www.printables.com/model/889513-noctua-airflow-amplifier-for-different-fan-sizes-w Update 2: I was inspired by the airflow amplifier to add a few new versions of the front cover that include a tapered version that narrows the input to just 40mm to increase airflow. Some have a fin in case you're not using the whole case with the feet so that it's not top-heavy. I think the tapered with cone is my favourite.
Originally published on Thingiverse


