Creality K1 SE Lid Riser Retainer Clip
by Dennis Mckinney · via Printables
| Format | STL |
| Category | Art |
| License | CC BY-NC-SA |
| Triangles | 3.3k |
| Uploaded | Aug 16, 2025 |
⬇ 147 downloads
❤ 15 likes
👁 1.1k views
Description
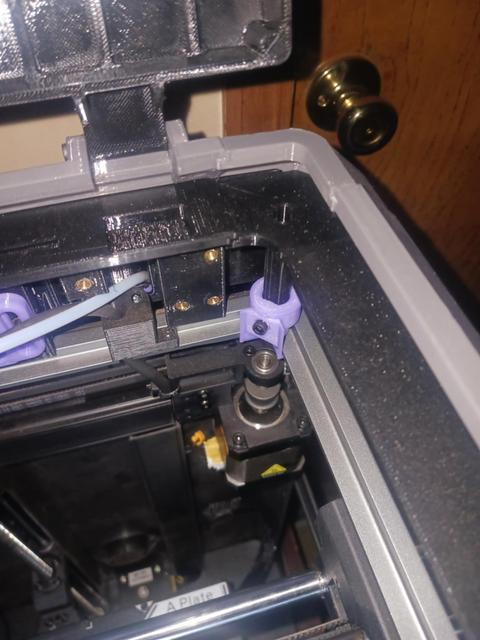
Update 2: Redesign for strength and stability. Added a new design for the frame post for the Lid Riser LED wiring corner post (2 inserts). The attached file has one of each. Print 3 of the corner posts with a single hole in the flat inner-facing face and 1 of the clips with 2 holes on the round section of the adapter. Instead of standard allen-key bolts, you can use M3x8mm thumbscrews for easy addition and removale of the lid riser. Orient the flat-face on the bed, with Auto Supports with a 5deg angle and On Bed Only. Photos of the install will be posted soon. -------------------------------------- Update: Added holes in the flat section facing the center of the printer to allow the use of M3x5x4 inserts. The mounting posts of the Lid Riser frame will need to have a small hole drilled near the bottom to allow a screw to pass into. This is simply to hold the Led Riser down, making it harder to bump off of the printer. New photos will be posted soon. --------------------------------------- The Leote Creality K1 Lid Riser v3 fits the K1 SE perfectly, but the SE model lacks the predrilled screw holes in the top of the frame, which are used to attach the lid riser frame to the printers frame. These clips fix that issue, with no modifications to the printer itself. Basically, there are 4 identical clips, which simply slide onto the top of the printer frame at each corner. The Lid Riser frame posts then slip into these clips. Holes are added for insertion of M3x5x4 brass inserts. Once the frame posts are inserted into these clips, add a screw to secure the posts in place. DO NOT OVERTIGHTEN! If you are using LED strips on the frame riser, there is a gap in the clip for the wire to pass through. Route the wire to the corner prior to attaching the clip in that corner. The image shows the clip installed in the rear corner, but it's printed in Silk PLA (it's what I had loaded), but will be printing them in black PETG. This is a fast and easy print. Simply place all 4 clips on the build plate and orient them so that they're standing upright, with a basic organic tree support.
Originally published on Printables


