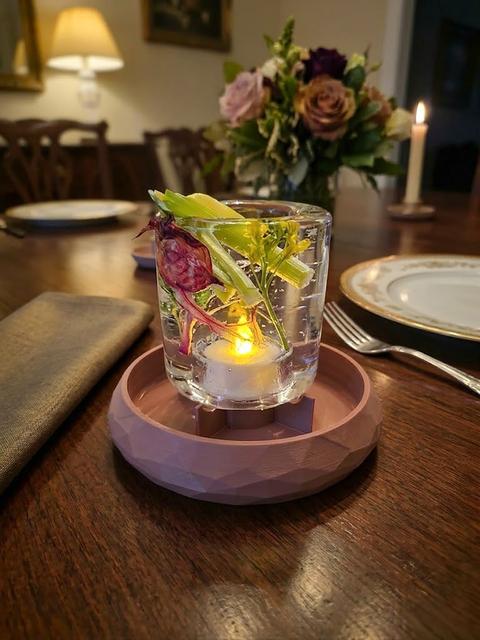
DIY Ice Sculpture Mold – The VIP Party Centerpiece
by Peachmelba · via Thingiverse
| Format | 3MF |
| Category | Art |
| License | CC BY-NC-ND |
| Uploaded | Mar 31, 2026 |
👁 2 views
Description
⚡ The Short Version (Summary) Create a stunning ice tower centerpiece for your dinner table! This set includes everything you need to cast a hollow ice tower that glows beautifully with a candle inside. Multiple Mold Sizes: Choose between a long-lasting standard version or a thinner, quicker-melting version. Both versions have the same hight. Various Drip Stands: Choose between the classic "Barrel" look or the new "Version 2" with 4 pegs that allow you to swap between different top shapes for the ice to rest on. This design creates a mesmerizing "raining" effect as the water drips down. Crystal Clear Ice Guide: A 3-step guide to achieving professional, glass-like ice. Material: I have printed the mold in PETG. Do not use TPU. Critical Settings (Manual filament edit): You must manually set Flow Ratio to 1.03 and Nozzle Temp to 240°C for better watertightness. Watertightness: For a 100% leak-proof and glass-smooth result, coating the inside with Epoxy Resin is highly recommended (and essential for the best finish and 100% watertightness). 📖 The Long Version (Full Guide) Create a stunning atmosphere for your dinner guests with this 3D-printed ice sculpture mold. The design includes a custom Drip Stand that catches the melting water, keeping your table dry while the sculpture slowly changes shape. 📦 What is included in the files? The Main Mold (Choose your size): Normal Version: The standard thickness. This robust tower lasts approximately 5 hours on the dinner table before melting completely. Thin Version: A delicate, thinner wall. This version lasts approximately 1.5 - 2 hours on the table. Perfect for shorter dinners or if you want to see the melting process happen faster. 2. The Drip Stand (Choose your style): The Barrel + cross base (Version 1): A low-profile, bowl-shaped stand featuring a sturdy cross-beam in the center. This minimalist design holds the ice securely while collecting the melting water dripping in the basin below. Note: The bowls are with different patterns, so you can choose the look that fits your style. The Peg Stand (Version 2): Features 4 pegs that allow you to swap between different top shapes for the ice to rest on. This design creates a mesmerizing "raining" effect as the water drips down. The Lid: Allows you to stack items on top of the mold in the freezer. The Insulation Cup: An outer shell used to create "directional freezing" for perfectly clear ice. Instead of this, you can wrap a tea towel or towel around the ice mold bottom + sides. Just don't cover the top of the Ice Mold. The cold should hit the water from above (directional freezing). 🧱 Filament & Material Choice Material: I have printed the mold in PETG. Do NOT use TPU: TPU expands when wet/frozen, which can cause bulges in the ice, making it extremely hard to remove the frozen tower. Do NOT use PLA for Ice Mold: PLA is brittle and will likely crack under the pressure of the freezing ice. You may use PLA for the drip stand, if you coat it with waterproof coating or epoxy resin Color: The color of the Mold and Lid does not matter (great for using up scraps!). However, print the Drip Stand in a nice color, as this will be the centerpiece on your table. ⚙️ Critical Print Settings (READ CAREFULLY!) The 3MF file comes pre-configured with geometry settings. Do not change these: Wall Loops: 4 (Critical for strength vs. flexibility). Infill: 100% (Solid). Wall Generator: Arachne. Seam position: Random. ⚠️ YOU MUST CHANGE THESE MANUALLY: The 3MF file cannot overwrite your specific filament profile, so you must adjust these two settings yourself: Flow Ratio: Change from 0.95 to 1.03. Why? This slight over-extrusion seals microscopic gaps between layers. Nozzle Temperature: Set to 240°C (for PETG). Why? Higher heat ensures maximum layer adhesion. 💧 Making it 100% Watertight (Highly Recommended) While the print settings above are optimized for water resistance, 3D prints can be tricky. For a 100% leak-proof result and a smooth surface that makes releasing the ice easier, I highly recommend coating the inside. Only option A can be used in the Ice Mold. Option A,B or C can be used in the Drip Stand Option A: Epoxy Resin (Best Result): The epoxy fills the layer lines to create a perfectly smooth surface, making it much easier to release the ice. Mixture: Approx. 25g Resin + 25g Hardener (if the mixing ratio is 1:1). Application: Pour over the center "chimney" of the ice mold and use “rolling” method and a brush to coat the rest. (See the included video). Link: https://a.aliexpress.com/_Ey1KO1I Option B: Rubber Paint / Liquid Rubber / Spray Sealer. Link: https://a.aliexpress.com/_Eya1ucM Option C: Waterproof Wood Glue (Type D3 / PVAc). I havent tested this but AI says this is also an option Link to waterproof coating/glue: https://a.aliexpress.com/_EQtkjgo or https://a.aliexpress.com/_Ev3xvFe Note: Do NOT use clear varnish (cracks in freezer) or silicone spray (sticks to ice). 🧊 Guide: How to get Crystal Clear Ice To get that professional, glass-like look, you can combine these three levels. For the ultimate result, do all three! Level 1: Boiling the Water (Removes Air) Boiling removes trapped air bubbles, making the ice clearer than raw tap water. Boil the water. Let it cool down. Boil the water again. WARNING: Let it cool to room temperature before pouring it into the mold! Pouring 100°C water will warp the PETG plastic instantly. Level 2: Directional Freezing (Removes Bubbles) This technique forces water to freeze slowly from the top down, pushing impurities to the bottom. You have two options here: Option A: The Insulation Cup (Printed): Place the mold inside the printed Insulation Cup. Stuff the gap with cotton wool, bubble wrap, or old socks. Tip: Put the mold in a plastic bag first to keep the insulation material dry from water (re-use). Option B: The Towel Method (DIY): If you don't want to print the cup, simply wrap a towel/Tea towel around the bottom and sides of the mold. Leave the top open. Secure it tightly with a rubber band or string. Ensure the bottom is well-covered so cold air only hits the water from the top. Level 3: Filtration (Removes Minerals) Cloudy ice is often caused by limescale and minerals in tap water. The Method: Run your water through a water filter pitcher (like a Brita, Dafi, or similar standard filter jugs) before boiling it. By removing the minerals first, then boiling (Level 1), and insulating (Level 2), you will achieve the clearest possible result. Disclaimer… Although it helps with the above, I haven't been able to get 100% crystal clear ice. If you succeed, I'd love to see pictures and explanations of how you did it in the comments. 🎨 Creative Tips: Decorations Since the sculpture is hollow and lit from within, translucent items look amazing frozen inside! Natural: Citrus slices, berries, rosemary. Party: 3D printed stuff - 1mm thickness Water Colur: Add food coloring, tea water or coffee water The Tape Trick: To prevent items from floating, suspend them using a small piece of tape across the rim of the mold. The Layering Technique: Freeze in steps (1/3 full -> freeze -> add items + water -> freeze again) to make items float in the middle of the ice. 📖 How to Use Leak Test: Before first use, fill with water and place on a paper towel for 10 mins. Fill: Fill water only to the top of the center chimney. Freeze: -18°C (Standard): 12-18 hours. -5°C: 24-48 hours. Release: Rinse the outside of the mold with lukewarm water and also lukewarm water inside the chimney. The ice will release the mold after a couple of minutes. Or let it sit upside down for 20-30 mins until it slides out. Let it slide out on a towel, so it does not break. Enjoy: Place on the Drip Stand and insert a candle or LED light inside the ice tower!
Originally published on Thingiverse


