DnD Dice Hammer
by Garth · via Printables
| Format | STL |
| Category | Organisation |
| License | CC BY-NC |
| Triangles | 61.5k |
| Uploaded | Jan 26, 2024 |
⬇ 1.3k downloads
❤ 589 likes
👁 8.7k views
Description
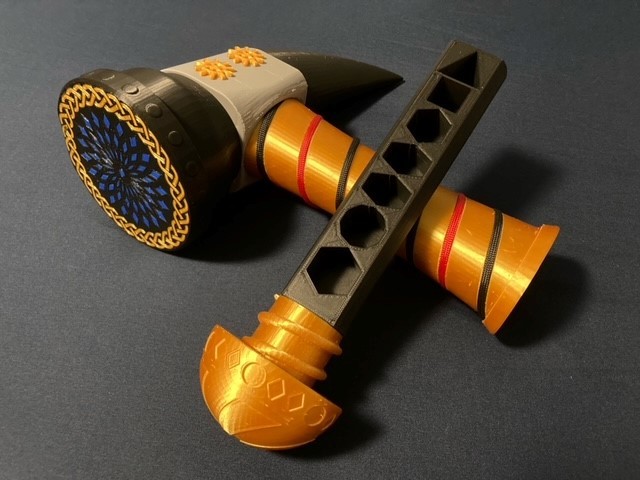
Updated 10-Oct-23: This model has had issues for a while. A bunch of people have noted in the comments that they needed to do a bunch of modifications to get the parts to fit together. I finally got back to this to make some needed improvements. Updates include: Now there are 2 rods used to lock the parts of the head together instead of the 4 screws. The screws are now left as a decorative part of the design. I increased their tolerance and shortened the length. New connection between the handle and the head. The original connection has been the biggest pain point for people. I switched it to a screw, just like the pomel. Hope the changes help! Here's round 3 of the dice storage collection! This hammer was designed to hold a set of 7 dice (d4, d6, d8, 2d10, d12, and d20). The dice are stored in a tray that screws into the handle. When you are ready to roll you can unscrew the hilt and slide out the dice. There is also some extra storage space located behind the hammer face. This face can screw off to reveal a small cavity. The front face of the hammer was designed for multimaterial use. The main body of the face has two patterns located in it, a braid around the perimeter and the diamond pattern in the center. In order to print with these patterns you need to split the STL into parts in the slicer. Otherwise you will not see the separate bodies. Assembly Instructions: This hammer was built in two main sections: the handle and the head. The handle is comprised of 3 parts. First, the pommel and dice holder files were made to press fit into one another. Then the pommel can screw directly into the handle part. The head of the hammer is built out of 10 parts. The head connector is used as a hub to line everything up. The spike head and hammer head connection pieces can slide into the head connector part and are locked in with the two pin rods. The four head screws are decorative and screw directly into the head connector. Finally, the hammer head face part can screw directly into the hammer head connector. I chose to add some paracord into the groove on the handle for some extra flair. The ends of the paracord can tuck into either end of the handle to remain hidden. Check out the sword I made here: https://www.thingiverse.com/thing:4829524 Check out the shield I made here: https://www.thingiverse.com/thing:4990382 Print Settings Printer Brand: Prusa Printer: i3 MK2 MMU Rafts: No Supports: Yes Resolution: 200 Infill: 20% Filament: Hatchbox PLA Black, Gold Category: Toy & Game Accessories
Originally published on Printables