Dropper Post Lever – Resin Cast
by marcin10 · via Thingiverse
| Format | STL |
| Category | Other |
| License | CC BY-SA |
| Uploaded | Apr 16, 2026 |
⬇ 23 downloads
👁 26 views
Description
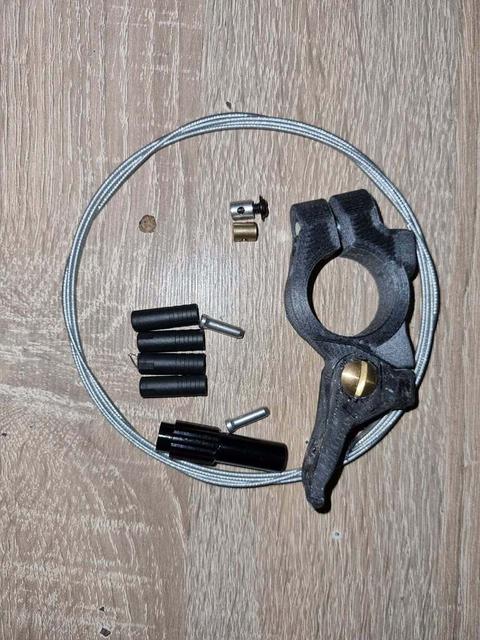
This project involves the design of a dropper seatpost lever. It can be manufactured entirely using 3D printing, or as a hybrid construction combining 3D-printed components with carbon fiber–reinforced resin parts The component is 13 mm thick, and the cable pull is over 12 mm, making it compatible with most seatposts available on the market. I have been using this component for two years, even during very intensive riding, and I have not had the slightest issue with it. This is not standard, as I often see listings online for seatposts for sale where a broken lever is included for free. !!!Some of the images show an older version of the lever, while the description here is more accurate. However, I occasionally refer to the photos.!!! To assemble everything on the bike, you will need: the body component the lever component a 6 mm thick barrel nut with an M4x10 screw (!!! use threadlocker !!!) / or any equivalent solution that can act as a 6 mm wide lever pivot (!!! use threadlocker !!!) an M5x14 screw an M5 nut !!!a Teflon tube taken from a derailleur housing, 16 mm in length (the photo helps to understand what is meant) (2.5mm dril bit is used tu preper the hole for it) 4x standard cable housing end caps a barrel adjuster installed between two sections of housing a bent piece of housing acting as a guide / or a standard cable guide used in bicycle components housing long enough to reach the seatpost derailleur cable friction paste / mud can also be used a cable barrel (end cap) and, of course, the dropper seatpost itself I printed the entire assembly in ABS, and it worked for about a month before it broke. The failure occurred at the lever; it’s possible that printing it from a stronger material would make it suitable for riding, but I decided to take it a few steps further and made my own using forged carbon fiber. The body, on the other hand, was made from PCTG+CF, which is one of the strongest materials for standard 3D printing (printing parameters are shown in the image). !!! When printing the body, make sure to use a 0.6 mm extrusion width, as the model is optimized for this setting. !!! To print the lever, you have two options: use "waicha_z_wcienciem" if you are using a pivot with chamfers, or "waicha_bez_wcięcia" if you are using something that is flat on both sides (the differences can be seen in the models). To make the mold, you first need to understand how to produce this type of casting—I recommend the following material: https://youtu.be/nhqAhYOdGNc?si=k_D0oGhVJCL1m-Cw The components required for the mold are: 3d prints mold cz1 V3 mold cz2 V3 mold cz3 V3 mold cz4 V3.3 2x rod insert oter a piece of pencil lead inserted into the insert 2x 6mmwaid aluminum tube It is also worth having a drill with a 2 mm bit to enlarge some of the holes.” The "wiercenie_V1' component is used for drilling 2 mm holes in 5 mm waid 6mm long threaded bushings, which I originally used as cable anchors https://pl.aliexpress.com/item/1005008153714122.html?spm=a2g0o.order_list.order_list_main.115.a93a1802H05emq&gatewayAdapt=glo2pol , but I later switched to https://pl.aliexpress.com/item/1005010783810671.html?spm=a2g0o.order_list.order_list_main.53.a93a1802H05emq&gatewayAdapt=glo2pol "kierownica_rowerowa" is simply a bicycle handlebar model used for testing various types of devices mounted on bicycle handlebars.
Originally published on Thingiverse


