Drybox - Respooler
by jmillerfo · via Printables
| Format | STL |
| Category | Gadgets |
| License | CC BY-SA |
| Triangles | 34.9k |
| Uploaded | Apr 30, 2025 |
⬇ 64 downloads
❤ 24 likes
👁 1.0k views
Description
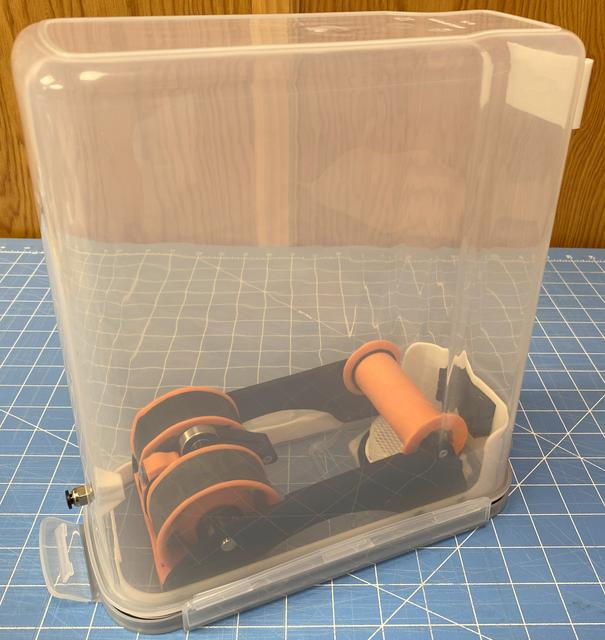
This design is an adaptation of the Filamentalist Passive Filament Driven Rewinder (Passive Respooler) originally designed as part of the Voron ERCF project. Details of this design and any follow-up revisions can be found in the reference below. The object of this model is to create a single spool air tight enclosure that can automatically take up filament during a multi-material servers (ERCF, MMU3, etc) unload procedure without the need for active components such as motors (steppers or otherwise). This version fits within the Cereal Box referenced in the BOM below. This is larger than the ones used by previous DryBox projects (see https://www.printables.com/model/1232988-drybox-hub-mount . Ideally this design could use the same box, but alas the height of the Driven Rollers plus with the diameter of a 1kg spool exceeded the interior height of the original cereal box. The new Cereal Box is 2" taller and 1" wider. The new box also has a hand hold molded into each side near one end reducing the spool width somewhat. The ERCF model is parametric driven and can support a wide range of spool widths. In order to fit in the drybox selected for this design, the spool widths have been limited to a range of 34-75imm. The drive hubs ( rim_rollers ) could support 82.5mm spool widths but the Idler Rollers only 75mm due to the narrowing of the cereal box at the idler end. This design replaces the original supports with Left_Support, Right Support(Mirror), and Mount. It also modifies the idler rollers to remove the taper. The purpose of the taper was to keep the spool centered on the rollers but in practice it caused the spools to tilt enough to rub against the enclosure. The new idler rollers are a constant diameter. 32mm OD O-Rings are installed on the idler rollers and are designed to keep the spool centered. The O-Rings can be moved in/out to match the size of the spool. This keeps the spool from wandering side to side as the filament is played out or retracted. The supports and mounts must be printed from the .stl's included herein. The remainder of the parts can be printed using the Fusion 360 Parametric model contained in the Passive Respooler if you have that capability, but I have posted herein the .stl files necessary to create this device for convenience. Instructions for building the Passive Respooler are contained in those project files. Build Instructions: Print core parts using instructions in the assembly document contained on the Passive Respooler site. The parts may be printed from this repository or from the Passive Respooler site. Print Settings Filament Types Tested: PTEG, ABS, ASA Layer Height: 0.20 (First Layer 0.25) Extrusion Width: 0.40 Infill Type: Grid, Gyroid, Honeycomb, or Cubic Infill %: 40% Top/Bottom Solid Layers: 5 Print Left_Support, Right Support(Mirror), and Mount parts from this repository using the same settings as above, Print the remainder of the parts from this site or from the ERCG GitHub site. Keep in mind the maximum spool width must be 75mm, Complete the Respooler per instructions in https://github.com/Enraged-Rabbit-Community/ERCF_v2/tree/master/Recommended_Options/Filamentalist_Rewinder , Install the Passive Respooler assembly built per their instructions onto Left_Support and Right_Support(Mirror) and Mount using 4 M3x8 FHCS screws at the idler end and 4 M3x16 FHCS at the Rim_Roller end. The head of the screws should be flush with the Mount surface. The supports should be placed inside the Mount before the fasteners are installed, Cut a piece of Inner Tub to slightly larger width compared to the Rim_Roller . The tube piece cut will shrink when installed on the Rim_Roller . If substituting a different Inner tube that the one below, make user it is 3.0" flat, Turn the tube piece inside out, Insert the tube piece onto the Rim_Roller making sure that the tube does not ride up on the Rim_Roller flange and covers the entire with of the roller. Cut away any portion of the tube that rides up on the flange, Install one M32 O-Rings onto each idler roller. Move them next to either flange, Insert the above assembly into the Drobox Lid. It should fit snuggly against the sides of the lid interior flange and bottom out on the Lid's interior surface without any distortion. Drill a 10mm hole on the larger Drybox enclosure end centered on the end and 37mm up from the mounting flange. The hole must be aligned with the filament path in the Tensioner_Mount , Install a PC4-M10 PTFE Tube connector in the 10mm hole drilled above, Secure the PC4-M10 Connector with a PTFE_Cap , Install the optional Hygrometer into the Mount, Adjust the Tensioner Spring per GitHub assembly instructions . Loading: Thread the end of the filament through the rollers and leave approximately 15cm extending from the Tensioner_Mount, Thread the filament through the PC4-M10 connector and restrain the filament end to prevent it from retracting from the PC4-M10 connector, Place the spool on the rollers and the Drybox container on the Lid. Install the Drybox body on the Lid. Test the spool will take up the filament as it is pushed into the container. BOW: QTYItemDescriptionSource1PC4-M10Connector https://www.amazon.com/gp/product/B07SKX5P9P 1BoxCereal Box https://www.amazon.com/dp/B0CZ1MGZGG 1MeterHygrometer https://www.amazon.com/dp/B07MCGDN5C 1M8Rod https://www.amazon.com/dp/B082ZP5CLB 16MMSpring https://www.amazon.com/dp/B076LNJF5Q 1BearingOne Way https://www.amazon.com/dp/B09BZ6KMLN 4608ZZBearing https://www.amazon.com/dp/B0CYPV2817 4M3x6 FHCSScrews https://www.amazon.com/dp/B09BRDLF6N 2M3x10 FHCSScrews https://www.amazon.com/dp/B09BRDLF6N 6M3x16 FHCSScrews https://www.amazon.com/dp/B09BRDLF6N 1M3x35Screw https://www.amazon.com/50-M3-0-50-35mm-Stainless-MonsterBolts/dp/B078LDW48Y 2M3Washer https://www.amazon.com/dp/B09BRDLF6N 2211 Buna-N O-Ring https://www.amazon.com/dp/B000FN0W7I 2M32 O-RingO-Ring https://www.amazon.com/dp/B07GJQKK9L 1BikeInner Tube https://www.amazon.com/dp/B0DLTMY54N
Originally published on Printables


