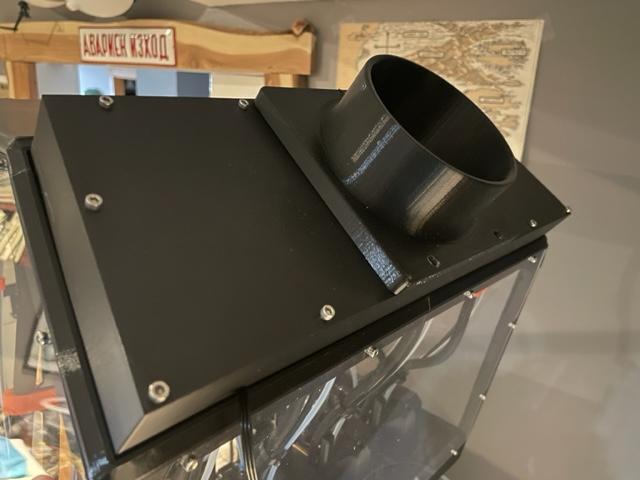
Duct Port 90mm Fan with 4 inch Fume Extractor Vent EnXLosure Back Top Panel Mod by CaptJon
by CaptJon320 · via Printables
| Format | STL |
| Category | Art |
| License | CC BY-NC |
| Triangles | 5.8k |
| Uploaded | Apr 15, 2024 |
⬇ 66 downloads
❤ 11 likes
👁 1.0k views
Description
I wanted to add a fan to push the air out from my EnXLosure case. However, I didn't have room for the fan to be mounted behind the case. This design has a cleaner overall look which complements the EnXLosure. I rummaged through my extra stock of 3mm screws, found a fan laying around and bought a flexible ducting hose along with potentiometer fan motor controller. Once I got everything together, I noticed the print head cables/Bowden tubes of the middle tool heads were going to hit the fan blades potentially stopping it. I didn't want to remodel the file as then printing it with supports would make it hard to remove them cleanly. Also, I was too lazy to reprint. I took the easiest route by cutting up a small dowel rod and hot gluing it to inside the fan cutout. I have included a picture of this. It doesn't take long to print and I have added links to parts* below if you don't have extra parts laying around. I just started self teaching myself CAD after printing for 12+ years, this is the first remix I have made. ****Don't forget to scale up your parts**** For my EnXLosure this value was 100.2%. Use the same material (PET for myself) and scale up your parts when you print the back plate and hose adapter. Step 1: Print the parts on your XL. !!!Don't forget to scale up your parts!!! Print the fan controller case if you want to add variable speed to your extraction fan as well (optional). Step 2: Remove the back top panel of acrylic from your EnXLosure. Step 3: Hot glue dowel rods (or other items) inside the fan encasement. Place your fan inside, make sure you have it blowing the correct direction! Step 4: Use some 3mmx40mm screws to attach your new backplate. You don't need the three screws where the duct attachment will be placed, they are added in the next step. Make sure that you route the fan wires outside the case. Step 5: Add the 4 inch hose attachment. You can use 3mmx45mm or 50mm screws for this. I did not have these available. I simply countersunk my holes using a 4mm drill bit (be careful not to drill all the way through) and used the same 40mm screws as the rest of the back plate. In hindsight, I should of countersunk these three holes. Again, I was too lazy and didn't want to reprint. Step 6: Attach your hose and vent it out of your living area, enjoy fume free printing. You can source your parts however you like, here are links to parts that will work. I required a 25 foot ducting hose for my setup, you may need less. Parts*: Motor Controller: https://amzn.to/3VXMsJ8 Fan: https://amzn.to/3W3n3xo Ducting: https://amzn.to/3xx1V8T White Vent: https://amzn.to/49xWu6U Brown Vent: https://amzn.to/3TUHqKH *These are monetized links
Originally published on Printables


