Dummy 13 skin: Soundwave
by Dr Operator · via Printables
| Format | STL |
| Category | Mechanical |
| License | CC BY-NC-SA |
| Triangles | 31.8k |
| Uploaded | Dec 18, 2025 |
⬇ 1.1k downloads
❤ 490 likes
👁 9.1k views
Description
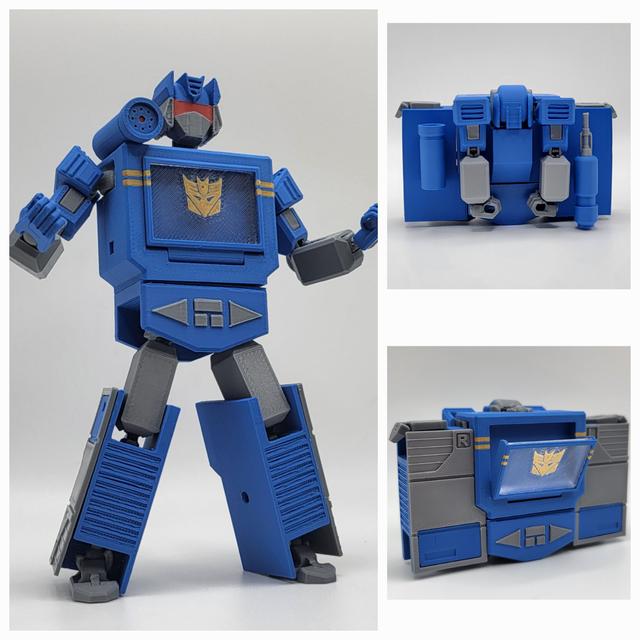
It's been quite some time since I've remixed a Lucky 13 toys model. Soundwave is a character that I originally wanted to remix for Lucky 13 but I always seemed to have something else on the go, so I'm happy to have finally found time for it. This model will require either a multi-colour printer or painting skills. When you open Chest.stl, Chest Door 1.stl, Chest Door 2.stl, Waist.stl and Head.stl in your slicer, right click on each piece and select “split/to parts” to make colouring the parts easier. NOTES: This model remixes the Dummy 13 armour only. You will still need to download and print a Dummy 13 frame. In the profile, I had to use white as a colour because there was no option for translucent. I used translucent AMZ3D filament for Chest Door 2. The other filaments used were Bambu PLA tough Silver, Bambu PLA basic Gold, Bambu Matte PLA Marine Blue and Dark Red. I haven't made any tapes for Soundwave yet, but I'll try and get some made soon. ASSEMBLY: You will need to download and print a full Dummy 13 frame plus two extra frame-abdomen-v6.stl. You need to add those extra abdomen parts to the shoulders as seen below. The picture on the left is a regular Dummy 13 frame and the picture on the right has the extra pieces added. 📷 Image redacted — claim this model to add your own media Most of the Soundwave armour will assemble the same way regular Dummy 13 armour does, but there are just a few notes about the legs. Even though the leg plate fits snug onto the leg itself, I would still recommend using a bit of glue to help keep it on. The shin frame part will snap into place when inserted into the leg as seen below. 📷 Image redacted — claim this model to add your own media You will need to attach the knee to the thigh before attaching it to the shin. 📷 Image redacted — claim this model to add your own media 📷 Image redacted — claim this model to add your own media TRANSFORMING: Transforming Soundwave is pretty easy. Start by removing the gun and mic, and put them aside for right now. Turn the head around 180 degrees and fold it downwards as seen below. 📷 Image redacted — claim this model to add your own media Next, fold the arms all the way back and curl the hands. 📷 Image redacted — claim this model to add your own media Once you have the arms and the head sorted, turn the legs so that the silver panel is facing forward. You will notice that there is a peg on the leg and a hole in the side of the chest. That will help keep it's shape when transformed. 📷 Image redacted — claim this model to add your own media Once you have the legs in place, the last thing you will need to do is attach the gun and mic. The mic fits into the back of the left leg and the gun fits into the back of the right leg. 📷 Image redacted — claim this model to add your own media
Originally published on Printables


