Easy Multi Color Filament
by Area51 · via Printables
| Format | STL |
| Category | Art |
| License | CC BY-NC-SA |
| Triangles | 230.8k |
| Uploaded | Feb 19, 2026 |
⬇ 2.1k downloads
❤ 424 likes
👁 14.4k views
Description
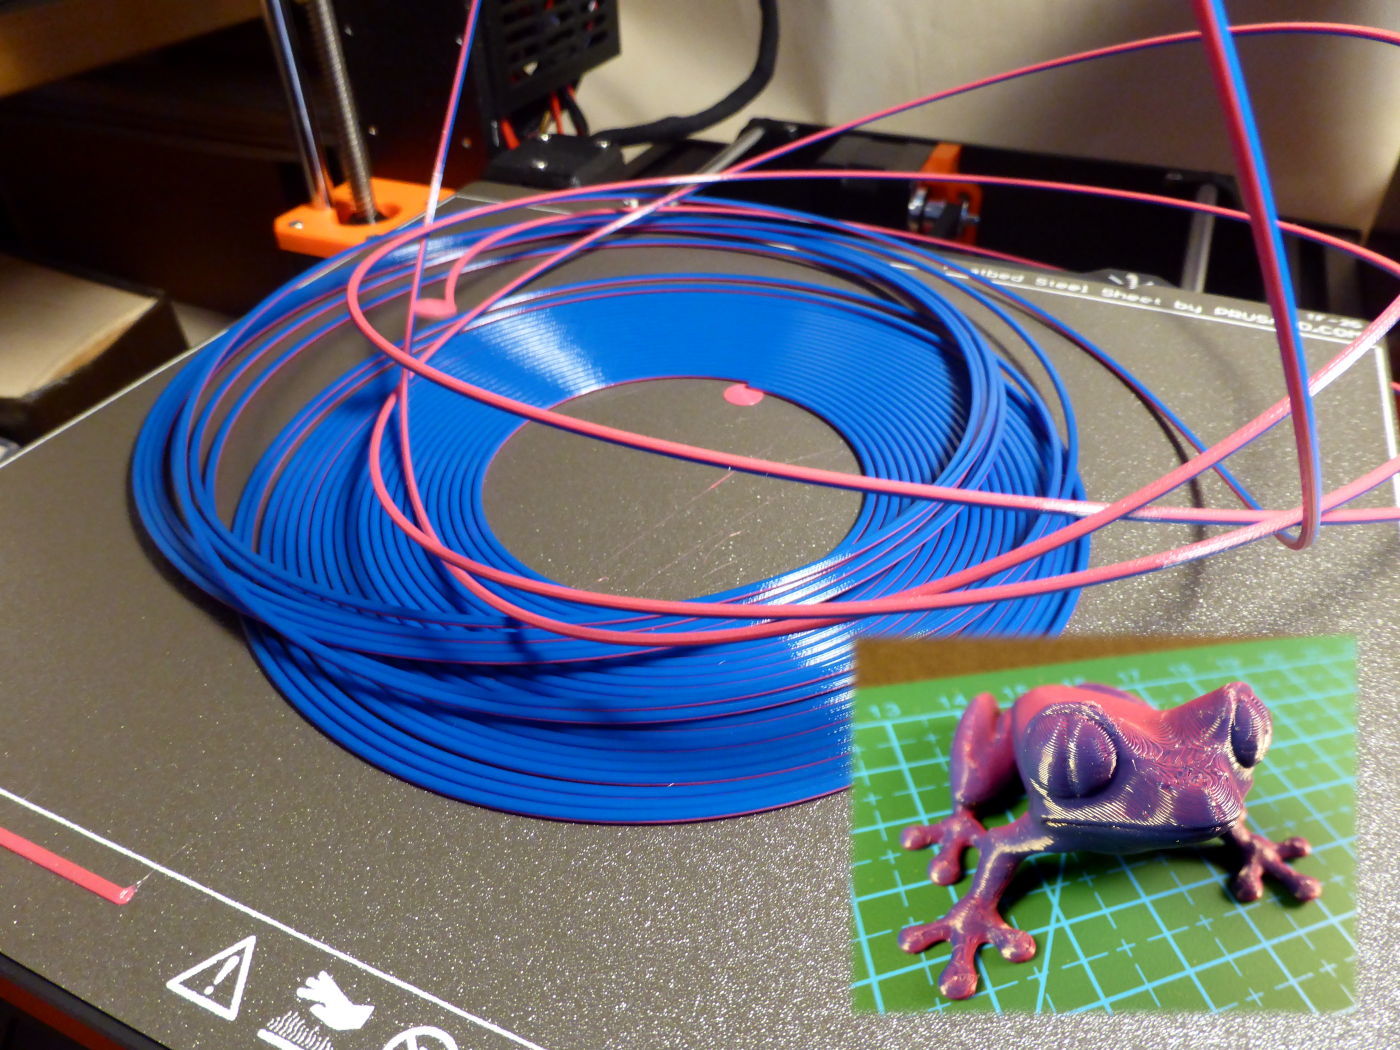
Print Your Own Multi-Color Filament! This model is a 3D-printable 1.75mm filament spiral . It allows you to create custom multi-color strands for your projects by printing the spiral, changing colors at specific layers, and then using the result as raw material for your next print. The Technique: Laminar Flow: By printing the strand with color changes, you achieve a side-by-side (laminar) color extrusion, much like toothpaste. No Mixing: The extruder doesn’t fully mix the colors, resulting in vibrant and distinct color sections in your final model. Simple Workflow: Just print the spiral, peel it off the bed, and feed it into your printer. While not a new idea (as demonstrated by creators like Breaks'n'Makes on YouTube ), this version is optimized for ease of use and consistent 1.75mm diameter across different bed sizes. What’s Different About This Model: Unlike traditional hexagonal (6) designs, this model uses an octagon (8) shape that better fits the round shape of normal filament. The filament “spiral” on the build plade is as dense as possible, maximizing the length of the printed filament. Note: As the resulting shape is not round, the extrusion flow rate must be increased by 10–20% to match a regular round filament. How to Create Multi-Color Filament: Insert one or more color change instructions at different heights in your slicer. For two-color filament, place the color change at the midpoint (e.g., at 1.00mm layer height). Experiments show that two-color filaments provide the best results. If the outer mouse-ear makes the model to wide or to high, just rotate the model 45 degree CW or CCW. Tips for Success: 1. To get a longer filament, splice several pieces together using my Filament Splicing Jig and a soldering iron or use a similar splicing tool. 2. For optimal results in PrusaSlicer, use these settings: Center and rotate the model to fit the build plate. Use 0.20mm layer height and lots of perimeters (6 or more). Turn off top and bottom layers, gap fill, and elephant foot compensation. Adjust widths: first layer (0.45mm), perimeter (0.44mm). Increase external perimeter speed (35mm/s or higher with input Shaper). Set extrusion multiplier: 1.05–1.15 for best flow. Compatible Materials: This technique works with all rigid filaments, so feel free to experiment with different materials to achieve unique results! Updates: 2026.02.19: Updated the description. 2025.03.18: Updated the model description and added a 45 degree rotated model for the Prusa Mini 181mm model. The ending mouse-ear made the model to wide if not rotated. 2024.11.20: Added 256x256mm model for use with Bambu Lab printers (approx. 23m filament). All models now include sizes in their filenames. 2024.03.16: Added Prusa XL model (360x360mm), providing approx. 47m of multi-color filament. 2023.02.22: Added models for various bed sizes (290x290mm and 110x110mm) to give approx. 30m or 3.5m of filament. 2022.04.27: Included optimization tips for PrusaSlicer projects. 2021.12.26: Added files for Prusa Mini (approx. 10m filament) and expanded MKx models (approx. 15m filament). Get creative, experiment with colors, and enjoy this fun technique! >> Download, leave a like, and make my day — thank you!
Originally published on Printables


