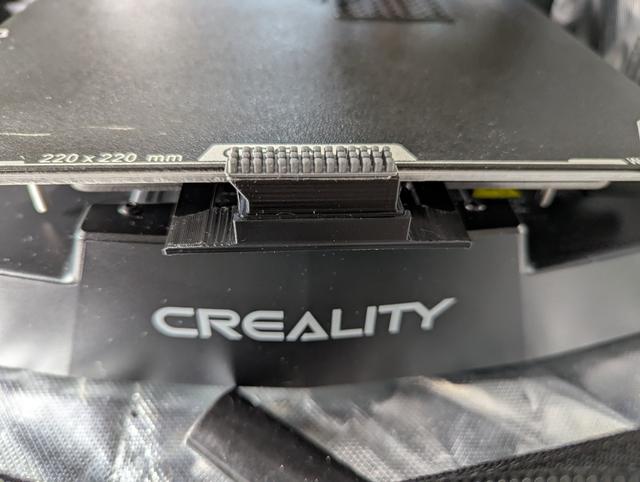
Ender 3 v3 KE SE Nozzle Brush Mount
by DanielCF · via Printables
| Format | STL |
| Category | Art |
| License | CC BY-NC-SA |
| Triangles | 18.2k |
| Uploaded | May 31, 2025 |
⬇ 133 downloads
❤ 33 likes
👁 1.4k views
Description
This model is based on "Ender 3 V3 KE and SE automatic nozzle cleaning brush." by Alehandoro VR VR With inspiration from Dane Reasenberg 's remix. It can be used with a brass brush, as in the original model or with a silicone brush Anollya 's Blobifier - Dropin adapter for Bambu silicone nozzle wiper . If you use the silicone brush adapter be sure to remove it before doing a bed mesh as it can interfere with the hot end Start Gcode: added G82 and G83 on 5/31/25 to fix extrusion for purge lines. SET_GCODE_VARIABLE MACRO=PRINTER_PARAM VARIABLE=fan0_min VALUE=30 ;compensate for fan speed SET_VELOCITY_LIMIT ACCEL_TO_DECEL=2500 ;revert accel_to_decel back to 2500 M220 S100 ;Reset Feedrate M221 S100 ;Reset Flowrate M106 P0 S180; turn on parts fan M140 S[bed_temperature_initial_layer_single] ;Set bed temp M104 S[nozzle_temperature_initial_layer] ;Set nozzle temp G28 X Y Z;Home XYZ axes and turn off bed mesh BED_MESH_PROFILE LOAD=default ;turn on bed mesh. Very important to have this after G28 as G28 disables the bed mesh G1 X-13 Y-15 Z10 F5000.0 ;Move off nozzle off of the bed M190 S[bed_temperature_initial_layer_single] ;Wait for bed temp to stabilize M109 S[nozzle_temperature_initial_layer] ;Wait for nozzle temp to stabilize G1 X87 Z7.4 Y-13.94 F5000.0;Move to Start position. You will have to find the correct Z-value for your nozzle. G1 X133 ;Wipe 1. -> G1 Y-14.94 ;Move to middle G1 X87 ;Wipe 2. <- G1 Y-13.94 ;Move to first groove G1 X133 ;Wipe 3. -> G1 Y-15.94 ;Move to second groove G1 X87 ;Wipe 4. <- G1 Y-13.94 ;Move to first groove G1 X133 ;Wipe 5. -> G1 Y-15.94 ;Move to second groove G1 X87 ;Wipe 6. <- G1 Y-13.94 ;Move to first groove G1 X133 ;Wipe 7. -> G1 Y-14.94 ;Move to middle G1 X87 ;Wipe 8. <- G1 Y-13.94 ;Move to first groove G1 X133 F7500 ;Wipe 9. -> G1 Y-15.94 ;Move to second groove G1 X87 ;Wipe 10. <- G1 Y-13.94 ;Move to first groove G1 X133 ;Wipe 11. -> G1 Y-15.94 ;Move to second groove G1 X87 ;Wipe 12. <- G1 Y-13.94 ;Move to first groove G1 X133 F8000 ;Wipe 13. -> G1 Y-14.94 ;Move to middle G1 X87 ;Wipe 14. <- G1 Y-13.94 ;Move to first groove G1 X133 ;Wipe 15. -> G1 Y-15.94 ;Move to second groove G1 X87 ;Wipe 16. <- G1 Y-13.94 ;Move to first groove G1 X80 Z 12 F5000.0 ;Raise to clear brush M190 S[bed_temperature_initial_layer_single] ;Wait for bed temp to stabilize M109 S[nozzle_temperature_initial_layer] ;Wait for nozzle temp to stabilize G1 X80 Y-20 Z12 F5000.0 ;Move to the side of the bed, extra low to knock off any remaining glop. G1 X-10 Y-20 Z12 F5000.0 ;Move to the side of the bed, extra low to knock off any remaining glop. G1 X-6.0 Y0 Z0 F5000.0 ;Move to the side of the bed, extra low to knock off any remaining glop. G1 X-3.0 Y0 Z0.3 F5000.0 ;Move to start position G92 E0 ;Reset Extruder M83; use relative extrusion G1 Z0.2 ;Lower nozzle to printing height G1 Y80.0 F1500.0 E9 ;Draw the first line G1 X-2.5 F5000.0 ;Move to side a little G1 Y0 F1500.0 E9 ;Draw the second line G1 X-1.5 F5000.0 ;Move to side a little G1 Y80.0 F1500.0 E9 ;Draw the thired line G1 X-1.0 F5000.0 ;Move to side a little G1 Y1 F1500.0 E9 ;Draw the fourth line G1 X0.0 F5000.0 ;Move to side a little G1 Y80.0 F1500.0 E9 ;Draw the fifth line G1 X0.8 F5000.0 ;Move to side a little G1 Y0.0 F1500.0 E9 ;Draw the sixth line M82 ; back to absolute extrusion Here is a link to the silicone brush on Amazon. https://a.co/d/eXtvwkg
Originally published on Printables


