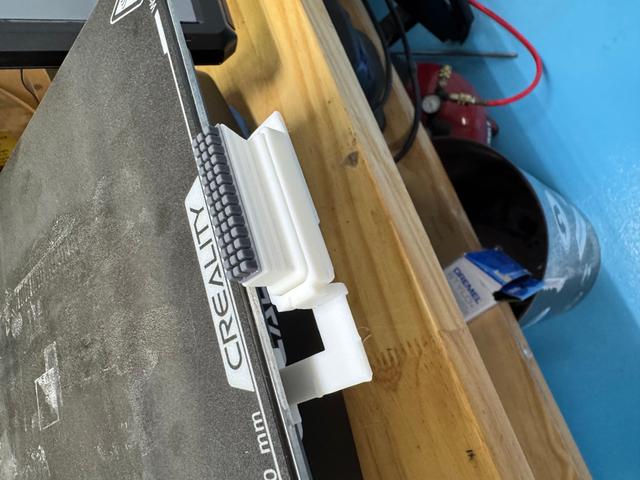
Ender 3 V3 SE/KE Automatic Brush Nozzle Cleaner
by Dane Reasenberg · via Printables
| Format | STL |
| Category | Art |
| License | CC BY-NC-SA |
| Triangles | 6.4k |
| Uploaded | Apr 8, 2025 |
⬇ 191 downloads
❤ 33 likes
👁 1.4k views
Description
This is a fully automatic 3d printed brush holder that can clean your nozzle before every print using custom gcode. I remixed my model from this model: "https://www.printables.com/model/742343-ender-3-v3-ke-and-se-automatic-nozzle-cleaning-bru". Ive changed the original model from my model by adding one extra arm to grab on to the plate. I did this because the original model was wobbly therefore having less nozzle cleaning abilities. Also, to attach the Bambu Labs brush I had in the pictures, I used this model: "https://www.printables.com/model/969575-blobifier-dropin-adapter-for-bambu-silicone-nozzle". Here is the custom gcode I used for the automatic cleaning before every print. You might need to tweak these codes, every printer is different. M220 S100 ;Reset Feedrate M221 S100 ;Reset Flowrate M140 S[bed_temperature_initial_layer_single] ;Set final bed temp G28 ;Home G92 E0 ;Reset Extruder G1 Z2.0 F3000 ;Move Z Axis up M104 S[nozzle_temperature_initial_layer] ;Set final nozzle temp G1 X-2.1 Y20 Z0.28 F5000.0 ;Move to start position G1 X103 Y-18 Z5 F5000.0 ;Line up with brush M190 S[bed_temperature_initial_layer_single] ;Wait for bed temp to stabilize M109 S[nozzle_temperature_initial_layer] ;Wait for nozzle temp to stabilize M300 S1000 P200 ;First beep M300 S0 P200 ;Wait M300 S1200 P200 ;Second beep G1 X150 Y-18 Z5 F5000.0 ;Wipe 1; -> G1 X105 Y-18 Z5 F5000.0 ;Wipe 2; <- G1 X150 Y-18 Z5 F5000.0 ;Wipe 3; -> G1 X105 Y-18 Z5 F5000.0 ;Wipe 4; <- G1 X150 Y-18 Z5 F5000 ;Wipe 5; -> G1 X105 Y-18 Z5 F5000.0 ;Wipe 6; <- G1 X150 Y-18 Z5 F5000.0 ;Wipe 7; -> G1 X105 Y-18 Z5 F5000.0 ;Wipe 8; <- G1 X150 Y-18 Z5 F7500.0 ;Wipe 9; -> G1 X105 Y-18 Z5 F7500.0 ;Wipe 10; <- G1 X150 Y-18 Z5 F7500.0 ;Wipe 11; -> G1 X105 Y-18 Z5 F7500.0 ;Wipe 12; <- G1 X150 Y-18 Z5 F7500 ;Wipe 13; -> G1 X105 Y-18 Z5 F7500.0 ;Wipe 14; <- G1 X150 Y-18 Z5 F7500.0 ;Wipe 15; -> G1 X105 Y-18 Z5 F7500.0 ;Wipe 16; <- G1 X105 Y-18 Z8 F5000.0 ;Raise to clear brush M190 S[bed_temperature_initial_layer_single] ;Wait for bed temp to stabilize M109 S[nozzle_temperature_initial_layer] ;Wait for nozzle temp to stabilize G1 X-2.1 Y20 Z0.28 F5000.0 ;Move to start position G1 X-2.1 Y145.0 Z0.28 F1500.0 E15 ;Draw the first line G1 X-2.4 Y145.0 Z0.28 F5000.0 ;Move to side a little G1 X-2.4 Y20 Z0.28 F1500.0 E30 ;Draw the second line G92 E0 ;Reset Extruder G1 E-1.0000 F1800 ;Retract a bit G1 Z2.0 F3000 ;Move Z Axis up G1 E0.0000 F1800 I would recommend printing with PETG. It would probably be ok to use PLA too. For extra strength, use these settings. 4 walls 75% infill Gyroid Infill .20mm layer height (Link for the brush) https://www.amazon.com/YUYUEMI-A1-Silicone-Brush-Accessories/dp/B0DDQ18RRS/ref=asc_df_B0DDQ18RRS?mcid=364e1a5e3c5b3717a03fe6554ce02841&hvocijid=7190179279430547127-B0DDQ18RRS-&hvexpln=73&tag=hyprod-20&linkCode=df0&hvadid=721245378154&hvpos=&hvnetw=g&hvrand=7190179279430547127&hvpone=&hvptwo=&hvqmt=&hvdev=c&hvdvcmdl=&hvlocint=&hvlocphy=9032432&hvtargid=pla-2281435175938&th=1
Originally published on Printables


