EuroGrid – Merge Gridfinity & Euroboxes for Next-Level Storage
by Marcello · via Printables
| Format | STL |
| Category | Organisation |
| License | CC BY-NC-SA |
| Triangles | 4.3k |
| Uploaded | Mar 11, 2026 |
⬇ 26 downloads
❤ 35 likes
👁 1.6k views
Description
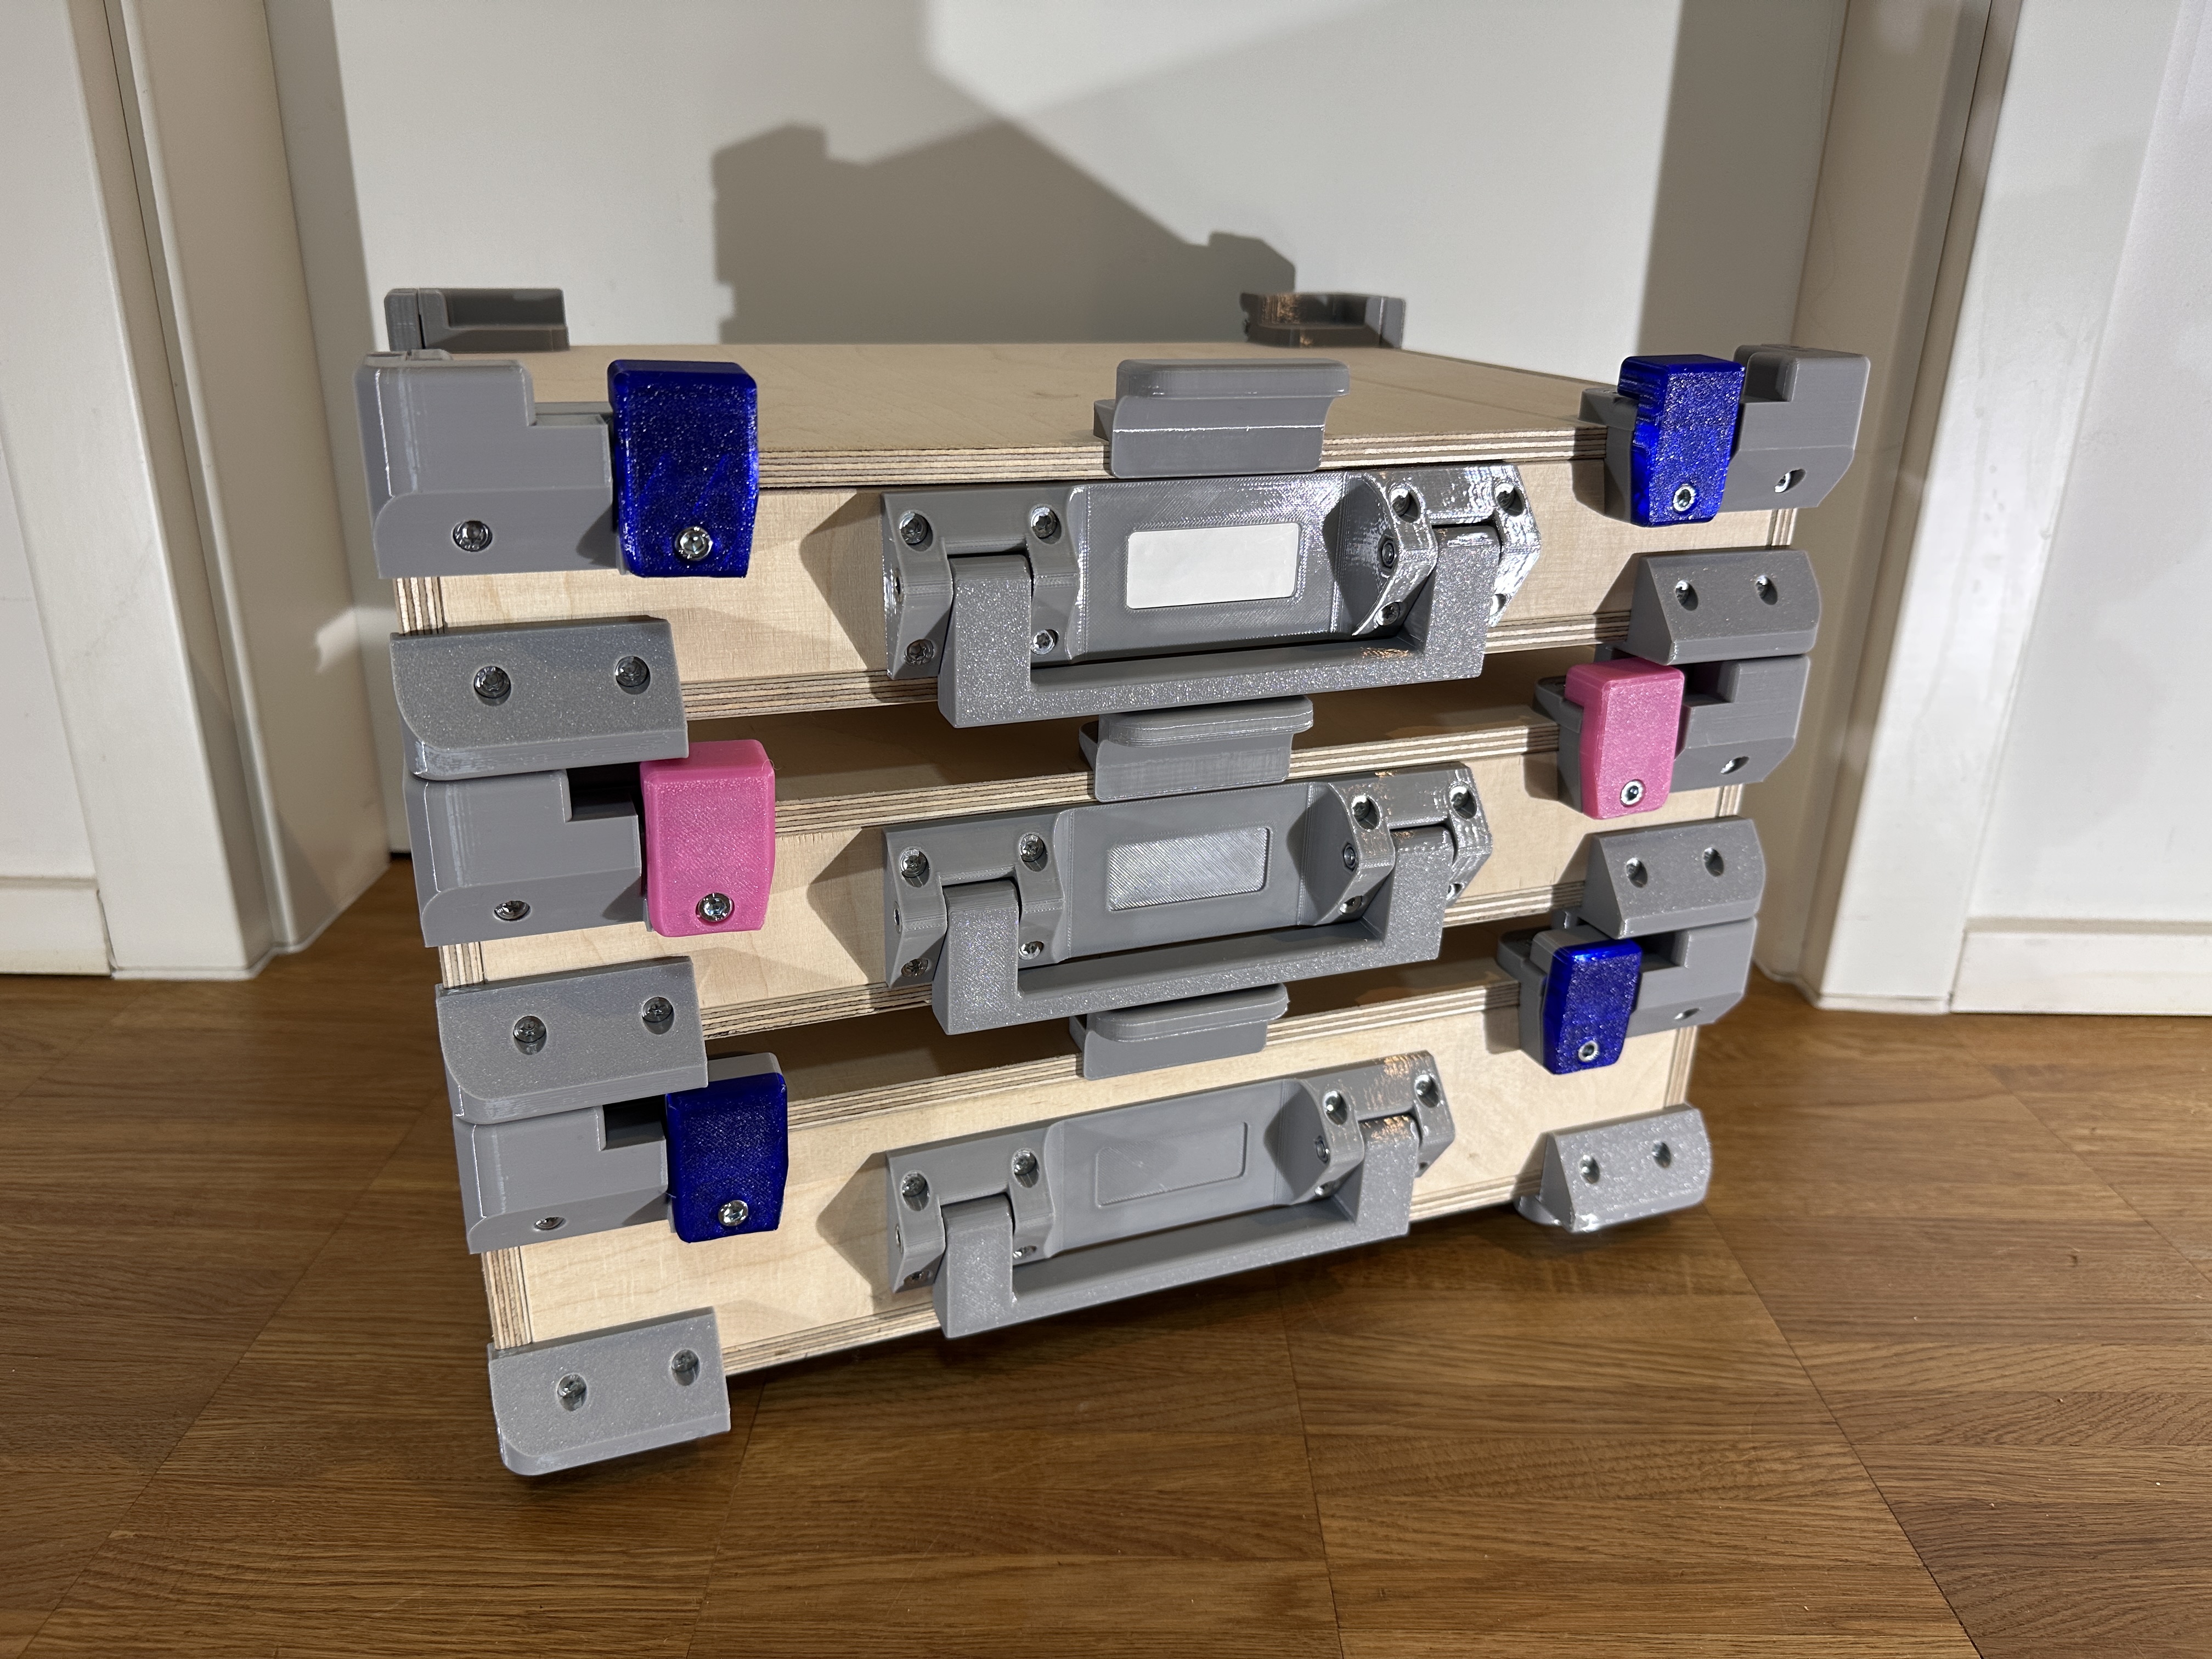
I was looking for a practical sorting solution for my small parts. I have been using Gridfinity for quite some time, as well as Euroboxes, which have proven themselves in my everyday work. I found adapter solutions between Gridfinity and Makpac or Sortimo interesting, but they usually don't make efficient use of the floor space – and the cases themselves are also quite expensive. Fully printed boxes, such as those available on Printables, are often rather small and require a lot of printing time and material. Alex Chappell's box inspired me greatly: I liked the concept, but it is not Gridfinity-compatible and a few design decisions did not meet my requirements. So I started to develop my own design. The goal was to connect Gridfinity and Euroboxes directly, keep the 3D-printed parts as simple as possible, and combine them with standard materials from the hardware store. This keeps costs and printing time low, while making replacement parts easy to obtain at any time. I deliberately avoided using purchased hinges to ensure the long-term and worldwide availability of the components. I consider fully printed hinges to be less robust in the long run, so I use standard screws as axles. After about ten major and minor iterations , I am satisfied enough to make the project available here. key features: Stackable with 400×300 mm Euroboxes Robust construction, yet individual parts can be quickly replaced - even for later design upgrades Relatively short printing time and moderate material usage Asymmetrical handle: compact when folded, easy to grip when unfolded, with lock in folded position Label area on the handle (50 × 20 mm) The parts can also be used for other box dimensions – completely independently of Gridfinity – and remain stackable as long as 9 mm sheet material (e.g., multiplex or acrylic) is used; other material thicknesses are also possible with certain restrictions. Print suggestions I have printed all parts with 3 layers of wall and 15% infill in Standard PETG. Untill now everything worked fine. Recommended printing orientation: # instruction piece Surface to the printplate P1 Front bottom on the slanted plane P2 Back bottom on the slanted plane P3 Back top Standing / like it’s mounted later P4 back lid On the mounting surface P5 Front top Standing / like it’s mounted later P6 Front lid On the mounting surface P7 Bush Standing P8 Lever On the front P9 Handle Lying on the bigger side P10 Latch On the side P11 Handle support On eht mounting surface Maybe i will make a pre-arranged print plate for the parts. Additional parts # instruction amount Fasteners S1 46 4x16 Countersunk head chipboard screw S2 6 M5 Locking Nuts S3 4 M5x45 cylinder bolts S4 2 M5x10 cylinder bolts 9mm Plywood W1 1 396x270 mm 9mm Plywood W2 2 55x270 mm* W3 2 46x378 mm* W4 1 270x378 mm * The underlined values are those that need to be adjusted in order to build the box at a different U height. +7 mm for +1 U. Minumum height with handle is 6U (like with my values), if you decide not to install the handle it‘s 5U. My heigth values are for a 9x6 Gridfinity Baseplate in ‚thin‘ Style generated by the Generator: https://gridfinity.perplexinglabs.com/pr/gridfinity-rebuilt/0/1 Recommended Tools # Instruction tools T1 cordless screwdriver with torque adjustment (Bosch 12V) T2 Long Bits T20 T3 Allan Key 4mm T4 ratchet with 8mm socket T5 Drill ~3-4 mm T6 Small water pump pliers (Knipex Cobra) T7 1 or 2 Small screw clamp ~150 mm* T8 Big screw clamp ~500 mm *Instead of the screw clamp, a helping 3rd hand could also work. Building instruction Cutting will not be discussed further. Precise cuts are important! I recommend doing all wood finishing before assembly, including sanding, routing a small chamfer on every edge, and applying paint or varnish. In my example, I only routed a small chamfer on all edges and then sanded everything with fine sandpaper. The correct torque setting for the powerdrill ideally be checked on a scrap piece of wood: it should be tightened to the point where the wood on the back does not splinter or break through. It is better to use a slightly lower setting and then complete the final turn with a hand tool (this is also enough after completing the entire assembly) I have numbered the tools used and new added components per step (LEGO principle). Step 1 P9, P11, S3, S2, T6, T3 Put in the 2 nuts, use the pliers i fit doesn’t comes in easy Position the handle Screw both screws in Step 2 P3, P4, S3, S2, T3, T4 Position both printed parts together. Push in the screw, some force is needed Screw it together with Allan key and ratchet Repeat for the other side Step 3 P5, S2, T6 Put in the nuts into the 6 edge hole, maybe the plier is needed. I fit doesn’t goes in screw a long M5 screw through the hole and pull the nut into the part Repeat for other side Step 4 P7, S4, T3, T6 Screw the bush onto the screw, until the end Repeat a second time Step 5 W1, P1, P2, S1, T1, T7 Mount the 4 bottum parts onto the biggest plate Use the clamb for fixation Put the parts really close onto the edge, without a spacing Step 6 W2, W3, S1, T1, T7 Postion the 4 longitudinal wood pieces on tot he big woodplate clamp down the piece you screw in screw Step 7 W4, P3, S1, T1 Position the Wood lid Position the hinge assambly Put it onto the right side oft the assambly (with the 10mm overhang) Look for equal spacings in the hinge Use clamb for fixation Screw Repeat for other side Step 8 W4, S1, T1 Look out that the upper hinge part is positioned straight and that the lid is aligned on the rest oft he box Screw don’t screw in the upper screws yet Repeat for other side Step 9 P5, S1, T1, T7 Position Front top look out that it is postioned straight to the lower printed parts and that the overhang on the inner side should align tot he upper cut oft he wood fix with clamp screw don’t screw in the upper screws yet Repeat for other side Step 10 P6, S1, T1, T7 Postion front lid direct on the edge oft he lid Fix Screw Repeat for other side Step 11 S1, T1, T5, T8 Use the big clambs with just a little force, to put the pieces a bit together, so you can tilt down play Drill in the screw holes (the only screw you have to predrill) otherwise the plywood delamintes Screw Repeat for other side Step 12 P10, T3 Mount the latch onto the box It’s constructed so you can setup the force over the screw, even with low force it won’t fall of After some time it grinds in and losens a bit, so you can tighten the screw it later Repeat for other side Step 13 P11, S1, T1, T7 Postion the handle in the middle of the front part If you use 6U height, it should align tot he upper Wood face when the lid is opend Fix screw If some of you have problems postioning, i will construct a template Step 14 P10, S1, T1 Postion the latch in the middle of the lid – sense of proportion worked for me Fix Screw Your are done with your build! Possible later improvements and updates Interlocking system for multiple boxes still have no idea how Second Handle on the lid Additional levers for other tolerances Optimized construction for other Eurobox Sizes (600x400 mm & 300x200 mm) – maybe with other material thicknesses oft he wood and so that it still equals out with gridfinity system Some parts could be improved for printablity Print-ready plates Additional part ‚mirrored‘ to the latch, so that you can stack half sized boxes onto the box Thanks for checking out my model! I’d love to hear your ideas and feedback. I put a lot of care into the whole creation process and tried to make everything as clear and easy to reproduce as possible, so you can get great results right away.
AI Analysis: This is a multi-tiered storage unit designed for organizing items. It features a sturdy structure with multiple compartments and handles for easy movement. The unit is constructed from a combination of materials, including a light wood base and metal components, making it both durable and visually appealing. Notable features include the adjustable compartments and the secure locking mechanisms that allow for secure storage of various items.
Originally published on Printables