European Christmas "Pyramid" Nativity Scene
by Ghostrider · via Printables
| Format | STL |
| Category | Home |
| License | CC BY-NC-SA |
| Triangles | 8.6k |
| Uploaded | May 20, 2024 |
⬇ 258 downloads
❤ 62 likes
👁 2.0k views
Description
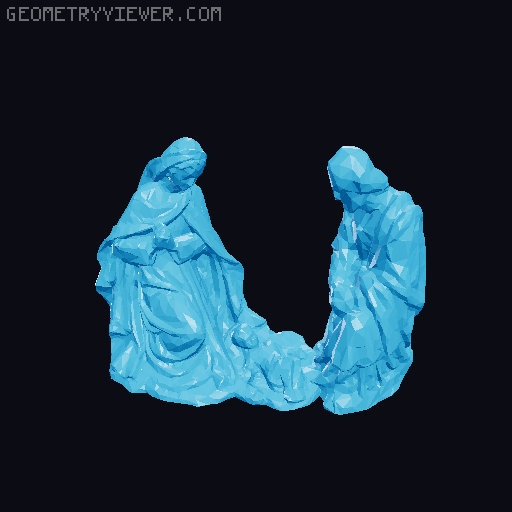
Growing up in Europe, my family always had one of these in our home. Its about time I made one with my printer. This Pyramid can be printed on any printer with a build volume of 210 x 210 x 210 or more. I am currently working on a downsized version that can be printed on smaller printers like the Mini+. All you need to make this are work are 4 Candles! When they are lit, the hot air rises and pushes the fan blades away, turning the platform. At the time I printed this, I only had white filament, but the parts are printed separately so they can be printed in different colors. Included above are some representations of a multi-colored version. Here is the Tinkercad project: https://www.tinkercad.com/things/huZdyAjT7wP Construction: Before assembly, please keep in mind that some components in this design might not fit if they are affected by severe elephant's foot, inconsistent extrusion, and bulging at the corners. Everything is designed to fit smoothly, so if some components don't want to fit, try shaving or sanding the problematic areas. Base Assembly: The “Base Bottom” And “Base Middle” should snap right together. The “Base Top v3” should fit right on to that. Next, Snap the “Wall v3” on to the base. Make sure that everything is tightly fit into place. Now glue the candle holders into place (refer to photos). The Once the base has been assembled, you can either use the included bearing or a standard 608 bearing, which I recommend. Place the bearing in the hole on the “Base Top v3” piece. If you decide to use the printed bearing, the “Lower Shaft” fits right in. The hole in the shaft should be on top. If using a standard bearing, you will need to shave down the edges to make it fit. Place the shaft into the bearing, then place the “Spacer v4” on to the shaft, and shove it all the way down to the bearing. Then place the rotating base on top of that. The spacer should elevate the rotating base above the regular base. Roof Assembly: Fit the “Roof Middle v2" into the ”Roof v6". On the “Roof Middle v2” MAKE SURE THAT THE SIDE CLOSEST TO THE HOLE goes into “Roof v6” first! Refer to photos for details. Before this next step, make sure you can see through the shaft hole in the roof. If not, then you placed the “Roof Middle v2” in reversed. Final Assembly: Fit the completed Roof over the “Lower shaft" and on to the completed base. It will need a bit of glue where it lines up with the notches on the wall (refer to the photos). Now fit the 10 fan blades into the ”Fan Blades Mount" and glue that on to the “Upper Shaft”. then put some glue on the bottom of the “Upper Shaft”, slide it through the roof, and glue it into the hole on the top of the “Lower Shaft”. When the glue dries, you should be able to spin the fan blades and it simultaneously spins the rotating base. if not, check the joints to make sure there is nothing inhibiting the movement. Lastly, glue the figures on to the Roof and Rotating Base. The Star should be glued on to the “Roof Middle v2”, Jesus, Mary and Joseph on to the platform hanging from the roof, and the sheep/shepherd/magi/camel on to the rotating base. Make sure that the base still spins freely once the figures are glued on. Finally, take some small candles, fit them into the holders (if a bit small, then dribble some wax in to hold it in place), light them and watch this beautiful piece do its magic. Depending on how angled the Blades are, it allows them to catch more or less heat from the candles. If it moves too fast, then angle the blades a bit more. if it spins too slow, then angle them less. Several Components of this model are remixes from Thingiverse: The Magi and animals, as well as Jesus, Mary and Joseph by lucapinello https://www.thingiverse.com/thing:604609 The shepherd boy by makerwiz https://www.thingiverse.com/thing:966695
Originally published on Printables


