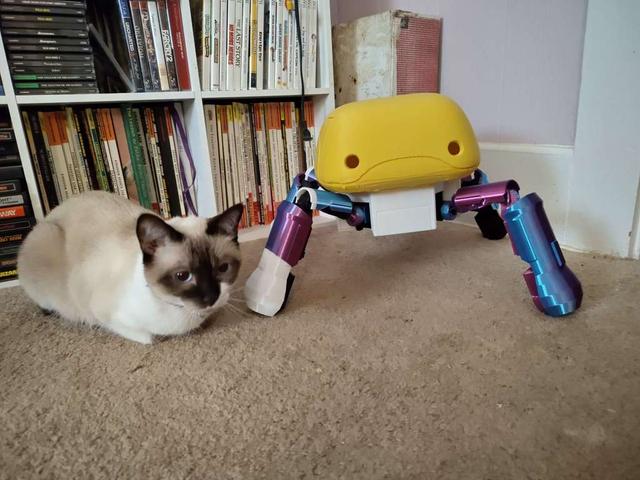
Flycatcher bot from Apocalypse Hotel - Life size
by ElLosteaux · via Printables
| Format | STL |
| Category | Art |
| License | CC BY-SA |
| Triangles | 186.9k |
| Uploaded | May 17, 2025 |
⬇ 15 downloads
❤ 5 likes
👁 114 views
Description
A approximately full scale replica of the Flycatcher robot from the anime series Apocalypse Hotel. Features: Legs are posable - Knee joints have interlocking gear teeth to maintain position and the hips are adjustable tension ball joints Hollow design - For those who want to add lights to the eyes or the RECEPTION feature from the show Fairly simple assembly - Only non printed part is glue to attach the ball joint balls to the hips. Largest part can be printed in one go on a 300x300 build plate, smaller printers will need to use a slicer to cut it up. Parts list: X1 Body - 3+ walls is a good idea here as everything sockets into this part, no support needed (Black is closest to screen accurate) X4 BallJointScrew - Ring nuts to assemble the hip joints, these must be installed when you glue in the hip ball joint to the thigh (Black is closest to screen accurate) X1 Head - Largest part, recommend printing at an angle with supports, OrcaSlicer auto orient worked just fine for this (Yellow is closest to screen accurate) X4 Hip attach - 3+ walls a good idea here, print with cup part upright, no support needed (Black is closest to screen accurate) x4 HipBallJoint - 3+ wallls since this is going to support the majority of the object's weight. Print flat side down, no supports needed (Black is closest to screen accurate) X4 Knee Pin - 3+ walls. Print larger flat side down, install this BEFORE the leg armor parts as they will block access (Black is closest to screen accurate) X4 Shin - supports needed and let the slicer auto orient (Black is closest to screen accurate) x4 Shin guard - friction fit or you can glue them in place once you have fully assembled the robot (Yellow is closest to screen accurate) X1 Side Boxes - not structural, you can get away with 2 walls here (White is closest to screen accurate) x4 Thigh - supports needed, let slicer auto orient (Black is closest to screen accurate) x4 Thigh guard - (Yellow is closest to screen accurate) Assembly notes: DO NOT GLUE THE BALL JOINT BALLS INTO PLACE WITHOUT FIRST PUTTING ON THE RING SCREWS FOR THE BALL JOINT. If you do this out of order the legs will not attach and you will have to re print 2 parts (ball joint and hip) Ball joints are slightly altered from https://www.thingiverse.com/thing:4739696 Category: Interactive Art
Originally published on Printables


