GOEWS 10 inch rack
by jfunk · via Printables
| Format | STL |
| Category | Organisation |
| License | CC BY |
| Uploaded | Mar 28, 2026 |
⬇ 25 downloads
❤ 8 likes
👁 288 views
Description
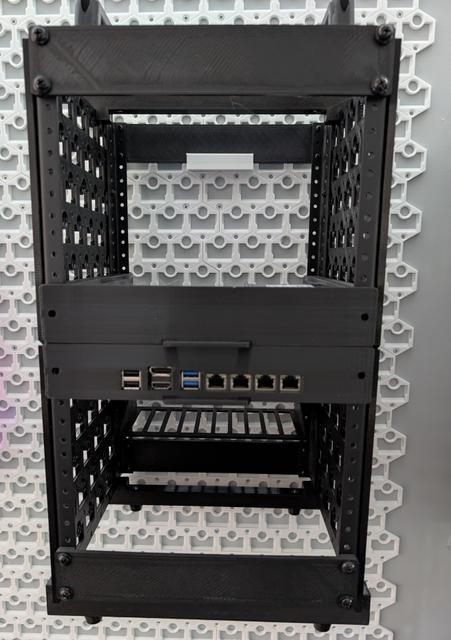
This is a 10-inch rack using GOEWS tiles as the side panels, providing good rigidity while allowing for GOEWS accessories to be mounted. Accessories can be used for storage, cable management, and even attachment of devices such as switches and power supplies. Variants Normal GOEWS and “thicker cleats” variants are provided. The “thicker cleats” use less material but are incompatible with standard GOEWS accessories. However, accessories for both variants can be built at https://goews.funktronics.ca/ Both standard and extended depths are also provided. The standard depth is about the same as the original 10-inch rack depth while extended allows for more depth, enough to fit most GPUs. What to print Print 2 each of your desired top and bottom tiles. You also need to print 4 crossbars but you should measure the true width of your side rails first. The standard width is 15.875mm but most rails will be wider due to the way they are made. The ones I got from Amazon were 17.5 and I suspect most of them will be closer to this. If you have a different width, you can set the side_rail_width parameter in crossbar.scad or let me know and I will create a variant. If you want handles, print 2 of them. I also recommend printing at least 2 and ideally 4 of the assembly guides. They are simply thick blanks designed to lock everything together so that they match the official 10 inch rack hole-to-hole width. They can also be left in place to keep the whole thing more rigid. Requirements Rails This should work with a pair of any rack rail set. I used 2 sets of “Reliable Hardware Company RH-10-SRR-A 10U” from https://www.amazon.ca/dp/B00JQYVGEA Rail and crossbar fasteners To attach the rails and crossbars to the sides you will need: 16 M4x12 flat head cap screws 8 M4x30 socket head cap screws 24 M4 hex nuts Rail sides almost always have holes that match the standard rack hole spacing. As you lay the sides down and put the rails on them you will see 2 holes on each side that will line up. There will be a small gap between the top and bottom tiles. Crossbars are attached to the top and bottom mounting holes of the tiles. For the bottom ones use the outermost holes. For the top make sure there are 2 empty holes between them for proper spacing of the handles. Handles If you want to add the top handles you will need: 4 M5x30 socket head cap screws 4 M5 hex nuts Handles are attached to the top crossbars. Feet If you want to add feet you will need: 4 M5x30 socket head cap screws 4 M5 hex nuts 4 feet with a 5-6mm hole Feet are attached to the bottom crossbars. Customizing The sides were built using https://goews.funktronics.ca/ and can be customized if you want a different height. Here are the settings used to build these tiles: Common options Fill left Fill right Exact width Mounting hole shank diameter: 4.2 Mounting hole head diameter: 7.75 Mounting hole countersink depth: 3 side-top-standard-depth Columns: 6 Rows: 6 Fill top Variant: Original version side-bottom-standard-depth Columns: 6 Rows: 6 Fill bottom Variant: Original version side-top-extended-depth Columns: 7 Rows: 6 Fill top Variant: Original version side-bottom-extended-depth Columns: 7 Rows: 6 Fill bottom Variant: Original version side-top-standard-depth-thicker-cleats Columns: 6 Rows: 6 Fill top Variant: Thicker cleats side-bottom-standard-depth-thicker-cleats Columns: 6 Rows: 6 Fill bottom Variant: Thicker cleats side-top-extended-depth-thicker-cleats Columns: 7 Rows: 6 Fill top Variant: Thicker cleats side-bottom-extended-depth-thicker-cleats Columns: 7 Rows: 6 Fill bottom Variant: Thicker cleats To adjust the height choose different numbers of rows for the top and/or the bottom. For example, for 12U you only need one additional row. That can be added to the top or the bottom. Changelog Mar 28 2026 Adjusted crossbar make it easier to get a correct alignment Added assembly guide to make it easier to lock in place with the correct width
Originally published on Printables