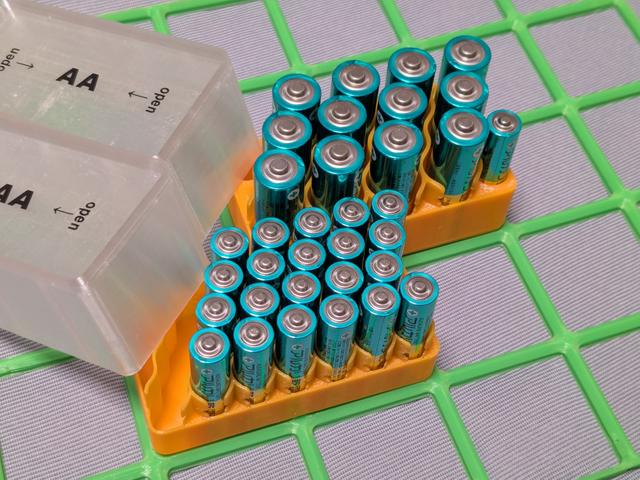
Gridfinity 2x1 Battery Bin 12 AA or 26 AAA with Lids (optional)
by osamutake · via Printables
| Format | STL |
| Category | Organisation |
| License | CC BY-SA |
| Triangles | 110.9k |
| Uploaded | Aug 6, 2025 |
⬇ 145 downloads
❤ 28 likes
👁 543 views
Description
2x1 Grid Battery Bins Gridfinity refined compatible. 12 AA ( + 2 AAA) or 26 AAA can be stored on 2x1 grid. The AA bin has bonus 2 AAA slots. Optional lids are provided. They are best printed with transparent filament. Then, you can count how many batteries remaining from the outside. 📷 Image redacted — claim this model to add your own media 📷 Image redacted — claim this model to add your own media 📷 Image redacted — claim this model to add your own media 📷 Image redacted — claim this model to add your own media With the lids, AA bin is 2x1x9u or 2x1x10u and AAA bin is 2x1x8u or 2x1x9u. Shorter and taller versions of lids are provided to be aligned with other bins. You can stack any gridfinity bins on them. 📷 Image redacted — claim this model to add your own media Of course, without the lids, the bins are still useful with their very high packing density. They are also of some functional beauty with the wavy design, aren't they? 📷 Image redacted — claim this model to add your own media Printing No difficulty for printing bins. Any PLA or PETG. 0.2mm layer height with 0.4mm nozzle. Printing opaque lids is also easy. The lid is modeled split into two parts to be printable without support. Though the side wall of the lid has a small footprint, I did not need brims for it. Use brims if you have any issues on the bed adhesion. 📷 Image redacted — claim this model to add your own media 📷 Image redacted — claim this model to add your own media 📷 Image redacted — claim this model to add your own media Printing “Transparent” Lids Printing transparent lids is a little tricky. First, I learned many things from the interesting article “How To Print Glass” by Rygar1432 . I understood that, to have clear transparency, we need to have smooth surface and to avoid including air in the printed materials. After number of trials, I created the following instruction. My printer: QIDI Plus4 Tested filament: CC3D transparent PETG Dry the filament before printing especially for PETG. Roughness of the base plate surface affects the result. The smooth PEI plate makes the lid top look like foggy glass. The powder PEI plate makes the lid top look like obscure glass. 📷 Image redacted — claim this model to add your own media 📷 Image redacted — claim this model to add your own media Increase nozzle temperature in the "Filament Settings". For example, I used 265degC or 270degC for CC3D Clear PETG. 📷 Image redacted — claim this model to add your own media Increase "Flow ratio" to 1.01 ~ 1.04 in the “Filament Settings”. 📷 Image redacted — claim this model to add your own media Do not forget to increase flow ratio for top surface and initial layer independently in the "Quality" section of "Process Settings". 📷 Image redacted — claim this model to add your own media Turn off the nozzle fan. For the purpose, it seems easiest to set large number to “No cooling for the first xxx layers” in “Cooling” section in “Filament Settings”. 📷 Image redacted — claim this model to add your own media Printing speed 50mm/s was slow enough to have so-so transparency, except for the initial layer. So, I set 10mm/s only for the initial layer and 50mm/s for others. Printing the whole model at 10mm/s is too much time consuming… 📷 Image redacted — claim this model to add your own media For this design, we need wall loops to print the side wall smoothly. 📷 Image redacted — claim this model to add your own media In order not to have infill pattern visible, set sparse infill density 100%. In order to have no air bubbles contained in the infill, all the infill lines should be parallel. So, select “Aligned Rectilinear” for sparse infill pattern and set infill direction to 0 deg to make them aligned to the walls. 📷 Image redacted — claim this model to add your own media It was also effective to print infill before the wall loops to decrease bubbles. But somehow, this does not affect the initial layer. Why? Fmm, ok, it's not infill… 📷 Image redacted — claim this model to add your own media Reducing layer height from 0.2mm did not affect much, compared to the increase in printing time. 📷 Image redacted — claim this model to add your own media Ironing affects. It seems better to have the ironing direction parallel to the infill direction. 📷 Image redacted — claim this model to add your own media For ironing, we need at least one top surface, but we must avoid alternating infill direction. So, set top shell thickness 0 and select “Aligned Rectilinear” for top surface as same as the sparse infill pattern. We do not need bottom shell. 📷 Image redacted — claim this model to add your own media To have the inner seam and outer seam at the same position, set the "Seam position" to “Back” and slightly rotate the whole model. 📷 Image redacted — claim this model to add your own media 📷 Image redacted — claim this model to add your own media 📷 Image redacted — claim this model to add your own media That's it. Ugh… Well, even with these settings, they will not be clear transparent. The clarity of the top ceiling could be improved with tweaking filament condition, printing speed and ironing conditions. I doubt that we could have any nicer transparency for the side walls due to its thin thickness. But anyway, at least, I can count how many batteries are in the bin without opening them. So, it's fine. 📷 Image redacted — claim this model to add your own media Deburring Because of the high printing temperature to have transparency, often, the bottom part of the side wall of the lid suffers from elephant foot. Apply deburring tool when you do not feel opening/closing the lid smooth. 📷 Image redacted — claim this model to add your own media Assembly A lid is printed as two parts. Press fit them to have a lid. They will not break apart unintentionally after assembly. 📷 Image redacted — claim this model to add your own media Usage The lid is easily open when pressed in the longitudinal direction. On the other hand, they will not open when pressed in the crosswise direction. You can pick up a bin with full of batteries by catching it in the cross wise direction. 📷 Image redacted — claim this model to add your own media Updates 2025-08-06 Added taller lid for AAA bin. Renamed lid side parts to clarify their height. 2025-08-05 Filled out the not-easily-cleanable holes on the bins to avoid dust stimulates in them. Slightly thickened the fins at the both ends of AAA bin to make them robust. Added two holes on the AA bin to store two additional AAA batteries there. 2025-08-02 Revised the instruction for printing transparent lids. Added chamfers to the bottom edge of the reinforcing stems to make deburring easier. 2025-08-01 Added short lid for AA bin. Happy printing!
Originally published on Printables