Hadley Mount with Build-In Azimuth rotation
by Redlow · via Printables
| Format | STL |
| Category | Mechanical |
| License | CC BY-NC-SA |
| Triangles | 69.4k |
| Uploaded | Apr 26, 2025 |
⬇ 47 downloads
❤ 6 likes
👁 643 views
Description
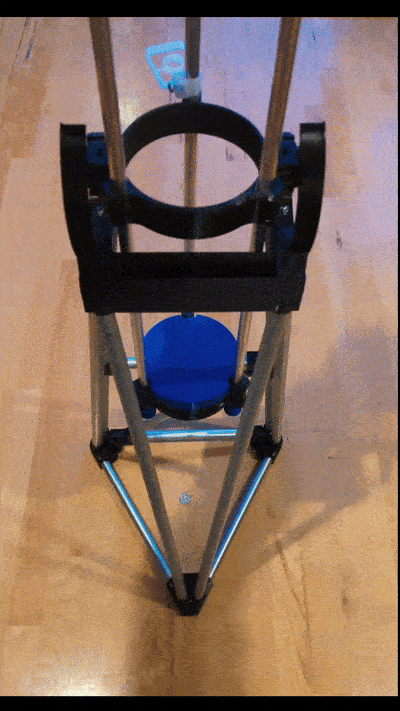
This telescope mount has an integrated Azimuth rotation. 📷 Image redacted — claim this model to add your own media The design is a remix of my prior remix ( Z-Brace - a stiffer Hill Mount for the Hadley Telescope ). It adds Azimuth rotation with only a few extra parts. The new mount design has three wheels oriented to create a virtual center of rotation. The mount holds it's center well, even when pushing the telescope near the end. I tried it with a 9 mm eyepiece and it is rock solid; Jupiter & four visible moons were super sharp and wobble free. It was easy to track them across the night sky with a light touch :-) Note: the base parts still have holes (like the original) to support other mounting options. Instructions note These instructions are in addition to the Z-Brace remix and the Hill Mount for Hadley . Additional parts 3x 608 Bearings (see below for an alternative without bearings) 3x #8 x 1 inch Machine Screws Printing instructions For modifying an existing remixed Hill Mount: Print the Base parts (Front, Left, Right) as before; PLA in default settings works well. Print 3 Bearing Centers in PLA Print 3 Bearing Tires in FLEX (I used Overture TPU). Makes sure to use Scarf Joints with Random orientation for a smooth rolling action (requires PrusaSlicer 2.9) Alternative without Ball Bearings: print the Hard Wheel in PLA or PETG. It rolls pretty well, bit less grip on the rolling surface. Note: no supports needed on any part. For a newly built telescope mount: Print the three Base parts as well as the Bearing parts (3x) from this Remix Print the two Middle parts from Z-Brace remix (see printing parts) Print the Top Part from Hill Mount for Hadley . Cut the EMT tubes per prior instructions: 6x 30 inches 3x 12 inches 1x 14 ⅓ inches 1x 9 ⅔ inches Assembly instructions Stretch the tire over the 608 bearing and insert the Bearing Center Position the wheel in the slot in the Base part (it is a tight fit) Push the machine screw in; the end of the screw hole is purposely narrow for a light screw-in fit. Put the new Base parts on your Hill Mount. Use instructions Place the mount on a smooth surface (such as a deck or a wooden floor) for a smooth action. For a rougher surface such as a deck with grit, slats, boards or a grooved surface: Print four Track parts (inspired by Brio tracks) Glue them together using a flat support surface for a good flat joint; super glue works well. Sand the rolling surface in the joints a bit if necessary to even out a small step. 📷 Image redacted — claim this model to add your own media Use a small board on uneven surfaces or grass. (approx. 20 x 20 inches). Roll away! Creator's Note Hadley is fun a thing to design for, check out my other designs in Redlow's Hadley Add-Ons Collection Change Log Jan 24, 2025: added the Track part, updated the Base parts to make the wheel visible (makes it easier to place it into the track in low light conditions)
AI Analysis: This object is a mechanical mount designed for telescopes, featuring a robust frame with adjustable components. It includes a blue circular base and a black ring structure that allows for precise alignment and rotation. The mount is intended for astronomical observations, providing stability and accuracy for viewing celestial objects. Notable features include its adjustable azimuth mechanism and the sturdy construction of the frame.
Originally published on Printables


