Heltec V3 Case H1 Minimal + Extra space for screen
by Aveygo · via Printables
| Format | STL |
| Category | Electronics |
| License | CC BY-NC-SA |
| Triangles | 84.4k |
| Uploaded | Jun 2, 2024 |
⬇ 581 downloads
❤ 71 likes
👁 3.6k views
Description
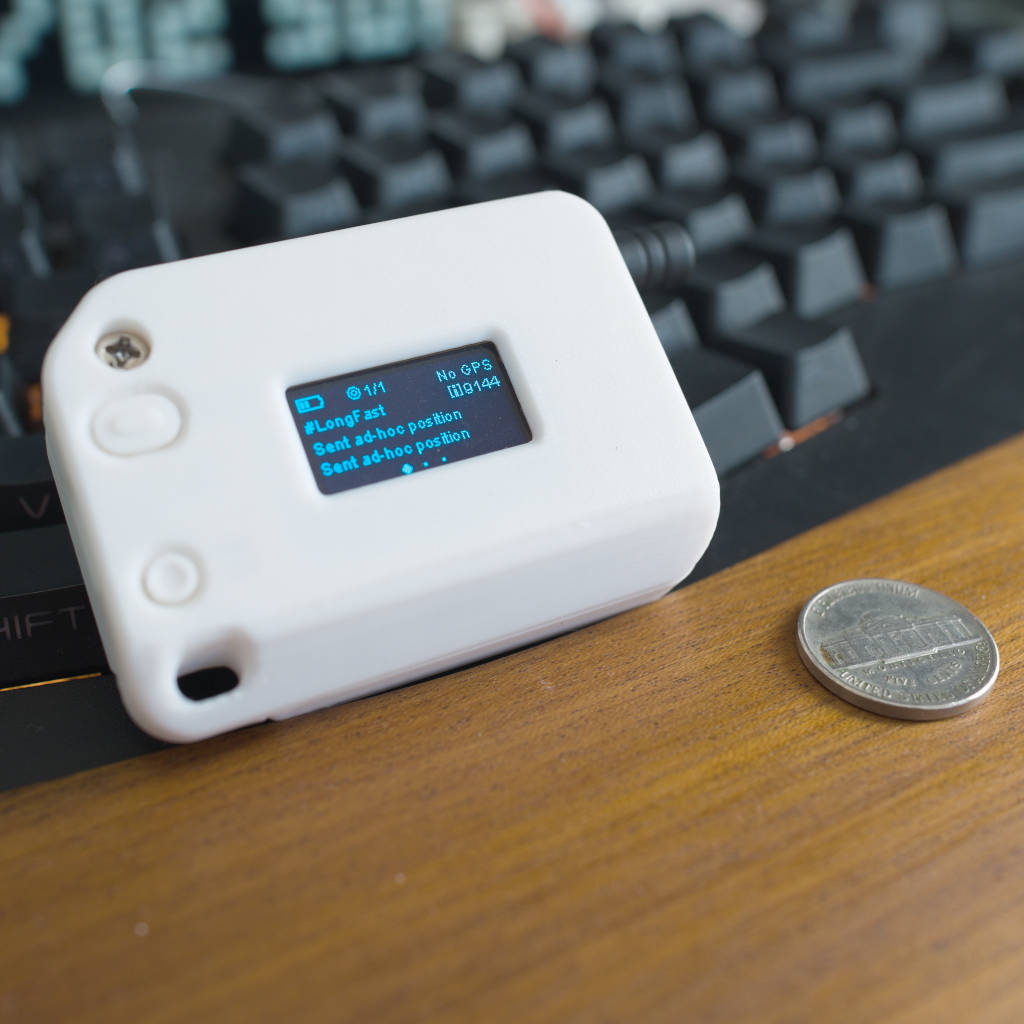
Remixed from V1.1.1 Original design is epic - but the weird grip on the side and all the text felt really distracting for such a small case. Updated 2024/04/17 to add space for the screen - should help prevent cracking but no guarantees - I didn't have this problem, but I can see how it might happen with poor print tolerances. Also moved the led holes closer to the surface, now only 2 layers thick rather than 7 to allow for more light to pass through. All credits to the original creator, glad to see that the copyright strikes were finally sorted out! Original Source Model https://www.printables.com/model/741974-h1-case-for-heltec-v3-running-meshtastic Guide You'll need: Print Files I printed with 0.12mm layer height, 20% infill, 3 walls, and with support. 1x H1_Front.stl 1x H1_Back.stl (or H1_Back_(Deep).stl for a thicker battery) 1x H1_Buttons.stl Hardware 1x Heltec V3 1x M3x12mm screw 1x SMA Pigtail + SMA antenna 1x Lithium Ion battery, at most 8mm x 30mm x 49mm, or 10mm x 30mm x 49mm for the H1_Back_(Deep).stl version - with a 1.25mm JST connector. Steps Use a razor blade/exacto knife/file to remove all stringing and seams for the printed parts, especially around the buttons and contact points around the board. Take H1_Front, oriented with the USB C port hole towards you, and rest H1_Buttons through the button holes. Connect the SMA pigtail to the board and feed the connector through the hex hole on the right. It should be a solid friction fit. The “butt” of the connector should route *around* the screw hole. Add the thin SMA nut and then antenna to fix the connector to the case. Gently slide the board into H1_Front face down, pushing it into the left side. It should take a fair amount of force to overcome the clip on the right. Use a blade to trim down any excess material for an easier fit. Try not to apply excess downwards force as this may break the screen. The board should be level when fully inserted. Check that the buttons are making contact and move freely. Ensure that an antenna is connected and plug in the battery. Ensure that all cables feed around the battery and do not go underneath or above it, as this would add thickness and prevent the case from closing. Tap the M3 screw hole being careful not to punch through the case, and snap H1_Back on top of H1_Front to finish the case. I recommend placing it on an angle such that the right clip is fully inserted, then pressed down with force to insert the left clip. Screw in the M3 screw to hold the case together. Done! Setup Go to https://flasher.meshtastic.org/ to flash the board. I had to use windows and chrome to get this to work, and used the latest Alpha release to allow for board shutdowns. Original Guide Premium case for the Heltec V3 Lora board. Recommended to print in a Matte filament to provide more grip. Tap the M3x0.5 post on the ‘Case Rear’, careful not to poke through the wall at the end. Install the buttons, board, SMA Pigtail and snap the 2 halves of the case together. Secure with a M3x12mm screw for a rock solid enclosure. Original case (non-remixed version) can be purchased from muziWORKSlab.etsy.com Fits: - Battery up to 8mm x 30mm x 49mm (Extended version: 10mm x 30mm x 49mm) - SMA Pigtail - Your choice of SMA antenna up to 10mm in diameter at the base Recommended components: - Heltec V3 Board + SMA Pigtail + Stubby Antenna [https://www.amazon.com/dp/B076MSLFC9] - Battery 1100mAh with 1.25mm JST [https://www.amazon.com/dp/B0867KDMY7] * NOTE: the 1000mAh version will require the Case Rear Extended design * Dimensions: - 45.5mm x 64.6mm x 19.5mm [1.79in x 2.54in x 0.77in] - 22g [0.78oz] Meshtastic® is a registered trademark of Meshtastic LLC. Meshtastic software components are released under various licenses, see GitHub for details. No warranty is provided - use at your own risk.
Originally published on Printables


