HP Otto: Otto Bus
by Alex Just Alex · via Printables
| Format | STL |
| Category | Other |
| License | CC BY-NC-SA |
| Triangles | 32.3k |
| Uploaded | Mar 19, 2026 |
⬇ 15 downloads
❤ 27 likes
👁 196 views
Description
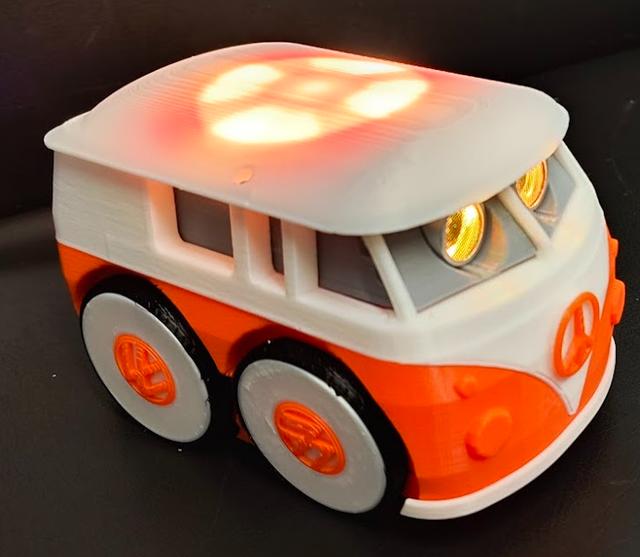
HP Otto: Otto Bus Otto Bus uses all the components found in the HP Robots | Otto Starter - Creator Kit to build a complete Otto-based robot. It can also be used as an alternative body for the HP Robots | Otto Starter Santa Edition and the HP Robots | Otto Starter - Builder Kit . Printing PLA, 15% infil. This model can be printed without supports but there are a few places on the 'upper body' where supports will improve the final result. I used 1mm diameter painted on 'organic' supports in the areas indicated (blue spots). 📷 Image redacted — claim this model to add your own media Tyres are printed with TPU or, alternatively, ~40mm id O-rings can be used. A 3.5mm cross section for the O-ring works well. Assmbly Note: Most of the assembly is very similar to the assembly detailed in the manual supplied with the starter kit and this manual should be referred to when assembling the Otto Bus Mount the line sensors in the base and secure with self tapping screws. 📷 Image redacted — claim this model to add your own media Mount the servos and secure with the servo clamp, which is, in turn, secured with a self tapping screw. 📷 Image redacted — claim this model to add your own media Secure the caster assembly to the underside of the base with more self tapping screws. Otto Bus can operate without the caster, but it struggles with tight turns. 📷 Image redacted — claim this model to add your own media Place tyres or O-rings on the 4 wheels. 📷 Image redacted — claim this model to add your own media Attach the rear wheels, following steps 18 and 19 of the manual. 📷 Image redacted — claim this model to add your own media For the front wheels, pass the hub through the base, slip on 2 washers and then push fit the front wheel on to the hub. Secure this with a small self tapping screw such as the ones supplied with servo horns. (19 March 2025) I received feedback that the self tapping screws from the Otto set protruded too much to allow fitting of the hub cap piece so I have now updated the STL for the front wheel with a recess for the screw head. I now also recommend 2 washers to prevent the wheel from having too much free play. 📷 Image redacted — claim this model to add your own media Assemble the 'inner module' following steps 8 to 10 of the HP Robots starter manual and secure the module inside the upper body section 📷 Image redacted — claim this model to add your own media The base and upper body can now be combined, by clipping them together. First place the front piece in position on the base and then clip on the upper section which secures the front piece in place. Make sure to feed all the wires from the base up the sides of the upper body section so that they can be attached to the control board. 📷 Image redacted — claim this model to add your own media Connect the motor leads to connectors 10 and 11 as indicated in step 13. This has to be done now as the screen insert makes this tricky once it is fitted. 📷 Image redacted — claim this model to add your own media Slide the ultrasonic module into the screen insert with the connector pointing downward and attach the connecting wire 📷 Image redacted — claim this model to add your own media Position the insert inside the upper body section, you will need to squeeze the sides together to do this. 📷 Image redacted — claim this model to add your own media Mount the LED ring on the roof with the connecto to the front using 4 self tapping screws. 📷 Image redacted — claim this model to add your own media It's now time to make the rest of the electrical connections. These can be found on page 3 of the manual. 📷 Image redacted — claim this model to add your own media (image used with permission) 📷 Image redacted — claim this model to add your own media Now attach the roof with four more screws. 📷 Image redacted — claim this model to add your own media Attach the logo of your choice to the front with a drop of superglue. 📷 Image redacted — claim this model to add your own media The logo 'hub caps' can also be attached. Depending on your printer the logos may clip in place or may require a dab of glue. I recommend a glue stick like Pritt for this so that they can be easily removed again if required. 📷 Image redacted — claim this model to add your own media Bumpers(fenders) and rear number plate are mounted with a drop of superglue. 📷 Image redacted — claim this model to add your own media Otto Bus can use exactly the same code as HP Otto starter. (https://hprobots.com/otto-robot/code/)
Originally published on Printables


