LED Mount Nubs (and spacer jig) to retrofit the earlier minimal enclosure riser
by Doug Joseph (design8studio) · via Printables
| Format | STL |
| Category | Electronics |
| License | CC BY-NC-SA |
| Triangles | 344 |
| Uploaded | Mar 30, 2025 |
⬇ 46 downloads
❤ 17 likes
👁 680 views
Description
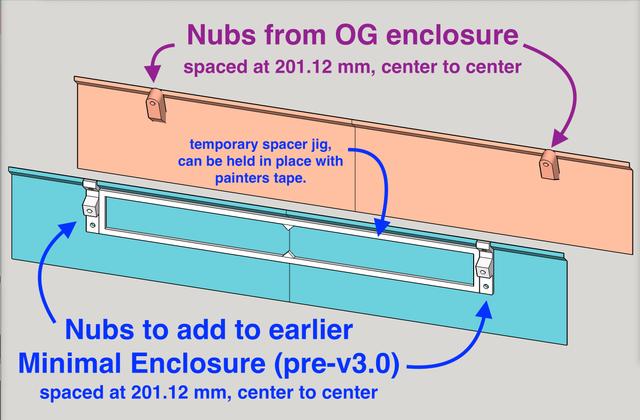
This pertains to the "Flashforge Adventurer 5M (AD5M) Minimal DIY Enclosure - prints faster, uses less plastic - and more" — https://www.printables.com/model/1130485-flashforge-adventurer-5m-ad5m-minimal-diy-enclosur 📷 Image redacted — claim this model to add your own media This is a set of nubs and spacer jig, for adding FF LED light bar to the riser set of the earlier Minimal Enclosure, before the new v3.0 set added the nubs back into the download set. The nubs can be attached with either glue or screws or both. Of the 3 screw holes, the top and bottom are more for attachment of the nub, while the middle screw hole is for attachment of the light bar. The holes are designed as 2.5 mm in diameter. If you design to use screws, you probably would want to pre-drill using a smaller bit, and the screws should probably be the “self tapping” type that are typically used for plastic. If it were me, I'd CA glue them in place and call it done. The spacer jig is meant to be temporary. Use painters tape to put the jig in the center as shown, and then the jig guides for placement of the nubs, as shown. 📷 Image redacted — claim this model to add your own media Please note: You can use these to retrofit the front two parts of the top riser set, so they have nubs like the OG enclosure. However, consider what I think is a better approach: putting LED strips inside the steel metal frame. That's what I did. If you attach the Flashforge LED light bar to the printed riser set, then if you ever need to remove the riser set to work on something, then you will still have a wire for the LEDs that is tethering your riser set, and you'd probably want to add into wiring some type of quick disconnect. Whereas, if the LED lights are positioned on the inside of the metal frame, then your LEDs and your wiring don't have to be disturbed — just lift the riser set away and replace it when done. Here's a link to two key listings I offered with regard to how I did my LED lights: https://www.printables.com/@design8studio/models?search=ad5m%29+led Also note: the new v3.0 riser set for the Minimal Enclosure, now includes nubs built into the print files. Here's a link to the new set: https://www.printables.com/model/1247920-new-v30-of-top-riser-set-for-flashforge-adventurer 📷 Image redacted — claim this model to add your own media Related info: In addition to the video and installation guide linked below, for the remixed side mounted spool holder, be sure to check out the BOM and installation tips on that listing here: https://www.printables.com/model/1127538-1-of-4-flashforge-adventurer-5m-ad5m-improved-side If you either watch the Flashforge video on how to assemble the DIY enclosure, or get from their Wiki the details on it, you will get a good handle on mine. Most everything will be the same or very similar. Both are below! NOTE: The two side verticals in the back... I CA-glued the top to the bottom on each, before attaching them with screws. I will look into whether something can be done to make it better. Flashforge video: And here's the link to the Flashforge Wiki with the details on the DIY enclosure: https://wiki.flashforge.com/en/knowledge_corner/printer-mod-and-diy And from the wiki, here are links to the installation guide in a variety of languages: Download Installation Guide: ad5m_enclosure_manual_a03_20240710.pdf ad5m_enclosure_manual_a03_20240710_de.pdf ad5m_enclosure_manual_a03_20240710_en.pdf ad5m_enclosure_manual_a03_20240710_fr.pdf ad5m_enclosure_manual_a03_20240710_ru.pdf ad5m_enclosure_manual_a03_20240710_cn.pd Finally, you may want to check out my many other remixes for the AD5M (see partial list below), including my mount for the side cutters, and matching safety cap for the side cutters: Flashforge Adventurer 5M (AD5M) Side Cutter Mount v1.0 📷 Image redacted — claim this model to add your own media Safety Cover for Side-Cutter Tips 📷 Image redacted — claim this model to add your own media Other cool options for the AD5M You may also like my other AD5M related design work: https://www.printables.com/model/785667-flashforge-adventurer-5m-ad5m-simpler-easier-faste https://www.printables.com/model/813334-flashforge-adventurer-5m-ad5m-printed-camera-mount https://www.printables.com/model/814546-flashforge-adventurer-5m-ad5m-nozzle-storage-box-t https://www.printables.com/model/827706-flashforge-adventurer-5-ad5m-led-mod-accessory-buc https://www.printables.com/model/828632-flashforge-adventurer-5-ad5m-led-light-bars-mod-ac https://www.printables.com/model/834011-flashforge-adventurer-5m-ad5m-side-cutter-mount-v1 https://www.printables.com/model/834097-flashforge-adventurer-5m-ad5m-improved-spool-holde https://www.printables.com/model/886714-flashforge-adventurer-5m-ad5m-filament-cutter-comp https://www.printables.com/model/1119699-flashforge-ad5m-enclosure-hinge-remixed-to-be-easi https://www.printables.com/model/1119872-flashforge-ad5m-door-handle-remixed-to-print-witho https://www.printables.com/model/1129412-safety-cover-for-side-cutter-tips https://www.printables.com/model/1130485-flashforge-adventurer-5m-ad5m-minimal-diy-enclosur Use Klipper stuff on AD5M stock hardware… …such as Mainsail, Fluidd, and Klipperscreen, etc, with the stock Klipper install on the AD5M's main board. Get it here: https://github.com/xblax/flashforge_adm5_klipper_mod Check out other cool AD5M related options here: https://github.com/g992/flashforge-ad5m-5mpro-research My PayPal tip jar: https://paypal.me/design8studio
Originally published on Printables


