LOTR Lamp for MMU/AMS - No Paint required - Easier print
by BLawl · via Printables
| Format | STL |
| Category | Art |
| License | CC BY-NC |
| Triangles | 66.4k |
| Uploaded | Jul 13, 2024 |
⬇ 424 downloads
❤ 207 likes
👁 3.8k views
Description
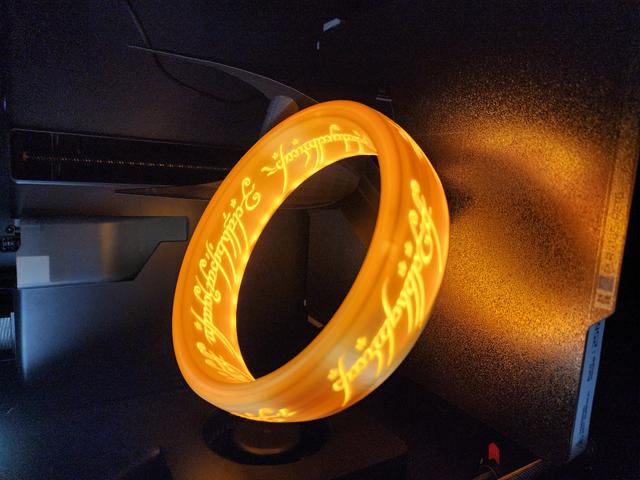
Intro I already had some Silk Gold PLA and was able to fine tune it for ring shapes. So I tried using slicer based “painting” to change Jéjé's model to print a light yellow color for the letters and the gold for the outer area. It sort of worked, but the added walls combined with the significant overhangs and floating areas of the model's letters resulted in a very rough print with uneven light shining through. The solution was to remodel the ring with printing and filament painting in mind. Slicer Setup I use OrcaSlicer, so these steps will likely translate to prusaslicer, bambuslicer, maybe superslicer. Cura may be very different. If anyone has tips for Cura, please share them in the comments or send them to me and I'll add it to the model. The main model is separated into two STLs, the ring and the ring letters. Importing the STLs individually will result in the letters not aligning properly. OrcaSlicer will not allow floating models; at least one point of the model must be touching the build plate. The solution is simple: Easy way: When prompted, click “Yes” to load the files as a single object with multiple parts 📷 Image redacted — claim this model to add your own media Alternative Method: Import the Ring Body STL Right-click the Ring Body and find the “Add Part” > “Load…” option 📷 Image redacted — claim this model to add your own media Select the Letters STL. This should add the letters to the Ring Body as an assembly in the correct position. Change Colors as you like. Model Print Settings Here are the basic settings I used: General Wall gereator: Arachne Brim enabled to prevent shifting/warping top shell layers: 6 bottom shell layers: 4 Ring Body 5 or more walls loops/perimeters In testing, the Overture Silk Gold PLA I used had minimal LED transmission at 5 walls. If your filament has a high transmission distance, your model will likely glow more. For reference, Overture Silk Gold PLA has a TD value of 2.7. If you are familiar with HueForge, you will be familiar with TD values. Here's a guide on TD values Cosmetic Improvements Scarf Joints: Scarf Joints helped hide the seams I was getting on the original model. After testing, these were the best settings for my printer and the silk Gold PLA 📷 Image redacted — claim this model to add your own media Walls Printing order: Inner/Outer/Inner “Slow down for curled perimeters” - ON If you are using Silk PLA, make sure you test what max speeds work best. My best results were 220 degrees with max vol speed of 7.5 mm^3/sec Letters 2 Wall loops/perimeters I used sunlu Lemon Yellow for the letters. It has a very high TD (7), which is more translucent than any of the white I had. 0% Infill Standard seam settings Supports Supports will be needed for the rear attachment point. I used support painting to select just the bottom edge and used normal(manual) support settings. If your printer has issues with steep overhangs and bridging, you may need some supports for the inside of the ring model (it is a very steep angle for the last few layers of the inside. Base Cap/cover Use the same scarf joint seam settings as above 5 wall loops 100% infill slow down for curled perimeters (optional but recommended) Make Overhangs Printable (will prevent small defects/failures on first few layers due to steep curve angle) Finishing touches: I used superglue in a few spots to help hold the bottom cap on properly. I used a small heat gun to clean up a few strings and imperfections. Printed on my P1S with AMS, it took about 11.5 hours for the two-color print. If anyone is interested, I also uploaded the Barad base that I modified to include a side switch and rear USB-C female plug that I used. I did not use any controllers, just a white 5v LED strip/tape roughly shoved in the bottom. I also used a very minimal fuzzy skin on the barad base. It helps hide layer lines and almost gives a stone-ish texture to the base. Happy Printing!
Originally published on Printables


