LowRider 3 CNC - Mod - boot tips on protrusions on XZ plates for "bladeless" Z homing (v1.0)
by Doug Joseph (design8studio) · via Printables
| Format | STL |
| Category | Tools |
| License | CC BY-NC |
| Uploaded | Mar 13, 2023 |
⬇ 67 downloads
❤ 13 likes
👁 909 views
Description
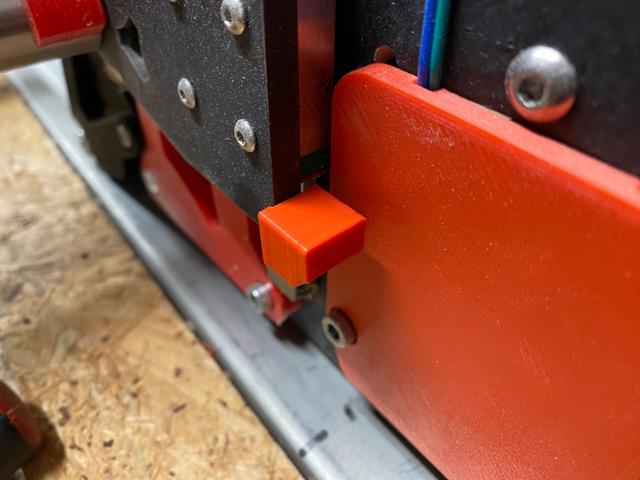
So, like many of you who operate LowRiders, I've had the little thin metal blades come off my homing / end stop switches. As many of you already know, but in case some don't, the little blades serve a purpose, which may be more important or less crucial depending on the circumstances. The purpose of the little blades is to trigger the end stop switch before the machine's moving parts have run out of room to move, because of lag or delay in stopping after the switch is triggered. The concept is that there may be a delayed reaction, and so a little bit of leeway is helpful. This need of extra space becomes more crucial when the moving parts are moving quickly, and when they are very heavy, and if both those moving parts and what they are colliding with are firm with little to no give. So, if the homing speed is low, and/or if the mass is low, there is less chance of trouble by going bladeless. I felt my LowRider 3 qualified on both these counts. After losing one of my blades yet again, I decided to test bladeless homing on the end stop switches. For this current time, I removed blades only on the one X axis switch (which for me is Y because my X and Y are swapped), and both the Z axis switches. The Z axis homing speed is particularly slow and careful, and removing the blades seems to work just fine. I did have to make one change to get this to work on the X axis (Y for me): I had to glue a thin strip of printed plastic onto the end stop (that the switch hits), to get the switch triggered a bit earlier than would happen without it. This was needed because the lack of a blade meant the distance offset offered by the blade is gone, and I needed to reach the switch as early somehow, lest the hardware all hit the physical limit at the side. (Remember, since my X and Y are swapped, this was to prevent a collision at what for most of you would be the "X-max" side.) This worked great. Also, similarly I did have to make two changes to get this to work on the Z axis: I unscrewed the printed holders for the Z homing switches, and flipped the switches around, to get their little switch nub closer to the protrusions on the XZ plates, and then reattached the holders. I designed and printed two little "boot tips" to slide onto the protrusions on the XZ plates. This was needed because the realignment in step 1 was not quite enough, and the lack of blades meant the distance offset offered by the blade's is gone, and I needed to reach the switch as early somehow, lest the hardware all hit the physical limit at the lead screws, i.e. the printed trucks on the lead screws banging into the top of the opening in the YZ plates. This worked a treat. Finally, while I have not yet removed them from the Y axis switches (again, X for my machine) I'm already halfway ready to do so if the need should arise, because my mod to hide the "near side" long belt inside the unistrut/superstrut meant that my end stop is already positioned to trigger the nub on the switch even if there were no blade. My non-mod'd other (far side) long belt would need attention to get such a connection. For now I'm working with homing this way and it seems fine. PS: I'm using steel XZ plates bought from Ryan in the V1 Engineering store. These would also work with aluminum plates too. They may work with printed plates as well. Below are pics of the little "boot tip" on one of the XZ plates: Design 📷 Image redacted — claim this model to add your own media 📷 Image redacted — claim this model to add your own media 📷 Image redacted — claim this model to add your own media Printed part: 📷 Image redacted — claim this model to add your own media 📷 Image redacted — claim this model to add your own media Change log: March 12, 2023 - Original remix uploaded. Labelled as v1.0. My PayPal tip jar: https://paypal.me/design8studio Various LowRider 3 CNC remixes: LowRider 3 CNC Collection View all my models and remixes on Printables: Design8Studio 3D models *Amazon product links are affiliate links.
Originally published on Printables


