LR V3 80mm Spindle Mount
by JRS · via Printables
| Format | STL |
| Category | Tools |
| License | CC BY |
| Triangles | 11.0k |
| Uploaded | Jan 16, 2023 |
⬇ 105 downloads
❤ 18 likes
👁 731 views
Description
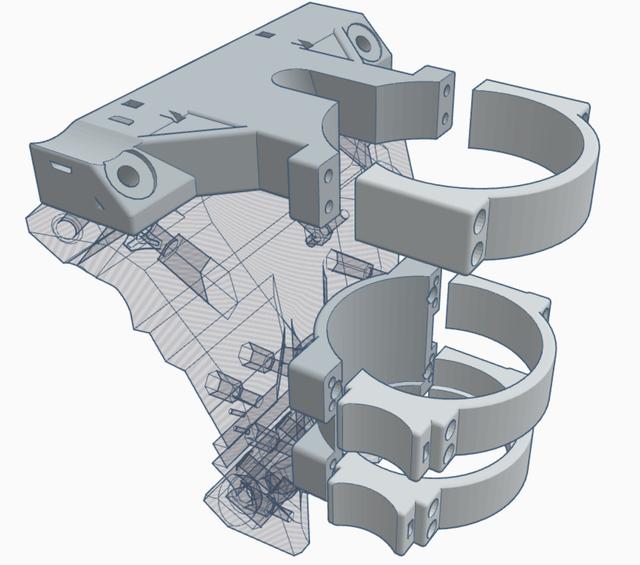
Parts were designed to maintain the V1 LR3 core, and have retain the flexibility to change out the spindle in the future. Hope to add a possible laser mount as well, but that is still to come. Mount the LR_V3_80mm_Spindle_Mid_Bot_Back_V2 through the exiting mounting holes. Because the spindle is wider than this spacing, this needs to be constructed in multiple parts to keep the things as close to the core as possible. Be sure to pre-thread locking nuts, otherwise they could spin out in place, then place 8x M5 locking nuts into LR_V3_80mm_Spindle_Mid_Bot_Back_V2 . The fit is intentionally tight, use a vise or heat press them in place. Attach the LR_V3_80mm_Spindle_Mid_Bot_Back_V2 to the core. Add LR_V3_80MM_Spindle_Upper_V2, on top of your core, it should sit / rest in place on the top of you core. You may want to drill out the mounting holes a little to have the core slide into place. Once in place, be very careful torquing down the M8 bolts alternating to keep them even . Do not crack the mount by torquing these down too tight! Again, be sure to pre-thread locking nuts, otherwise they could spin out in place, then place 4x M5 locking nuts into LR_V3_80MM_Spindle_Upper_V2 . Support the spindle from the bottom with the weight on the table surface and tighten down LR_V3_80MM_Spindle_Upper_V2, with 4x M5x55mm bolts. Pause as the bolts grab into the M5 locking nuts. Make sure the spindle is resting on the 8mm bottom lip of LR_V3_80mm_Spindle_Mid_Bot_Back_V2. This lip should prevent the spindle from dropping with vibration during operation. Place, LR_V3_80mm_Spindle_Bot_Front , with 4x M5x55mm bolts. Pause as the bolts grab into the M5 locking nuts & make sure that the bottom of the spindle is resting on the 8mm lip. Place, LR_V3_80mm_Spindle_Mid_Front , with 4x M5x55mm bolts. Pause as the bolts grab into the M5 locking nuts. Tighten 12x M5x55 bolts evenly using a zig zag pattern across the entire front of the gantry. Use a square to verify spindle is perpendicular to the work surface left-right and front-to back. Vacuum mounts are sized to hold rigid 2" central vacuum tubing, but should work with smaller sizes. Unfortunately the vacuum mounts may interfere with the X-Axis end-stop. I will build a sliding adapter for the X-Axis end-stop shortly. To mount these parts to your core you will need; 2x M8x80mm bolts 2x M8 Spacers / Washers 2x M8 locking nuts, 12x M5 locking nuts, 12x M5x55mm hex bolts,
Originally published on Printables


