Magnetic Fume Exhaust (4 inch duct) for EnXLosure Backpanel
by JCShumpert · via Printables
| Format | STL |
| Category | Art |
| License | CC BY-NC |
| Triangles | 15.0k |
| Uploaded | Apr 19, 2024 |
⬇ 31 downloads
❤ 7 likes
👁 440 views
Description
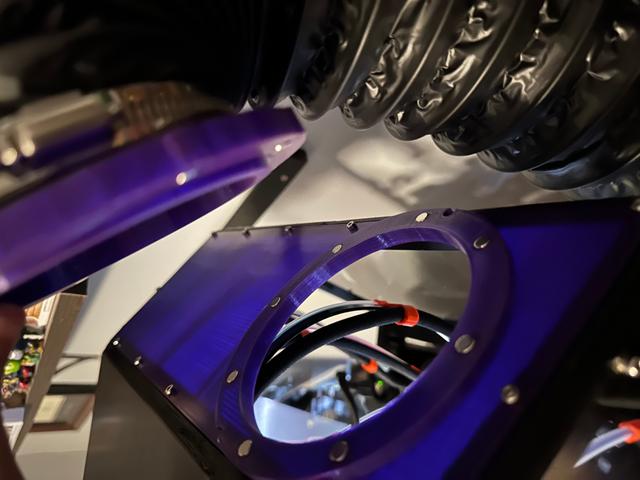
Background I have been using an AC Infinity Cloudline Pro S4 fume extractor with my Voron 2.4 for a while and when I finally received my Prusa XL and built my EnXLosure for it I wanted a quick way to swap my duct hose between the printers. I couldn't find any existing designs that I liked so I decided to try and design my own solution. I spent quite a while playing with different designs, but getting the hose alignment right was kind of annoying. I ended up looking around again for inspiration and found this recently uploaded youtube video from Functional Print Friday . His idea to use a slip ring to allow the magnet orientation to rotate was exactly what I needed to make attaching the hose more seamless. I was going to just call it quits and use his files, but they were designed for smaller hoses. I tweaked my hose adapter to be two pieces like his slip ring design and it works very well. You just have to get the hose close to the backpanel and the ring will auto-align and snap in place. Hardware Needed: 32x 6x3mm round neodymium magnet (3mm high); I bought N52 grade for stronger magnets 4-inch diameter flexible ducting (ex. https://www.amazon.com/dp/B071LHCFZ8) 4-inch adjustable hose clamp (ex. https://www.amazon.com/dp/B0BHZ8K74K) Optional→CA Glue (super glue) You do not need additional screws. You will reuse the screws that attached the Backpanel_Top piece. You will need a fan or fume extractor to hook your ducting up to, but there are tons of different options ranging from cheap/diy to ready-made/expensive. I have been very happy with my Cloudline extractor Print Guide: IMPORTANT : make sure that you print all pieces using the same scaling factor that you used for the rest of your EnXLosure parts to ensure correct fitment. Choose if you want to press-fit your magnets in or if you want to glue them in place with CA glue. The press-fit option is very snug and will likely need you to use some pliers, clamp, etc. to press them into place. The glue-in option is the same fitment found in the original EnXlosure parts. Once you've chosen if you want to use the press-fit or glue-in parts, choose an exit location. I have 3 options. The default part exits out the center. There are also a left and right exit (direction naming is based on looking at the front of the printer). Print List: 1x HoseAdapter.stl 1x SlipRing.stl OR SlipRingGlueIn.stl 1x BackpanelMagnetic.stl OR any of the other options (left vs. right, press-fit vs. glue-in) Assembly Guide: Install the magnets into your backpanel and SlipRing of choice. Each magnet recess will house TWO 6x3mm magnets stacked on top of each other. This increases their magnetic pull. Important: make sure you pay attention to the orientation of the magnets so that they don't repel each other. I find it easiest to install magnets in one part at a time. Insert the HoseAdapter into the SlipRing. The lips on each part should be on the outside edges. If oriented correctly, you will have the recessed magnet holes on one side and the long wall portion of the HoseAdapter sticking out of the other end. Insert the long wall of the HoseAdapter/SlipRing combo into your ducting and fasten in place with a hose clamp Remove your existing Backpanel_Top acyrlic/polycarbonate panel from your EnXLosure making sure to save the removed screws. Attach your new magnetic backpanel with those screws
Originally published on Printables


