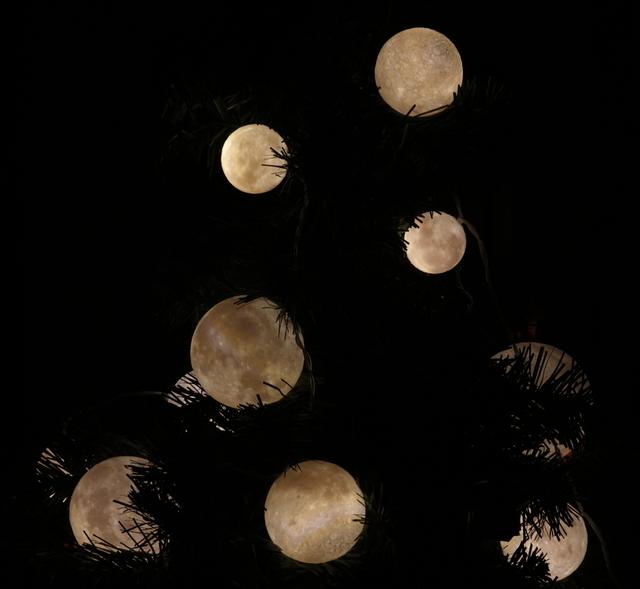
Moon lithophane Christmas tree bauble lights
by Matt Blissett · via Printables
| Format | STL |
| Category | Home |
| License | CC BY-NC-SA |
| Triangles | 1.6M |
| Uploaded | Jan 1, 2023 |
⬇ 171 downloads
❤ 69 likes
👁 1.8k views
Description
Moon Lithophane Baubles — Flying Tiger light strings Here are small moon lithophanes, suitable for use as decorative baubles. They attach to cheap (5€ or so) battery-powered light strings available in many countries from the Danish discount shop “Flying Tiger”, and similar lights from supermarkets etc. 1. Buy the lights. Do this first! Flying Tiger sell several designs, but many of them share the same basic light string design. Look for a light string with baubles (or pumpkins, or skulls, …) attached with small, rubber grommets. It's easy to replace the baubles while reusing the rubber grommets. The two designs shown here are perfect. 📷 Image redacted — claim this model to add your own media 📷 Image redacted — claim this model to add your own media 10 lights from two AA batteries will be brighter than 20 lights from three AA batteries, but if your home planet has many moons you may prefer a 20-LED set anyway. Sets with 50, 80, 100+ lights are likely to be too dim. If you can only find different lights, you may be able to modify the holes in the moons slightly to allow them to fit. 2. Flexible model slicing To give full flexibility, the moon STLs are complete spheres and the hole for the light is added in Prusa Slicer. The moon has a cylinder added to the base to give additional material for the socket, then another cylinder subtracted from the combination. The socket parts are at X=0, Y=0, and Z=just enough to be visible (same Z for both parts). The moon part is sunk below the bed just enough for the socket to touch the bed. The baubles shown above have a “lip” and matching space on the grommet of about 2.5mm height. Other baubles are different sizes, so check what you have bought will fit by printing the test socket. 3. Print a single, small moon to test filament opacity These lithophanes have thin shells, since battery-powered LEDs aren't so bright. If the light is too bright, perhaps print a small diffuser cap to go on the end of the LED, or colour it (see below). 4. Print more! I have been printing 5-10 at a time. The print settings are in the 3MF file, but for reference the settings used are: Many (10) perimeters, to make the shell solid Random seam position, to avoid a possible seam line which light could shine through A brim just to be safe, these models don't have much contact with the print bed Enforced supports for the first 20 layers, or more for the largest baubles – just to be sure when I print 5-10 at once A support blocker within the socket 5. Colour the moon? You can use marker pens to colour some of the LEDs. Do this with the grommet fitted, so it doesn't rub off the ink as you replace it. 📷 Image redacted — claim this model to add your own media 6. Post a make If your filament gives a good result, please post a comment or a make mentioning the brand. I used 3DE Premium Snow White PLA , which unfortunately seems only to be sold in Denmark. 7. Credit Credit to 陳亮 for creating the original model and especially for sharing the scripts used, and NASA's Scientific Visualization Studio for sharing their moon maps. https://www.instructables.com/Progressive-Detail-Moon-Lamp/ https://github.com/moononournation/BanateCAD https://svs.gsfc.nasa.gov/4720
Originally published on Printables


