Pastamatic Spindle Retention by Kistek
by Kistek · via Printables
| Format | STL |
| Category | Other |
| License | CC BY-NC-SA |
| Triangles | 19.3k |
| Uploaded | Jan 27, 2026 |
⬇ 246 downloads
❤ 36 likes
👁 1.3k views
Description
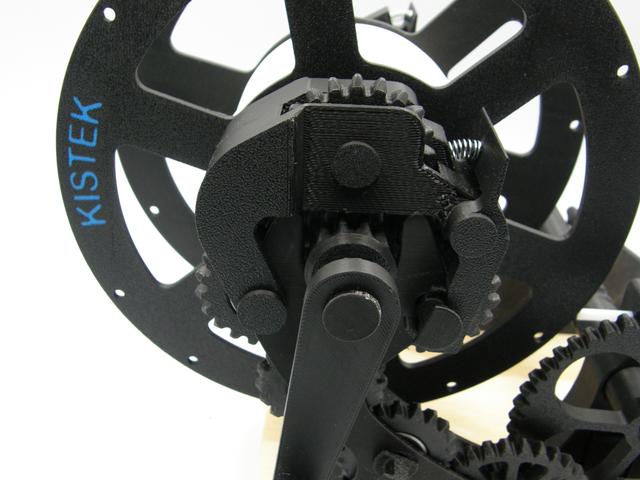
Pastamatic Filament Spool Winder Add-On by Kistek. This add-on is for Pastamatic filament spool winders and is meant to secure the drive spindle so that it does not come out of the cradle during operation. This is especially important for hand-cranking operations, although I have found it to be helpful with the drill as well. Printing suggestions: I used PLA with 15% infill on a K2 Plus. I printed the movable bodies and latches on their side for strength although it does make supports necessary and they can be difficult to remove. The pins, since they are round, are printed vertically and they are plenty strong. There are some required items needed for the assembly: 1. 608 Bearings (x2) 2. 7/32" x 11/16" Compression Spring (x2) I got mine from the 200 pc Storehouse Spring Assortment Kit from Harbor Freight. https://www.harborfreight.com/200-piece-assorted-spring-set-67562.html Other springs around this size may work, but haven't been tested. 3. One more idler gear from the original Pastamatic design 4. One more long pin and one more short pin from the original design if you are not using them currently The original pins (not the flush pins) are required for the latch to grab onto. If you have those pins in place, then nothing more needs to be done. Installation Instructions: Assemble the two assemblies. One is listed as the Bearing Side and one is listed as the Gear Side Bearing Side Assembly: 1a. Insert the bearing into the movable bearing body using the bearing pin (21 mm). 1b. Install the 7/32" x 11/16" spring on the nub of the bearing side latch and put the other end in the recess on the front of the movable body. 1c. Line up the holes of the latch with the holes of the main body and insert the wrist pin (34 mm) The latch should be able to be depressed via the top tab and the spring should return it to the "closed" position. 1d. On the Pastamatic passive target cradle, remove the pin through the rear bearing and put the movable body in place and insert the supplied shoulder pin (30 mm) through the body and the bearing to hold it all together. 1e. Test the latch to make sure it catches on the front pin when closed, and releases when the top tab is depressed. Gear Side Assembly: 2a. Insert a 608 bearing into the center of the idler gear. 2b. Insert the idler gear into the movable gear body and insert supplied gear pin (29 mm) 2c. Install the 7/32" x 11/16" spring on the nub of the gear side latch and put the other end in the recess on the font of the gear body. Note - the spring will be slightly off center on the gear side assembly 2d. Line up the holes of the latch with the holes of the main body and insert the gear side wrist pin (44 mm). The latch should be able to be depressed via the top tab and the spring should return it to the "closed" position. 2e. On the Pastamatic driven target cradle, pull pin from the rear gear and put the moveable body in place and inset the supplied gear side shoulder pin (37 mm). 2f. Test the latch to make sure it catches on the front pin when closed, and releases when the top tab is depressed. Video link: If you have any questions feel free to contact me: [email protected]
Originally published on Printables


