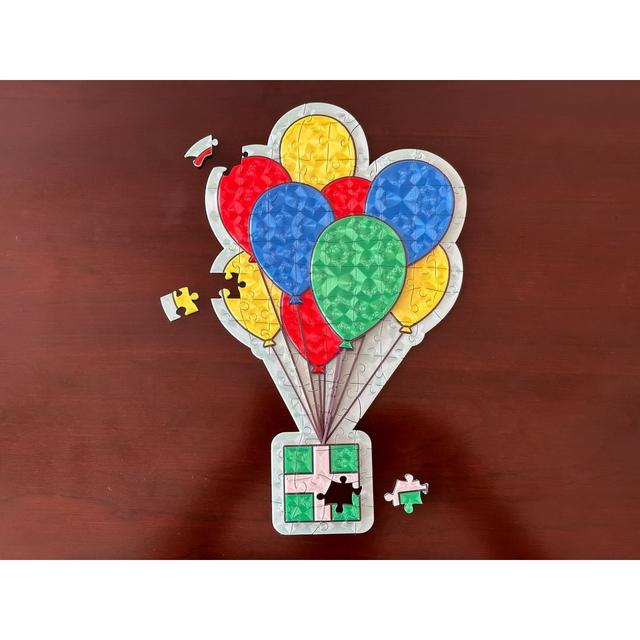
Puzzle Design Kit with Sample Balloon Puzzles
by dazus · via Thingiverse
| Format | STL |
| Category | Tools |
| License | CC BY-NC-SA |
| Triangles | 244.5k |
| Uploaded | Apr 14, 2026 |
⬇ 118 downloads
❤ 18 likes
👁 557 views
Description
Design your own jigsaw puzzles easily without CAD/modeling software! Balloon puzzle included! Versions for 200mm and 300mm printers! UPDATE: The circular puzzle cutters are now available! I encourage you to create derivations of this. It's the whole point! Have fun and share what you create! Just please, no commercial use. You get it for free, so you give it away for free. If you share the 3D files, please post them as a remix. Otherwise, please post your design as a make! The great thing about this project is that all the software you need to create your own puzzle or modify my cutters are available for FREE for Mac and Windows. The colors in the balloon puzzle are handled through color changes between print layers. You can print the full color puzzle with any filament printer, it's fast, and there's no waste! The color changes are already built into the PrusaSlicer SMF project files I've provided. Some settings may be lost if they are opened in other slicers. I created the balloon puzzle using a style I used to use for commercial illustrations. So, it's different from what I normally post. Maybe I'll do more puzzles like this. Who knows? This is a work in progress. I'm starting with just a few puzzle shapes and will add more as I complete test prints. This system makes use of the negative volume feature in PrusaSlicer. Similar features appear to be available in OrcaSlicer, Bambu Studio, and Cura. Maybe others, too. The cutters are designed to create puzzles with as many pieces as possible while keeping the pieces strong and big enough to work with. These are intended for adults and older children. I've created a number of different cutters. They vary in shape, size, and thickness of the cutting “blade.” The puzzles labeled “narrow” have a tighter fit than those labeled “wide.” 300mm Puzzles: Balloon: 94 pieces Square: 225 pieces Circular: 190 pieces 3x4 Rectangle: 165 pieces – Coming soon 2x3 Rectangle: 150 pieces – Coming soon 200mm Puzzles: Balloon: 46 pieces Square: 100 pieces Circular: 97 pieces 3x4 Rectangle: 80 pieces – Coming soon 2x3 Rectangle: 70 pieces – Coming soon ##Printing A successful print of a puzzle is all about precision – NOT speed. Be patient when you print AND when you separate the pieces. If you're just printing a thin, flat puzzle, I've found that 1 perimeter and 2 bottom layers are sufficient and it saves a lot of time and filament. For more sculptural puzzles, I've used: 2 perimeters 10% Rectilinear infill 3 bottom layers 4 top layers Print external perimeters first (more precise) I've had good luck printing with PrusaSlicer's “speed” presets, but I wouldn't print much faster than that. If the printer is rocking back and forth, slow it down. Top Fill Pattern: Concentric (creates fun patterns) No brim Before you print a puzzle, I recommend running a few quick tests. You won't be happy if you print a whole puzzle only to find the pieces are fused into one. Be sure to use the same filament for the tests and the final prints. Filaments can make a big difference. Check for elephant's foot by printing a small cube with the print settings you plan to use for the puzzle. The gaps in the puzzle are very small. Any elephant foot could be enough to fuse the first layer into a single piece. PrusaSlicer has a setting to address this (Print Settings → Advanced → Elephant Foot Compensation). I've provided a project file with two small test puzzles – one with narrow blades and the other wide – that prints in about an hour. If that doesn't work for you, you can create your own with the supplied test cutters. Just apply each as a negative volume to a cube resized to 58mm x 58mm x 5mm. Even though my 200mm and 300mm square cutters were modeled with consistent gaps, the final sliced and printed pieces varied significantly in fit. Better to go with the wide cutters (a looser fit) if you're not sure. ##Separating the Pieces After you print your puzzle, some pieces will separate effortlessly and some will just be determined to stick together. I find the same things is true of commercially bought cardboard puzzles. To separate the pieces of your puzzle, wiggle and twist them back and forth. If that's not enough, I insert a small, thin pocket knife blade between the two pieces and use the blade to pry the pieces apart. I don't use a hobby knife to pry apart pieces because the blades are brittle. If the strings on the balloon puzzles fuse together, use a hobby knife. Place the fused pieces on a hard, flat surface, place the blade on top and gently rock the knife back and forth while supporting the balloon string. Be patient. If the string breaks, repair it with super glue. Designing Your Own Puzzle I suggest you create a design with no overhangs. You can get away with an overhang only if it is part of a puzzle piece that is attached to the build plate somewhere. If the piece doesn't connect to the print bed at all, not only will it need supports, when you go to assemble your puzzle, the piece will just slide off. If you want to use one of my cutters, create a design the same shape (square, circle, etc.) and at least 1mm smaller in the X and Y dimensions. Create a puzzle as tall as you like (but I recommend not going crazy). You can always scale my cutter in the Z dimension so it cuts all the way through your model. If you want to create a design with an irregular outline like my balloon puzzle, you'll probably need to create a custom cutter for it. If you're designing a puzzle that's essentially flat, then 2mm thickness works well. I'm using that to test many of my cutters. The pieces feel nice, separate easier, and snap together well. I've found that the print time of the final puzzle is 2 to 3 times as long as printing the same model without cutting it into puzzle pieces. Designing Your Own Cutters My cutters were designed in a free 2D vector program called Affinity. I've provided SVGs of my Affinity cutter files. They should be editable in most 2D vector apps. Since Thingiverse treats them as images rather than download files, I've attached them as a Zip fie. Each line starts as an open path with a stroke. Once I have the design the way I liked it, I set the stroke weight to 0.4pt to create the narrow cutters and 0.6pt to create the wide cutters. Then, I expand the strokes. What I do next in Affinity depends on whether I model the final cutters in Blender or Fusion. I've alternated between both and in the end, use whichever you're more experienced with. When I use Blender, then I merge all the paths into a single compound path in my Affinity, then export as a single SVG. When I use Fusion, I don't merge the paths. Instead, I export all the horizontal lines in one SVG and all the vertical lines in a second SVG. Once you have the SVGs you want, it's time to open Blender or Fusion. ###Blender Create a new file, type A, then X, then to delete the default camera, lights, and cube. Now you have an empty world to work in. Import the SVG (File → Import → Scalable Vector Graphics (.svg)). Type A to select the curve, then type S300 to scale it to 300x so it is scaled to the right size. From the Object menu, select Convert → Mesh. Select the Modeling tab. Type A E15 . This extrudes the cutter to what will me 15mm high in the slicer. Export as STL. Blender tends to create meshes with errors, so I open the final meshes in Fusion and use it's mesh repair tool with the “Wrap” setting to fix it, then export it again. Sometimes Blender doesn't interpret the SVG properly. Parts could be missing or the shape could be wrong. I've usually found that I can fix them by making very small adjustments to the impacted curves in Affinity, then exporting as a new SVG. If you still can't get them to import properly, you could try using Fusion instead. ###Fusion Import each SVG as a separate sketch. When you import them, scale them to 0.32 so they import at the correct size. Hide one sketch, click and drag over the whole sketch, then go to the Create menu and select Extrude. Set Distance to 15mm and Operation to New Body. Fusion will create 1 new body for each curve. Hide the sketch you just used as well as all bodies, then display the second sketch. Click and drag over the whole sketch, then display all bodies. Go to the Create menu and select Extrude. Set Distance to 15mm and Operation to Join. Fusion will merge all the bodies into a single body. Select the new body. Then, go to the File menu and select 3D Print. From the 3D print dialog, choose Export from the Preparation Type menu, Open the Refinement settings toggle, and set Refinement to High. As with Blender, Fusion doesn't always interpret SVG curves accurately. If you find a problem, you could try making a small adjustment to the curves in your 2D vector app and exporting as a new SVG or you could try using Blender instead.
Originally published on Thingiverse


