Rotating (More) Rings Toy
by Greg M · via Printables
| Format | STL |
| Category | Other |
| License | CC BY-SA |
| Triangles | 841.3k |
| Uploaded | Oct 17, 2023 |
⬇ 515 downloads
❤ 47 likes
👁 1.8k views
Description
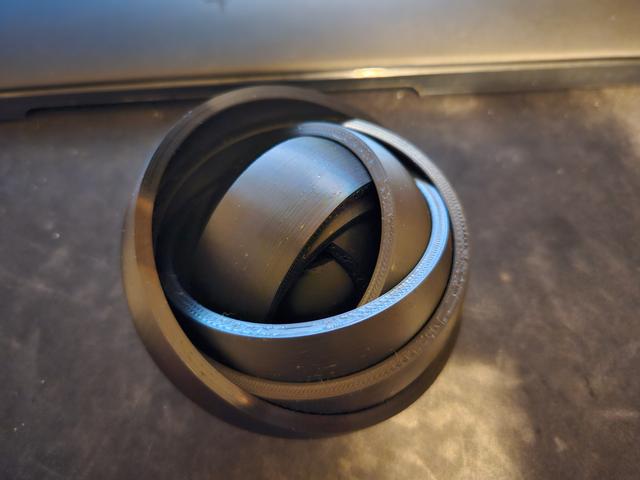
This is a clone of the excellent Rotating Rings Toy model by Marvin. “medium_4_shells.stl” is very similar to that model. I wanted to print a toy with more rings, and soon found that an even gap throughout the model put a limit on how far out the rings could go, before either the middle was too tight (stuck), or the outside was too loose (falls off). To compensate, I find the vertical displacement in the contact between the innermost ring, and the core, then compute new gap sizes to maintain the same vertical displacement allowed on each additional ring. In pure math, this works very well. In practice, as each ring demands tighter and tighter tolerances, the slight errors inherent in 3D printing become a limiting factor, well before numbers run out of precision. The pictures include a 2D cut of the two options, with equal gaps on top, and equal vertical displacement on the bottom. Printing Guidance After slicing, make absolutely certain that the slicer has not omitted the gap between rings, especially on the layers at the center of the model's height. Increase the precision settings of your slicer if required. The pictures include a (line type view) case where the slicer has fused two rings together. The gaps become extremely small, so the filament color view in my slicer sometimes makes them invisible. I recommend filament without carbon fiber, random seam alignment, and printing with at least 3 wall loops. Troubleshooting If the rings stick together, place your thumbs against the core, and use your fingers to hold the outer ring. Press down with your thumbs to stretch the toy into a cone shape, until the rings are freed. If any part of a ring is loose, flexing it up and down can break the nearby parts free. Likewise, if the outermost rings are too tight (don't move readily), but are broken free, you can pull just those rings off, and work them together for some time separately to grind away imperfections. On the 8 ring large model in the picture, I spent 4 minutes on making the outermost 2 rings cooperate with each other. If you need to replace a ring, turn the second ring from the outside 90 degrees from the third ring from the outside, and turn the outermost ring 90 degrees from both of them (making it look like an X in a circle). This will allow the outermost ring to flex outwards, and the second ring from the outside to flex inwards, making it as easy as possible to remove the outermost ring. Especially with a high resolution (the $fn variable in openscad), the model produces especially large stl models. That said, I've tried to optimize it very well, and typical render times for a 10 ring toy on my machine are sub-130ms, so playing with the parameters should absolutely be viable. Finally, here's the minimum gap size required to print each of the included models: Number of RingsSmallMediumLarge20.220071 30.1735670.151675 40.143220.121505 50.1218790.1013290.1510560.106060.08689210.1343337 0.07605270.1209428 0.1099769 0.10083210 0.0930898
Originally published on Printables


