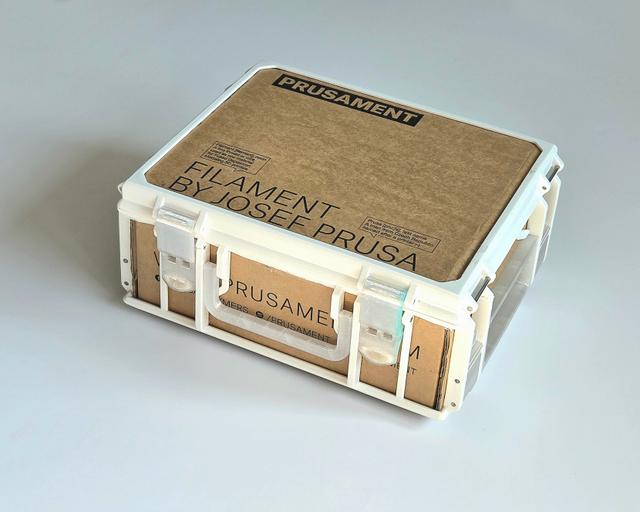
Sbox From Prusament Cardboard Box
by Ania Kompa · via Printables
| Format | STL |
| Category | Organisation |
| License | CC BY-NC-SA |
| Triangles | 85.6k |
| Uploaded | Mar 25, 2026 |
⬇ 18 downloads
❤ 16 likes
👁 274 views
Description
One day I've noticed that Prusament boxes have similar width to walls of Sbox printed on my Prusa MK3S+. I really like recycling projects and I'm in love with these cardboard filament boxes. For years I've used organizers from here: https://www.printables.com/model/58986-prusament-box-storage-system-v2 which are great, but I also wanted to have something compatible with Gridfinity. However, the interior dimensions of Prusament box are not optimal for this system's grid, unless you cut the lid tabs off. I designed Sbox with cardboard walls that is able to fit 5x4 Gridfinity base. The frame needs about 65% less filament than the regular Sbox of this size would need. It's bigger than small Sbox but smaller than the medium one. Printing Please be aware that this is a hardcore bridging test. It is designed to be printed without supports to save as much filament as possible. With the right settings you should be able do get a really neat print. Cutting the Prusament box to size Open the box and mark a line 18 cm from the front wall parallel to it. Cut through the side walls. 📷 Image redacted — claim this model to add your own media 📷 Image redacted — claim this model to add your own media Unfold thin piece that you cut through and cut it off. 📷 Image redacted — claim this model to add your own media 📷 Image redacted — claim this model to add your own media Remove the remaining piece of the tab you cut off to make room for the new one. 📷 Image redacted — claim this model to add your own media 📷 Image redacted — claim this model to add your own media 📷 Image redacted — claim this model to add your own media Add new creasing line by pinching the cardboard with a blunt tool and fold the back wall. 📷 Image redacted — claim this model to add your own media 📷 Image redacted — claim this model to add your own media Mark the points where the side wall corners meet the back wall and cut off the excess. 📷 Image redacted — claim this model to add your own media 📷 Image redacted — claim this model to add your own media 📷 Image redacted — claim this model to add your own media Fold the back wall along the new creasing line, inserting the tabs into the gaps in the side walls. 📷 Image redacted — claim this model to add your own media 📷 Image redacted — claim this model to add your own media Carefully insert the box into the printed bottom frame. 📷 Image redacted — claim this model to add your own media Add some hot or super glue between the top of the frame and press it firmly till it dries. 📷 Image redacted — claim this model to add your own media The top is pretty straight forward. Cut the lid of the box to size of the top frame (17,9 cm x 21,9 cm) and glue it to the lid frame. Further instructions on assembling the rest of the parts can be found here: https://www.printables.com/model/262716-sbox-for-mk234-stackable-toolbox-system#assembly
Originally published on Printables