Snowman - Pumpkin - Penguin BOTTOM remix with HOOK for elastic
by APrinterInTheHills · via Printables
| Format | STL |
| Category | Home |
| License | CC BY |
| Triangles | 113.8k |
| Uploaded | Jan 30, 2024 |
⬇ 63 downloads
❤ 8 likes
👁 204 views
Description
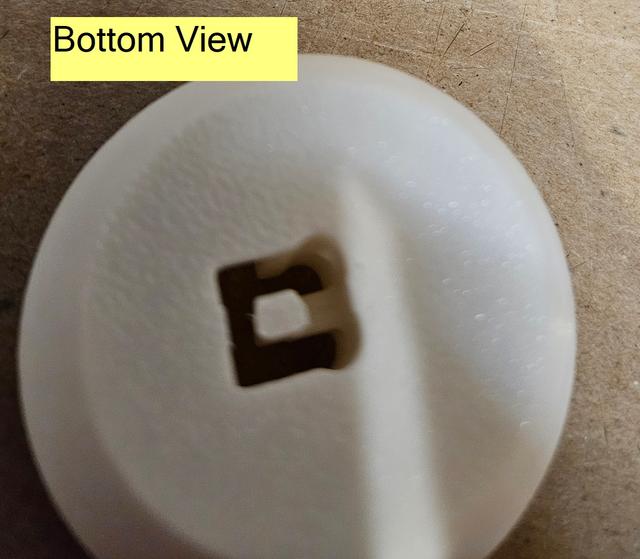
REmix of bottom/base for Snowman (3 part), Penguin, and Pumpkin (3 part) I changed the “larger connector hole” to a hook design, similar to “Modified head and TPU loop for snowman” by JW693D Modified head and TPU loop for snowman by JW693D | Download free STL model | Printables.com Original snowman/pumpkin/penguin is done by 3D-Printy https://www.printables.com/model/92714-articulated-snowman-fidget is the link for the orignal snowman. The Penguin and Pumpkin are in different files, same creator I like the HOOK in the head design. BUT, I have redesigned 15 of the hats that are used, and made them to have a peg insert, based on the design of “Snowman Hat Pins” by Joe Kelley Snowman Hat Pins by Joe Kelley | Download free STL model | Printables.com (I will post the hats later, as a remix, with credits to all the designers. ) The problem is , if the HOOK HEAD design is used, then the hats won’t fit with the pin. So, I made all the BOTTOMS (of the 3-part fidgets) to have the hook. The head I kept with the LARGER hole that 3D-Printy designed. SO, using 2 mm elastic, I can thread it through the head, make the right size loop, tie it off (without it being under tension), assemble the 3 parts, and take small wire hook to pull the elastic through the bottom HOOK HOLE, hook the elastic onto the hook/pin, and have an assembled unit that can have elastic replaced if needed, and can have changeable hats used, based on the HAT PIN design. This remix includes the three bottoms (snowman, penguin, pumpkin). The pin itself has two parts that need cut out - one-layer 0.2 mm height plastic, I included this so that a BRIM is not needed to print (the one-layer pieces act as a good removable brim itself). Use small exacto knife to remove. Then, after elastic or TPU through the head, create the loop, assemble the 3 parts, and pull the elastic/TPU through the bottom hole and have it hook onto the pin. Photo’s show the bottoms, and arrows at the two small pieces that need cut.
Originally published on Printables


