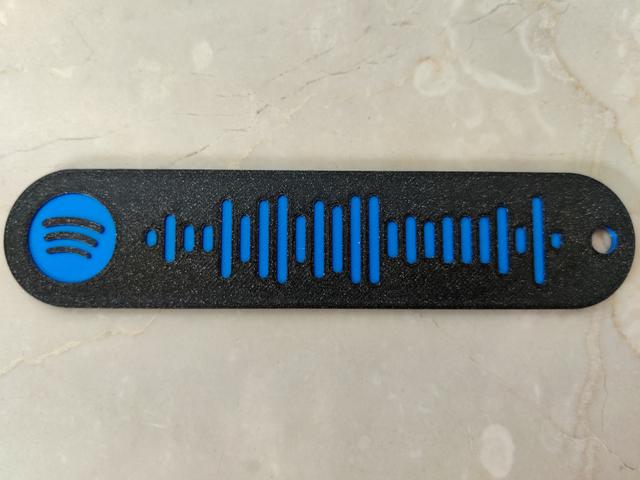
Spotify code - Customizable
by Pdor_Projects · via Printables
| Format | STL |
| Category | Art |
| License | CC BY-NC-SA |
| Triangles | 16.8k |
| Uploaded | Dec 22, 2025 |
⬇ 1.9k downloads
❤ 509 likes
👁 12.0k views
Description
Let me know in the comments if you find any kind of problems and I'll try my best to solve them. I have uploaded 4 examples as demo prints for everyone, for the customization read down below. I can't wait to see your makes and remixes! Also consider donations if you like the design! It would be really appreciated. How You Can Customize It I tried to keep everything as simple as possible so that anyone with a basic knowledge of fusion 360 can make his own Spotify code. The only skills you need to have in fusion 360 are: 1) Knowing what is a sketch and how to work with it and edit it. 2) Knowing the basics of the extrude command. 3) How to import an SVG file. 4) Export a file in .stl format. If you want the title (on the back) to be written with the Spotify font, you have to install on your pc the font called "Gotham bold" (it's not installed by default). Step 1 Getting the Spotify code First of all you need to get the Spotify code of the song you want in an SVG file. We'll use this website to get it: https://www.spotifycodes.com/ The website needs the url of the song. You can find it as shown here: 📷 Image redacted — claim this model to add your own media Then you'll have to paste the link in the website: 📷 Image redacted — claim this model to add your own media Last thing to do is to download the code in the SVG format: 📷 Image redacted — claim this model to add your own media Step 2 Import the template You have to download the provided file called template.f3d here on thingiverse and import it in fusion 360. Step 3 Import the SVG file Now you'll have to import the SVG file in the design and place it on the horizontal plane as shown in the pic down below (do NOT place it on the face of the object, otherwise the positioning of the SVG won't be perfect and alligned). To be as clear as possible, here it is the plane where to place it, viewed from above: 📷 Image redacted — claim this model to add your own media After you've selected the horizontal plane, you also have to scale the SVG file at a scale of 1.2148 (I know, it's a weird number, but this way I kept the same size as the old design that I thought was just fine). 📷 Image redacted — claim this model to add your own media Now the SVG should be perfectly aligned with the design (use the logo as reference for the alignment) and you can finish the sketch that has been created. 📷 Image redacted — claim this model to add your own media Step 4 The extrusion of the code Start an extrusion and select the bars of the code all at once as shown in the pic below, dragging from point 1 to point 2 to select them (it's important for selecting only the bars and nothing else with them). Then make a cut extrusion through the surface with a 0.4mm depth. 📷 Image redacted — claim this model to add your own media You should end up with something like this: 📷 Image redacted — claim this model to add your own media Step 5 Title and author Open the second sketch int the timeline by double clicking on it (the one showed here): 📷 Image redacted — claim this model to add your own media Double click on the text and edit the title and author (edit also the text height if needed to fit everything better like in my case). 📷 Image redacted — claim this model to add your own media Finish the sketch and it should look similar to this: 📷 Image redacted — claim this model to add your own media (don't worry about the color of the letters) Step 6 All done! You've finished! It's ready to be exported as an STL. 📷 Image redacted — claim this model to add your own media Slicing When you slice the model at a 0.2 layer height, the color changes should be done after the first 2 bottom layers and before the last two top layers (probably switching back to the color of the bottom ones), as shown here: 📷 Image redacted — claim this model to add your own media This pic shown here is taken in Prusa slicer. For more reference about making your print multicolor by switching filament I suggest this useful video made by Prusa:
Originally published on Printables


