Tesla Model 3 Trailer ECU Mount for Autohak TE02V
by Lion76 · via Thingiverse
| Format | OBJ |
| Category | Mechanical |
| License | CC BY-SA |
| Uploaded | Mar 9, 2026 |
⬇ 27 downloads
👁 45 views
Description
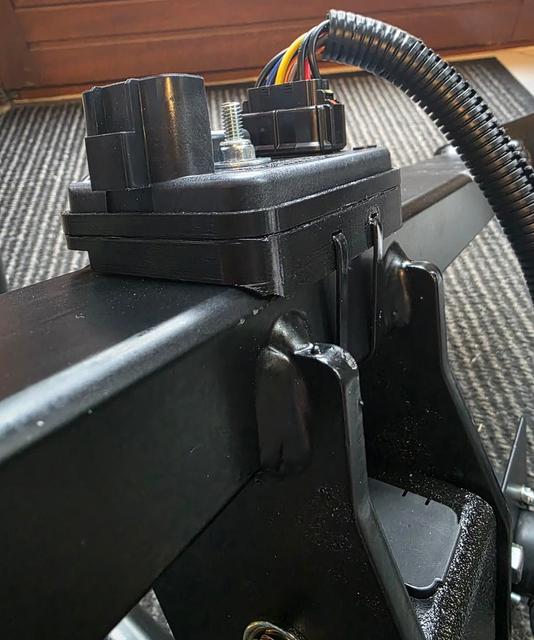
Tesla Model 3 Trailer ECU Mount for Autohak TE02V This 3D model was designed to mount the Tesla Model 3 Trailer ECU (Part Number: 1112581-00-A) to an Autohak TE02V tow hitch . The mount attaches directly to the crossbar of the Autohak hitch. Installation only requires two small strips of double-sided tape and two zip ties. Deutsch Beschreibung Ich habe dieses 3D-Modell erstellt, um die Tesla Model 3 Trailer ECU (Teilenummer: 1112581-00-A) an einer Autohak TE02V Anhängerkupplung zu befestigen. Die Halterung wird direkt am Träger der Autohak-AHK befestigt. Für die Montage werden lediglich zwei kleine Streifen doppelseitiges Klebeband sowie zwei Kabelbinder benötigt. Aufbau des Modells Das Modell besteht aus drei Teilen, damit alle Komponenten flach auf dem Druckbett gedruckt werden können: 1x AHK_Body 1x AHK_Center 1x AHK_Trim Nach dem Druck werden die drei Teile zusammengefügt und verklebt. Druckhinweise Material: mindestens PETG (wegen Temperatur- und Witterungsbeständigkeit) Keine automatisch generierten Stützstrukturen verwenden Automatische Stützstrukturen können sich in den Löchern für die Kabelbinder festsetzen und lassen sich dort nur schwer entfernen. Stattdessen empfehle ich: manuell platzierte Stützstruktur nur in der Mitte und an den Rändern, falls notwendig Dadurch erhält man ein deutlich saubereres Druckergebnis. Montage Alle drei Teile drucken. AHK_Body , AHK_Center und AHK_Trim zusammenkleben. Eine passende Schraube mit Sechskantkopf durch die mittlere Öffnung stecken. Zwei kleine Streifen doppelseitiges Klebeband auf die Rückseite kleben. Die Halterung am Träger der Autohak-AHK positionieren. Mit zwei Kabelbindern durch die vorgesehenen Öffnungen fixieren. Die Trailer ECU einsetzen und verschrauben. Die Kombination aus doppelseitigem Klebeband und Kabelbindern sorgt für eine stabile und vibrationsarme Befestigung. English Description I designed this 3D model to mount the Tesla Model 3 Trailer ECU (Part Number: 1112581-00-A) to an Autohak TE02V tow hitch . The mount attaches directly to the crossbar of the Autohak hitch. Installation only requires two small strips of double-sided tape and two zip ties. Model Structure The model is split into three parts so that all components can be printed flat on the build plate: 1x AHK_Body 1x AHK_Center 1x AHK_Trim After printing, the parts can be glued together. Printing Recommendations Material: at least PETG (for better temperature and weather resistance) Do NOT use automatically generated supports Automatic supports tend to fill the zip tie holes, making them difficult to remove. Instead, I recommend: manually placed supports only in the center and at the edges where necessary This results in a much cleaner print. Assembly Print all three parts. Glue AHK_Body , AHK_Center , and AHK_Trim together. Insert a suitable hex-head screw through the center hole. Apply two small strips of double-sided tape to the back. Position the mount on the Autohak hitch crossbar. Secure it with two zip ties through the dedicated holes. Mount the Trailer ECU using the screw. The combination of double-sided tape and zip ties provides a stable and vibration-resistant mounting solution.
Originally published on Thingiverse


