TESLA V-100 SXM2 to PCIe 'WOMBAT' COOLING ENCLOSURE V1
by FringeConcept · via Thingiverse
| Format | STL |
| Category | Electronics |
| License | CC BY-SA |
| Uploaded | Mar 22, 2026 |
⬇ 26 downloads
❤ 2 likes
👁 162 views
Description
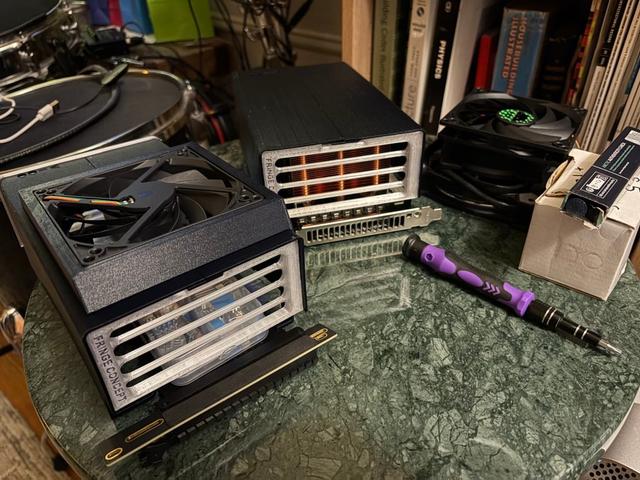
Cooling enclosure for NVIDIA Tesla V100 SXM to PCIe conversions using the following components: Tesla V100 SXM2 with PCIe carrier board (SPECIFICALLY the carrier supporting two OR three fan pinouts with onboard thermal management). Please refer to the images to see the correct board layout. 1.1 Server grade copper heatsink 60mm height. I chose copper for better thermal performance with a lower height. The file can also be modified to fit a 90mm aluminum heatsink with a similar footprint as well. Just make sure the air diverter fins on the enclosure are able to fit around the heatsink at the narrow middle portion. Refer to photos for the heatsink type used for the current 3D files. 100 mm 4-pin 12v fan with screws (you will need to drill the holes in the top of the case after gluing all the parts together). Larger fans can be used but fitment might become an issue. The fan will serve as an exhaust, so make sure to direct the airflow out of the enclosure. Two (2) 40mm static pressure fans (for purging hot hair from enclosure). Three (3) Nuts & Bolts of choice to attach case to carrier board. It is wise to use washers as the holes are made larger for varying stability of each print. After printing and cleaning all the parts, you will need to glue the two side covers together at the overlap. Then you can glue the front grille and the static fan bracket. Make sure you leave enough space for the heatsink when gluing the bracket and grille. Make sure your computer case and motherboard has enough room around the PCIe slot, as this chonk will take up some space vertically. Another solution is to use a riser cable and place the GPU assembly in a more convenient location. I will be testing this thing under heavy loads to see where I can improve the design as needed. I’m also working on a compact water-cooled shroud unit which will also include a VRM fan, using a modified heatsink and AIO cooler. *UPDATE 3/24/26 I've modified the enclosure side cowls to have a more free-flowing diverter fin design, and static pressure fan bracket to support two fans. This should help push enough air into the enclosure. I've also added a grille type with a flange, for easier removal and attachment. *SECOND UPDATE 3/25/26 A dual static pressure fan blow-thru enclosure (Wombat 3) cowls have been added to the file set. This design has a different set of traverse flow fins, designed for only two small fans, in order to save some vertical space.
Originally published on Thingiverse


