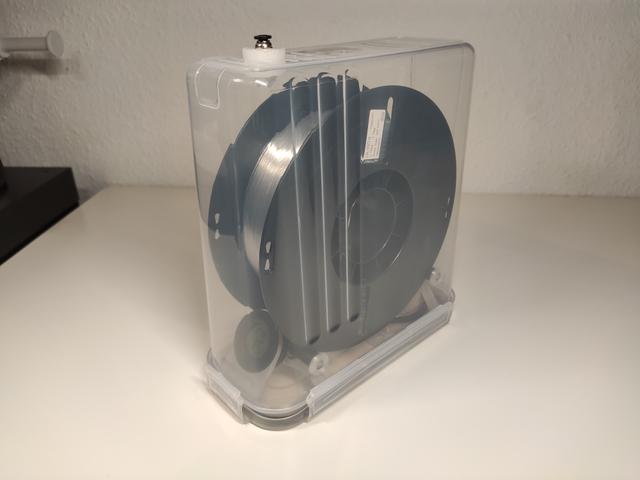
Upside down Filament Box for small Printers
by Sam_Fisher · via Printables
| Format | STL |
| Category | Electronics |
| License | CC BY-SA |
| Triangles | 2.8k |
| Uploaded | Jan 4, 2025 |
⬇ 30 downloads
❤ 2 likes
👁 398 views
Description
Here is my version of the filament box. Since my printer has only a small bed of 180 x 180 mm, I needed a solution to print the parts splitted in half. Both sides can easily be cut to the right length with a pair of scissors and then glued together with CA glue. Hardware you need to buy: 1x 4 litre food storage container (the model I used has only 3 small ribs and a hexagon in the lid. There is also a model with a huge dent for gripping but Idk if the base will fit there too) 4x 608ZZ bearings 1x PC4-M10 PTFE tube pneumatic fitting OR you can print it yourself 1x round hygrometer PTFE tube of desired length Silica Gel Things you need to print from other creators: 2x Axle by GunplaMark 4x Roller_42-77mmSpools by JK3D 1x Knurled PC4-M10 filament pass through with 'funnel' by SpectreGadget 1x Desiccant Lid by GunplaMark AND Dessicant Cup by hardiebotha [or any other related design you like] Print settings I printed all parts in PETG using Bambu's "Strength" preset. 0.4 mm nozzle 0.2 mm layer height 25 % infill The ring/holder for the hygrometer doesn't need support (enable “support critical regions only”) The bearing holder does need support. Both parts of the base have been printed with a 5mm brim. The Z-Seam on the 4 rollers could prevent them from rolling smoothly. To fix this, I printed 2 with the seam position “aligned” and the other 2 with the seam position "back". I then alternated them per axis. And/Or just scrape off the seam with a knife. All the parts you need can be printed in one run on a 180mm x 180mm bed. 📷 Image redacted — claim this model to add your own media Tinkering 📷 Image redacted — claim this model to add your own media After printing the parts and removing the supports and brim, both parts of the base are glued together with CA glue. I recommend putting them together in the lid: Push the two parts to the sides to make sure they fit snugly into the lid. Then mark the length and cut the wings with scissors. Finally, glue them together, being careful not to glue the base to the lid as well. 📷 Image redacted — claim this model to add your own media 📷 Image redacted — claim this model to add your own media 📷 Image redacted — claim this model to add your own media While the glue is drying, assemble the rollers. Do not forget to put the two bearings in the middle of the axle before attaching the rollers to the sides. The bearings and the hygrometer should sit firmly in the brackets. 📷 Image redacted — claim this model to add your own media At the former bottom, now the top of the container I drilled a hole fore the PC4-M10 fitting. 10 mm is fine, but 9,5 mm is just tight enough for the thread to bite firmly. I than removed the two pads with a chisel, so that the printed pass through sits flush and evenly on both sides of the container. Make sure you drill the hole on the side where the scale is not. 📷 Image redacted — claim this model to add your own media 📷 Image redacted — claim this model to add your own media Et voilà! After filling the basket with some silica gel and inserting the PFTE tube, your filament box is ready to use. I recommend drying your filament in a special dryer before storing it in the filament box. Once sealed, you will see the moisture decrease to around 10-15% within a few hours. 📷 Image redacted — claim this model to add your own media 📷 Image redacted — claim this model to add your own media
Originally published on Printables


