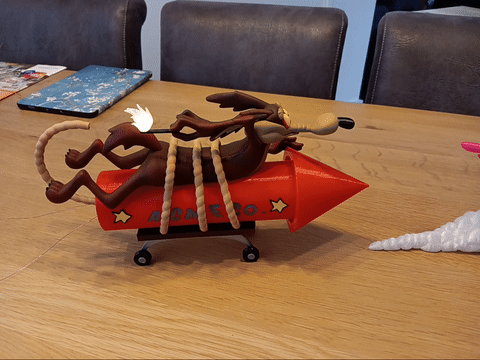
Wile E Coyote (with light)
by Betawolf · via Printables
| Format | STL |
| Category | Electronics |
| License | CC BY-NC-SA |
| Triangles | 60.2k |
| Uploaded | Nov 12, 2023 |
⬇ 202 downloads
❤ 60 likes
👁 1.7k views
Description
WARNING - updated d.d. Oct 18, 2023 The electronics circuit and description have been corrected after I discovered the first version was horribly wrong. My sincere apologies for any failures, if you tried it out yet. Introduction This is the brilliant model of Wile E Coyote by @reddadsteve that I adapted to incorporate some light effects. It's now got a sparking fuse and a flickering flame. You'll need to put some electronics together for this, but it will not be too difficult. I decided to use ESP01 modules, because I had a few lying around, but you could also use a XIAO module, Arduino ProTrinket, Adafruit Trinket, etc. As long as the board is small and it can control a WS2812 RGB LED (NeoPixel) and a white LED, you'll be fine. The firmware is really simple and easy to adapt to your liking or to any other platform. Printing Print all 3D parts except for the rocket back and the 3 flame parts. Instead, print the modified back and flame provided in this download. Important: do not just start assembling, first read the rest of this description. Parts list Next to the 3D printed parts (the modified rocket back and modified flame need to be printed instead of the original rocket back and flame), you'll need: A WS2812 RGB LED - you can buy these separately or you can desolder one from a NeoPixel strip (that's what I did). 0.5mm diameter (24 AWG) enamelled copper wire - this is enough for the currents involved and it is easily concealed. You'll need about 1.5 to 2 m (5-7 ft). A small white SMD LED - does not really matter what type, as long as it lights up with a voltage of 3.7 V. I took one with a SMD0805 housing (having thick fingers does not help, so maybe 1206 would be better…). A resistor for the white LED - I took 180 ohm giving me a 5 mA current through my LED at 3.3V, it depends on your LED which is a good value. Aim for a LED current of about 5 mA. Control board - As said, I used ESP01 with a 4x2 DuPont connector that I soldered the wires to. Use what you have lying around or prefer to work with. TP4056 battery charger circuit - For easy charging the battery in system. There's modules with a USB connector enabling you to use your phone charger (e.g. USB-C LiIon Charger 1A with LiIon protection circuit or micro-USB LiIon Charger with LiIon protection circuit ). 18650 battery - I used one that I scavenged from an old flashlight. These guys have a lot of power. Alternatively, any LiIon cell that fits the rocket housing will do. LM1117T 3V3 - Low-drop voltage regulator (or similar). This is one that can deliver 1A, so in case you want to use the WIFI on the ESP, you have enough juice. LE33 would be sufficient if you only use the base firmware (draws ~25 mA). 10 µF capacitor and 100 µF capacitor - for the low-drop voltage regulator 2 Nd cylindrical magnets 4mm diameter, 10mm long - adapt the design of the rocket back if you want to use different ones. Make sure that a small portion of the magnets is sticking out from the lid, so that lining it up with the back of the rocket is easier. The back has recesses where the protruding parts of the magnets fit in. 2 bolts M2.5x6 flathead - these fit in the recesses in the backside of the rocket for the magnets to attach to. Electronics Enclosed in this upload are also the Fritzing drawings of both the schematic and the breadboard versions of the electronics. I've simply connected all parts with 0.5mm enamelled copper wire to a DuPont connector that fits on my ESP01 module. That way, you can easily disconnect it to recharge the battery or reprogram the module. Follow these steps to prepare your electronics for mounting: Solder two enamelled copper wires of about 25 cm to your white LED. Don't connect the other ends just yet. Make sure you mark the wires on the other end, for instance by putting a small piece of tape on one of them or marking it with a black marker (e.g. one mark is cathode, none is anode). Solder three enamelled copper wires of about 40 cm to your NeoPixel (V+, GND, DIN). Don't connect the other ends just yet, but mark the wires on the other end (e.g. one mark is V+, two is DIN, none is GND). Solder your battery to your battery charger circuit (battery + and - to the circuit's B+ and B-, respectively) and your regulator with capacitors. Assemble the 3D printed parts, integrating the LEDs and wiring as described below. Solder the leads of the LED, the NeoPixel and the battery charger circuit to a DuPont connector (or to your specific controller). Assembly In general, you can stick to the instructions by Reddadsteve for printing and assembly. There are a few things you need to change: Glue Wile-E's face, eyes, nose and ears to the top part of his body. Also glue the middle part of the body to the top. Do not yet glue the match or the flame! You've now got a nice body to work with. On to the flame and its wiring; you'll see I've combined two of the three pieces in the original by Reddadsteve, these are the top parts. The bottom part has a recess for the NeoPixel and a hole in the bottom. Insert the wires through the hole in the bottom part of the flame and glue the NeoPixel in the recess. Glue the top part of the flame on the NeoPixel. Drill a small hole in the end of the match where the flame should be mounted and insert the wires of the flame through it. Then glue the flame onto the match and the match onto Wile-E's fingers. We're now going to lead the wires on the underside of the match towards Wile-E's right arm (see picture below) and glue the wires to the match and the arm with tiny dots of superglue. My tip: put a bit of superglue on a piece of plastic and use a toothpick to pick up a tiny droplet and apply it to the wires while you keep them taught on the surface. Few seconds later, you can let go and your wires are attached. 📷 Image redacted — claim this model to add your own media Attach the middle part of the body to the top part and lead the wires along the top part of the body to the fault line between top and middle parts. Then guide the wires along the fault line to where the body would touch the rocket (following the arrow. 📷 Image redacted — claim this model to add your own media I have to apologize for the complexity of my explanation here. In hindsight, I should've taken more pictures or made a video. Now glue the rocket's top and middle parts together and glue the Wile-E assembly (without his bottom) to the top part of the rocket. Make sure the wires of the NeoPixel stick out between the rocket and Wile-E. I did not have brown PLA, so I spray painted the body. I used the same paint to mask the wires as you may notice in the picture. Take the back part of the rocket and roughly mark the position where the NeoPixel wires would meet the back part of the rocket (open end goes to the rear of the rocket). Drill a small hole (~1mm or 0.04in) in the back part of the rocket and push the wires through so that they come out the back of the rocket. Now glue the back part of the rocket to the rocket-Wile-E assembly. Glue the lettering on or paint them on if you prefer (as I did). Also glue the stars together and put them on. Put the cables on that tie Wile-E to the rocket and glue his backside on (don't forget to glue his nails on his feet). Finally, there is the end cap of the rocket. Glue the white LED to the end of the fuse (the flat bit) and guide the wires along the fuse towards the other end, while dabbing small drops of superglue to fix the wires to the fuse. I also spray painted the fuse, so I used the same paint to mask the wires. You could even consider adapting the fuse design to pass the wires through the fuse, but I leave that up to you. First pass the wires through the hole in the end cap of the rocket and then insert the fuse in the hole. I filed out the hole a little to make room for the wires. Glue the magnets in the end cap. Make sure you push them in to the limit; about 2mm should be sticking out. Screw the bolts into the holes in the back part of the rocket and test whether the cap closes nicely. Done with the assembly. Only the soldering of the wires to the battery and controller left (see previous section). Firmware If your microcontroller is ESP8266 or ESP32 and you use Arduino as your programming platform, you'll need to install the ESP library for Arduino. See Rui Santos' page for an excellent explanation. I took the RGBW StrandTest example from Adafruit (install the Adafruit NeoPixel library for this) and adapted it to have one NeoPixel and one LED. I programmed a flashing pattern for the white LED with random duration and random colors between red and yellow for the NeoPixel. Just compile and program the ESP01 (or equivalent) and you're done. I used GPIO02 for the data control of the NeoPixel and GPIO00 for the white LED. Make sure you adapt this to your situation in case you use a different controller. Future plans If you used a more powerful controller like ESP8266 or ESP32, then you can think of all kinds of fun extensions of the firmware, for instance creating a web interface and connecting to it to trigger the lights or have them triggered each time you get a message. Anything is possible. You could even add a small amp board and a speaker for sound. Have fun.
Originally published on Printables


