YAFDB (Yet Another Filament Dry Box)
by FlMtbSteve · via Printables
| Format | STL |
| Category | Mechanical |
| License | CC BY-NC-SA |
| Triangles | 45.6k |
| Uploaded | Mar 9, 2025 |
⬇ 80 downloads
❤ 13 likes
👁 673 views
Description
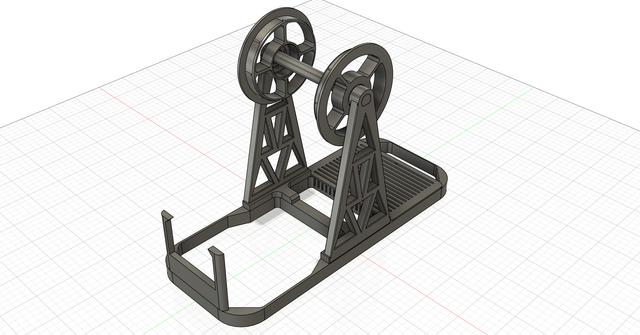
Parts required: 4L Plastic Storage Container (https://www.amazon.com/dp/B09ZLBJQDW) This design is custom fit for these container tops so be aware if you get something else, it may not fit and will need to be tweaked. 2x 608 bearings (Pretty much any cheap ones will do - no need to get expensive ABEC ones) 1x PC4-M6 connector (Again, pretty much any one will do, however if you get PC4-M10's then the PTFE tube can feed through but will require an M10 nut on the back which I haven't included in this model however easy to find here on printables.com) Loose desiccant beads or packs of beads ~100g of filament (I have printed it in both Overture ABS and Overture PETG) Make sure you account for filament shrinkage in your slicer settings, as the fit in the container lid, filament spool inserts and 608 bearings are close tolerances! Thermometer/Hygrometer - Lots of choices here as long as they are rectangular 28.5mm (H) 47.5mm (W) x 14.5mm (D) (https://www.amazon.com/dp/B0CXHS6CYS) ¼" bit and drill - Only one hole required! Build steps: Print all of the parts in the STL files, I was able to get all of them to fit on one plate. Again make sure you have somewhat calibrated your XY shrinkage for the filament type you are using and set that up on your slicer. I'm using Orca Slicer 2.3.0-beta2 and its under the filament settings. Since the containers are used upside-down, you will need to cut off the little tab on the spout opening (see pics). I used small diagonal cutters that came with my printer for cutting filament - however, be careful not crack the lid when doing this (speaking from experience here!) Drill a ¼" hole about 1/4 of the way from the bottom on the front of the container (see pics), If you are going to use a PC4-M10 (first you will need to drill a larger hole) note that it allows the PTFE tube to feed through so you may want the hole in another location. Look here on printables.com as there are a zillion dry boxes of all shapes, sizes and designs that feed filament out of their enclosure a 1000 different ways. Thread the “rocket” shaped PC4-M6 nut (threaded end is where the fins are) on and off the PC4-M6 connector several times to help help tap and clear out the 3D plastic printed M6 threads. Make sure that the rocket nut goes on straight and is not getting cross-threaded and off-center. Take the nut off and then press the PC4-M6 connector by first pressing it into the square base so the threaded end pokes out, again tight tolerances so it might take a little effort to get it pressed in. From the front of the container, insert threaded end of PC4-M6 poking through mounting plate into hole Insert the base into the container lid (remember, its used upside-down) then press fit the spool stands and thermo holder into the base (It worked great with both PETG and ABS). Snap the thermometer into its holder but be careful not to break the holder or base. Fill the desiccant tray with your favorite stuff and snap the lid on. Press the 608 bearings into the spool adapters (should be fairly tight fit). Press the spool adapters onto your spool. This model has 55mm diameter adapters (with nubs to help with spool tolerances) and are designed for Overture Cardboard Filament Spools . One of the designs I remixed probably had a dozen different size spool adapters so easy to find ones to meet your need, modify existing or design your own. Push the axle through the 608 bearing centers and center it, then insert one side then the other in the spool stands - you'll have to flex them to insert the axle. Now feed the filament into the filament guide nut, PC4-M6 connector and out the front. Use the PC4 filament keeper (you may have to reem it out a little to get filament to fit in it) to prevent the filament from getting pulled back into the dry box. Close up the box and you are good to go! Other thoughts: I've included a nice knurled top cap that came from one of the other designs I remixed that screws onto the PC4 square mounting plate but it won't fit with the filament keeper in place. I think their design had some type of filament keeper but I couldn't get it to work and created my own. I used metal 608 bearings but if you want to be a purest, you could try to use 3D printed 608 bearings! There are also numerous 3D printed PTFE feed throughs so you can pretty much 3D print the whole thing (other than the storage container - well I'm sure you could print something like it, lol) One final comment, I modified the stands to totally capture the axle, where the pics show an earlier iteration where the axle drops down and slightly snaps into them - not sure which solution is better. Happy building! -Steve
Originally published on Printables


